
Getting started on Udemy with SAP ABAP Programming for Beginners by Peter Moxon is just a matter of few steps. First of all, create your Udemy account by simply signing up. Log in to your account and purchase the courses you wish to study.
Once you have purchased, you have lifetime access to the on-demand videos. You can get a brief idea about what this course contains from here. The course- SAP ABAP Programming for Beginners is a 13 hours video lecture lesson.
There are a total of 13 modules and today we shall describe module 5. In this module, Peter Moxon has laid emphasis on Character Strings of the SAP ABAP programming. The entire module is of 47 minutes. The module is split into 9 parts. The videos are short and to the point. Each part is described in the upcoming sections.
Character Strings Declaring C and N Fields
We’re now going to discuss Character Strings. When we’re creating our programs, we nearly always have to use fields defined as Character Strings. In SAP there are two elementary data types used for Character Strings.
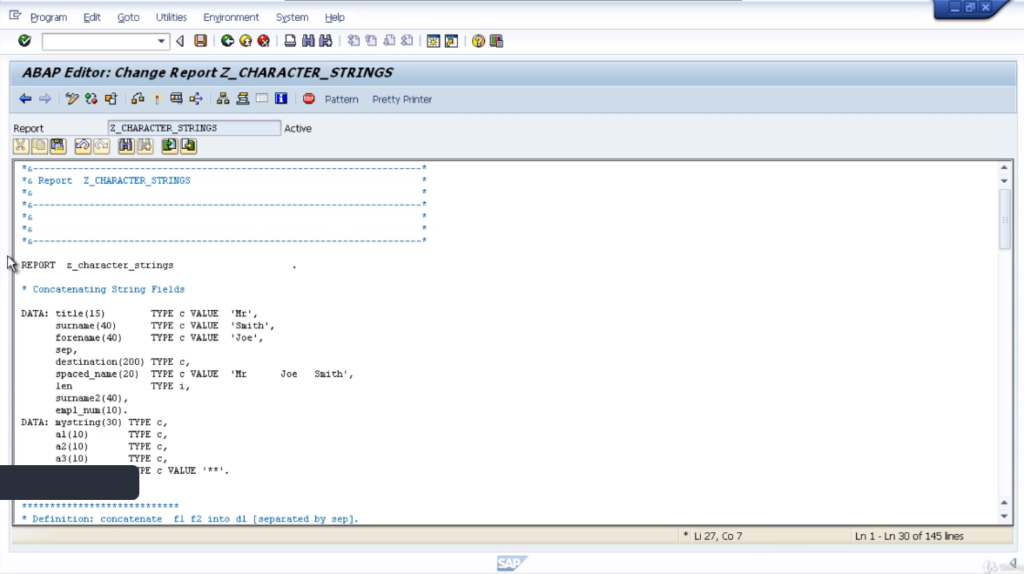
These are data type C and data type N. We’ll first have a look at data type C. Create a brand new program called Z_Character_Strings. Give a title- Character Strings Examples, and choose an executable program, status as a test program. Create the local object.
The data type C is used to hold alphanumeric characters, and it has a minimum length of 1 character, and a maximum length of 65, 535 characters. So first of all we’ll define a field of data type C and when we define this data type, once we key in the field name we use open brackets without any spaces.
Put in the length of the field as ten characters and then we declare the actual type, which is type C. Now, this is the long-form, of declaring a field of type C and this means that because this field is a generic data type, the system has some default values that it can use, to save us from typing out the full length of the declaration.
REPORT Z_CHARACTER_STRINGS
Data char (10) Type c
Data mychar2
So for example, if we declared a new field. Let’s call this mychar2 and make this field just to be one character, well the default value of the size of the field is actually one character.
So one can get away without declaring the size in brackets and because the character field is the default type, used by the system to declare the field one can even get away without declaring the type. So end this declaration of this variable just by keying in the field name. So this has the same effect. As declaring the field just like this.
If you recall, we created a table called Z_Employees, and in that table, we declared various fields of type character. One of these fields was Z_surname. If we create a table statement, and key in our Z_Employees Table, use forward navigation, now we can see is that Z_surname is type char with a length of 40. Well, we can replicate that declaration within our ABAP program.
So step back, and instead of mychar2, create a field called Z_Employees with a length of 40, and a type C. That has exactly the same effect. If you remember, a short form of doing this is to use the like statements. So this will declare Z_Employees like the actual field we declared in the table. Check it correctly. So now, you know, how to declare a field of type C.
Let’s look at the other generic Character String data type, and that is data type N. So thinking back again to when we declared our table, we created a field called Z_Employees, which was the employee number. So if we go to the table and have a look at this.
Actually, it’s just called employee, but you can see we declared the field of type NUMC with a length of 8. Now NUMC or the number data type is a special data type, treated just like a character type. But, there is an inbuilt rule to only allow numeric characters and when data is moved into this field, it is right-aligned, just like a normal numeric type field.
This data type is ideal when we only want to use numbers within the field and we have no intention of carrying out any type of calculation. So let’s go back to the program, and see how we would declare this field in ABAP.
Data znumber1 type n
So as usual, it starts off with data and we’ll call the field znumber1, with a data type of N. Just like the previous example we could use the like statement and refer back to the actual field in our table. It would end up with the same effect.
Now one additional point is this field does differ a little bit from the data type C. In that, the initial default value of this field is 0 instead of space. That’s it. There’s not much more to declare in these types of fields. So, let’s move on and see what we can actually do with them.
Character Strings Intro and Concatenate
As with many other programming languages, ABAP gives you the functionality to interrogate and manipulate the data held within character strings. Here we’re going to go through some of the popular statements that ABAP provides to carrying out these functions.
Here we’re going to look at concatenating strings together, condensing, finding the length of a specific string, replacing characters within a string, searching for specific characters, using the shift statement to move the contents of the field left and right, splitting character strings and using the subfield functions to access specific characters within a string.
So first let’s take a look at concatenating strings together. The concatenate statement allows us to join two character strings together to form a third string. It’s fairly easy to understand.
We start off by using the word, concatenate then it goes in the form of field 1, field 2, field 3, field 4, field 5, etc., and then we choose a destination that we want the output string to go to. So then we can have destination one.
We can also add in an additional term called Separating bar, to allow us to insert a specific value in-between each field into our destination field, and then we would have a separated field.
Now some things to note is if the destination field is shorter than the overall length of the input fields, the character string will be truncated to the length of the destination field. So make sure when using the concatenate statements, you are using string data types which as we have already discussed can hold more than 65,000 characters.
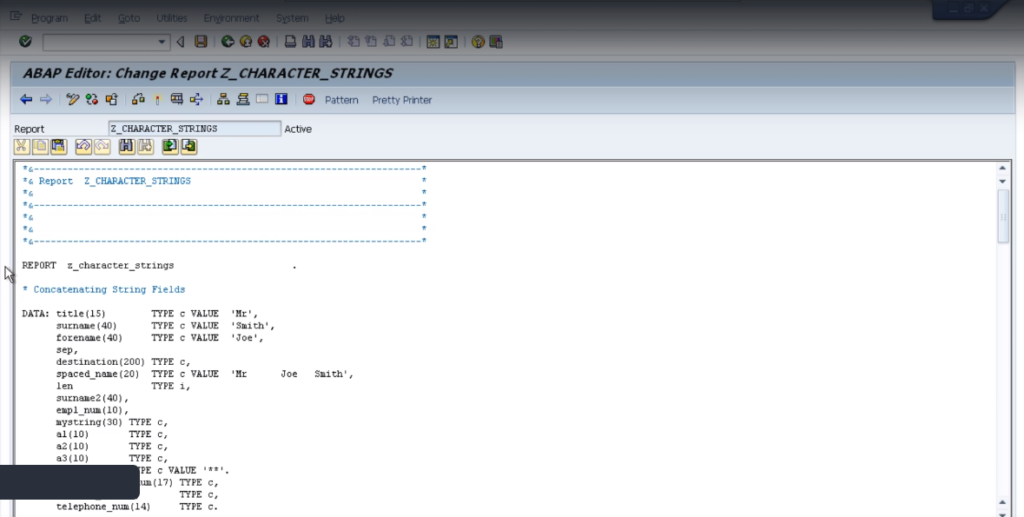
So let’s have a look at a specific example of some ABAP code using concatenate statements.
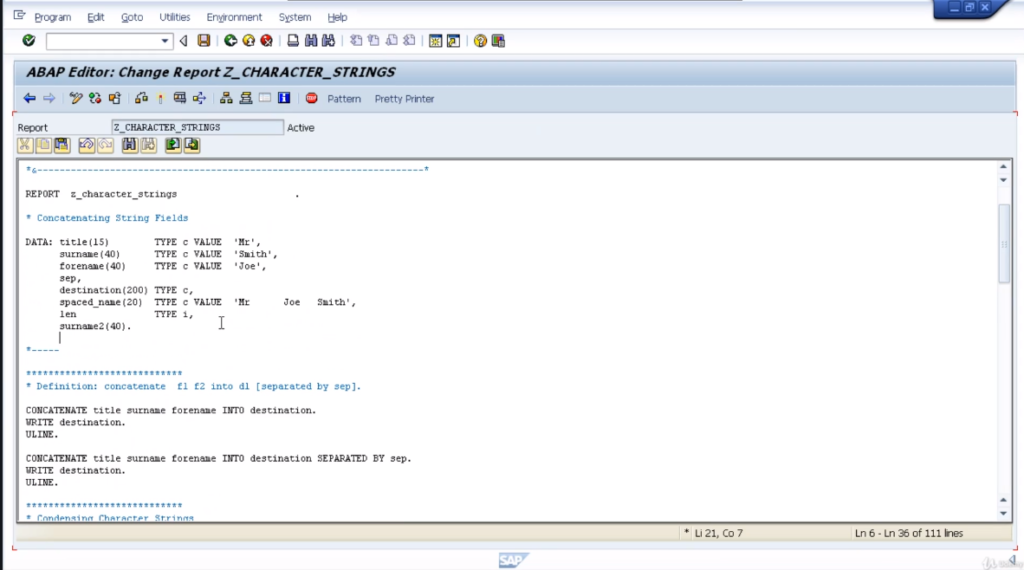
DATA: title (15) TYPE c VALUE ‘Mr’,
Surname (40) TYPE c VALUE ‘Smith’,
Forename (40) TYPE c VALUE ‘Joe’,
Sep,
Destination (200) Type c.
So the first statement we’ve got, is the data statement and because we’ve declared in five fields altogether, we’re chaining the data statement together, so we don’t have to keep writing the word data out multiple times.
So the first field is the title, we’re declaring a length of 15 characters. It is of data type C. and we have surname 40 characters long. The surname will be Smith, 40 characters again. First name of Joe. Now we declare a separator field here.
Just call SAP and we have not declared the length and a value or the type. So this will take on the actually defaults that the system uses which is a character string with a length of one character.
The last field is a destination and declares it 200 characters long on data type C. Now we get onto the code, and the first to do is bring up the ABAP help for the concatenate statement. We can see the actual syntax used.
As declared earlier, in the definition, concatenate F1 to whatever number of fields you want to concatenate into G. and separated by an additional option that we can use with this statement if we want to.
So the first line of code we’ve got, we’re going to cut a title, surname, and forename into the field destination. We’re going to write out the results of the destination with an underline underneath.
CONCATENATE title surname forename INTO destination.
WRITE destination.
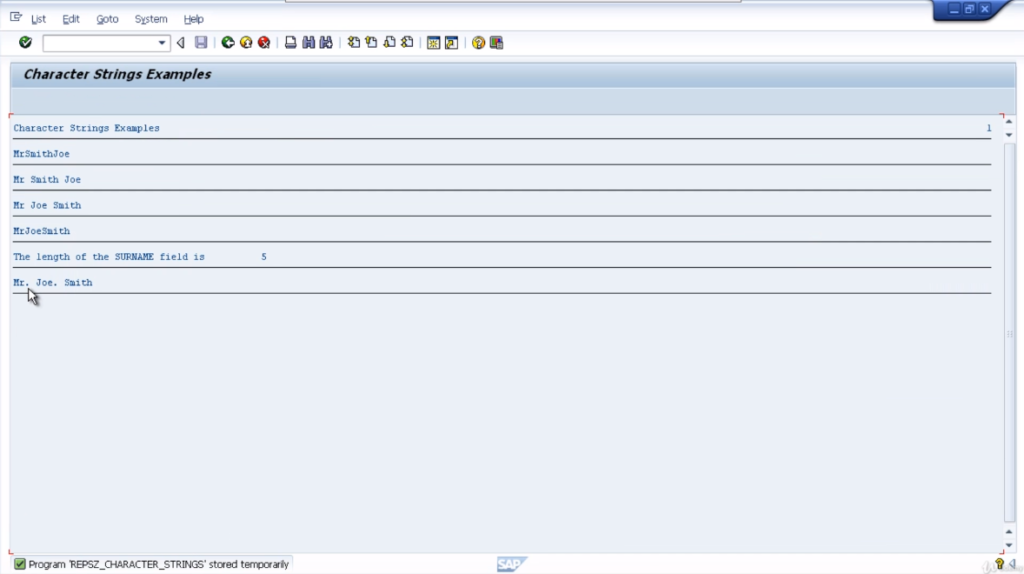
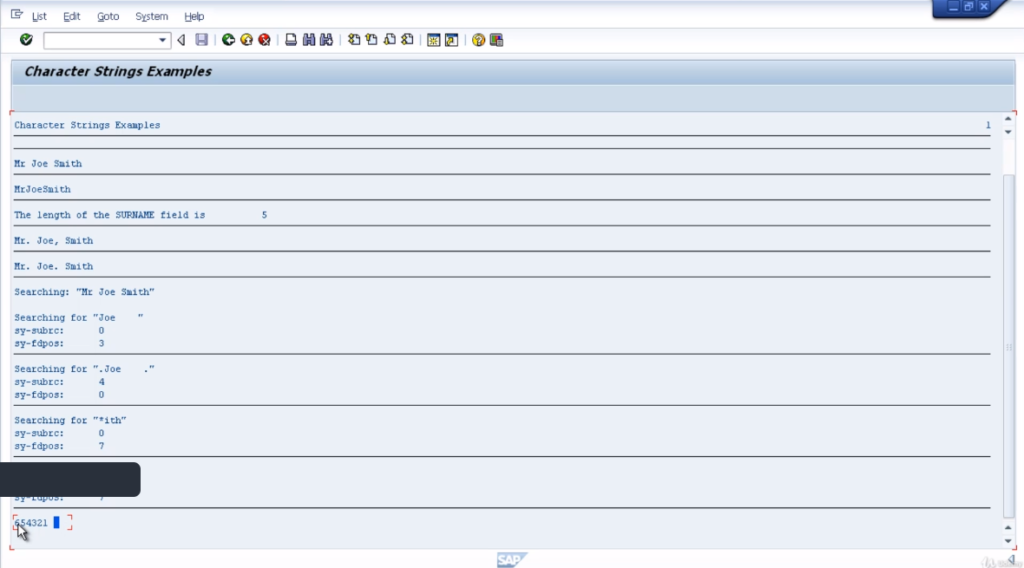
Check and test the program out. You can see, MrSmithJoe with the underline. So you notice a couple of things here. All the characters have been concatenated together so we got no space and it’s left-aligned.
That’s because we defined the result as a character field. If we used a data type of n, a number everything would have been right aligned. So we’ll step back. Now to tidy this up, we can use the separated by addition. So in this case, we’ll add a blank space between each field when it gets populated into a destination.
CONCATENATE title surname forename INTO destination SEPARATED BY sep.
WRITE destination.
You can see the same statement but we’ve got the additional separated by SEP at the end. We’ll write out the destination again and underline it. Do a check and a test. Now we can see it’s inserted the blank separator between our three fields.
Condense
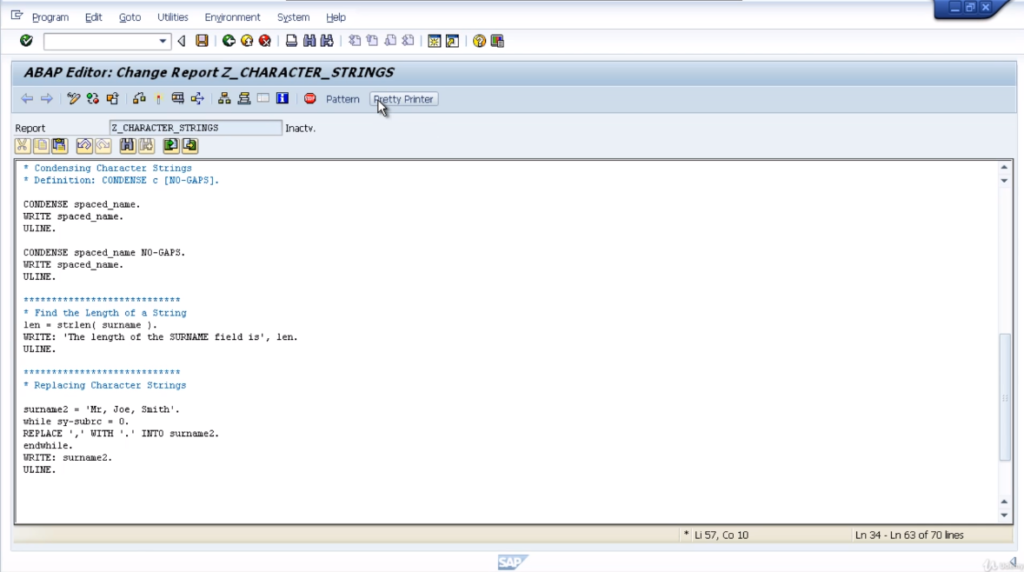
The next statement we’ll take a look at is the condense statement. Our ABAP programs quite often have to deal with long text fields that contain unwanted spaces. So this is where the condense statement can be used to remove these blank characters.
The definition of the condense statement is very simple. So first if we start off with typing out the condense statement. Search help and see the basic form. So here you can see condense and the field name, and there’s just one addition we can add, which is the no gaps.
So key in a line of ABAP code and we’ll go through it and test the program out and see the output. So add some coding here. Extend the number of fields by creating a new field called space name. It is 20 characters long and gives it the value of Mr. Joe Smith.
Insert many spaces between the three individual words. Add a comment just showing the definition of the content statements with the optional no gaps. Then the basic output. Now add-in, just a bit of code to write it out to our report window. So the coding part is done. So it’s very simple.
DATA: title (15) TYPE c VALUE ‘Mr’,
Surname (40) TYPE c VALUE ‘Smith’,
Forename (40) TYPE c VALUE ‘Joe’,
Sep,
Destination (200) Type c,
Spaced_name (20) TYPE c VALUE ‘Mr. Joe Smith’.
*Condense Character Strings
*Definition CONDENSE c [NO-GAPS]
CONDENSE spaced_name.
WRITE spaced_name.
The condensed statement will take out the blank spaces between our three words but not fully. It will leave one space between each word. So we should end up with Mr. space Joe space Smith. Let’s save the reports and test them out.
On execution of code, you can see Mr. Joe Smith written with one space. Now the addition is no gaps. No doubt you can work out exactly what this is going to do. Make it look nice. Very simple statements. Nice and easy to code.
Find the Length of a String
Let’s have a look, at finding the length of a string. To do this, we actually use a function instead of a statement. This is a very simple function, called string length. So the first thing to do is to declare the new data field.
We’ll call it LEN for length and the data type of I just to hold the integer value that will represent the length of the string you’re trying to interrogate. Then down to the code, we can have the following three lines, and you’ll see it looks very simple.
Len = strlen (surname).
WRITE: ‘The length of the SURNAME field is’, len.
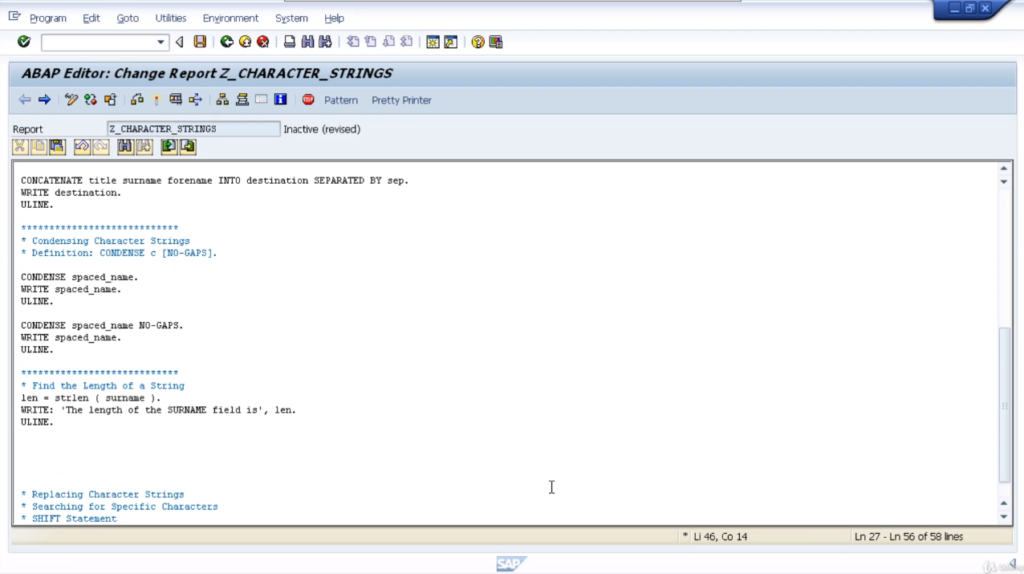
We have the field we have just defined and that will contain the length of the surname field. It is this string function, strlen, that will look at the surname field, move the length of the string into the LEN field we’ve declared.
If we take a quick peek at the surname field. You can see it currently holds the word Smith which is five characters in length. So when we execute this report, the LEN field will contain the number five.
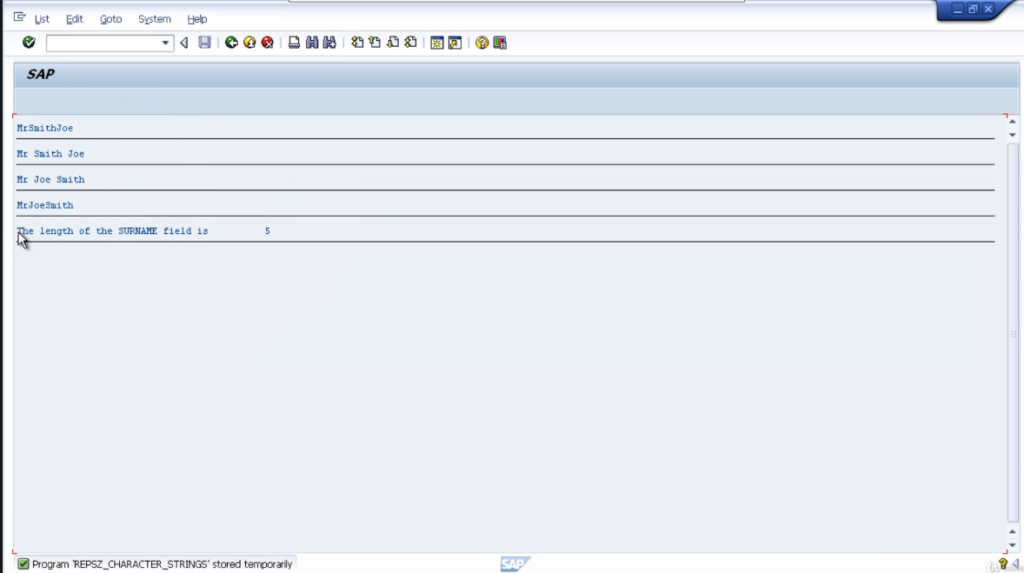
That will be output at the end of this write a statement. So include some text and then the LEN field at the end. So check the report for syntax errors. Everything’s good. Execute the report and then we have the length of the surname field is five. Very simple.
Replace
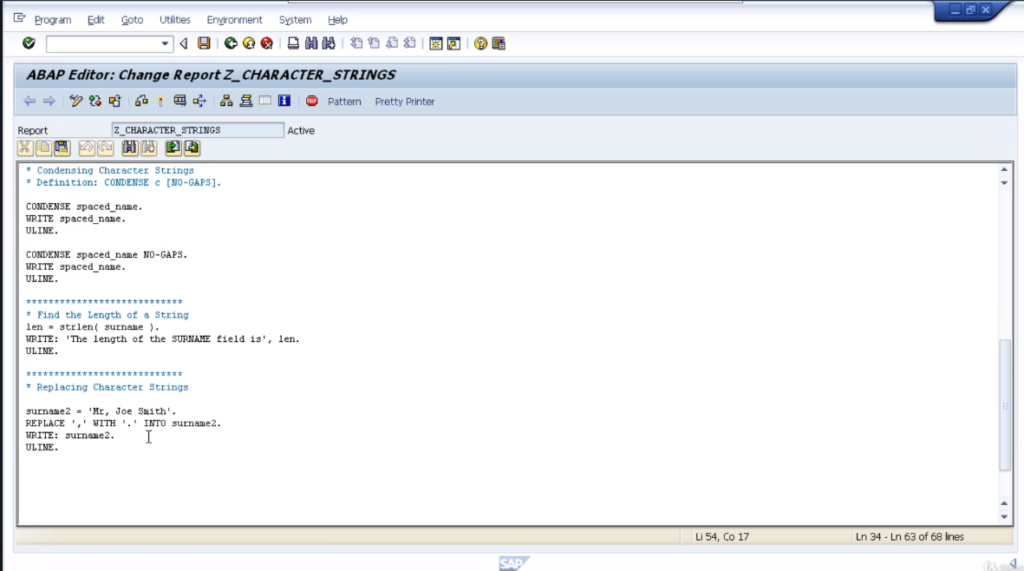
Now, let’s focus on replacing character strings. Add some code, and go through the explanation of how it works. So, the first thing we need to look at is the new data statement declared as surname2, and it’s going to be a length of 40 characters.
Note that no use of type declaration here because the system will use the default type c. Now, down to the logic itself. The first thing to do is move a value into the surname2 field and this is Mr, Joe Smith.
Then, we’re using the replace statement, and we’re doing a replace the comma with a full stop into the surname2 field. We’ll write out the results. First of all, let’s pretty the code up and then test it out.

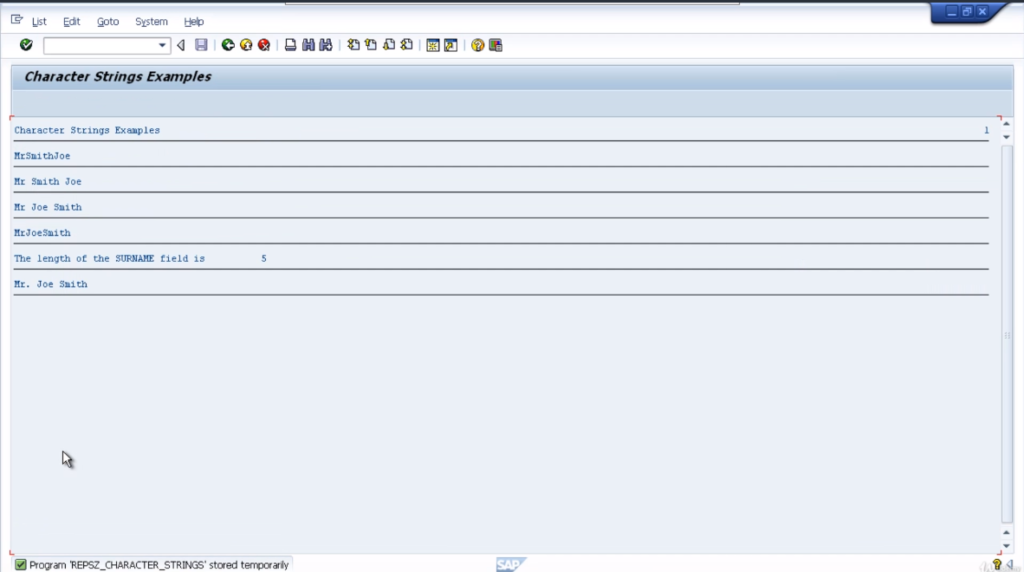
There you can see, the output is Mr full stop, Joe Smith. Now, one thing to note here is, with the replace statement, will only replace the first occurrence in the string. Our string had Mr comma Joe comma Smith, only the first comma would be replaced. To show you that, let’s test it out.
Only the first occurrence in the string has been replaced on code execution. So, how do you replace all the occurrences? Well, that’s where we could use something we will come on to a little bit later on when we have a look at loops.
You could use a while loop so that our replace statement can be executed multiple times, dependent on a specific piece of logic that we add to our loop statement. We won’t go into too much detail on it, because we will cover it later on.
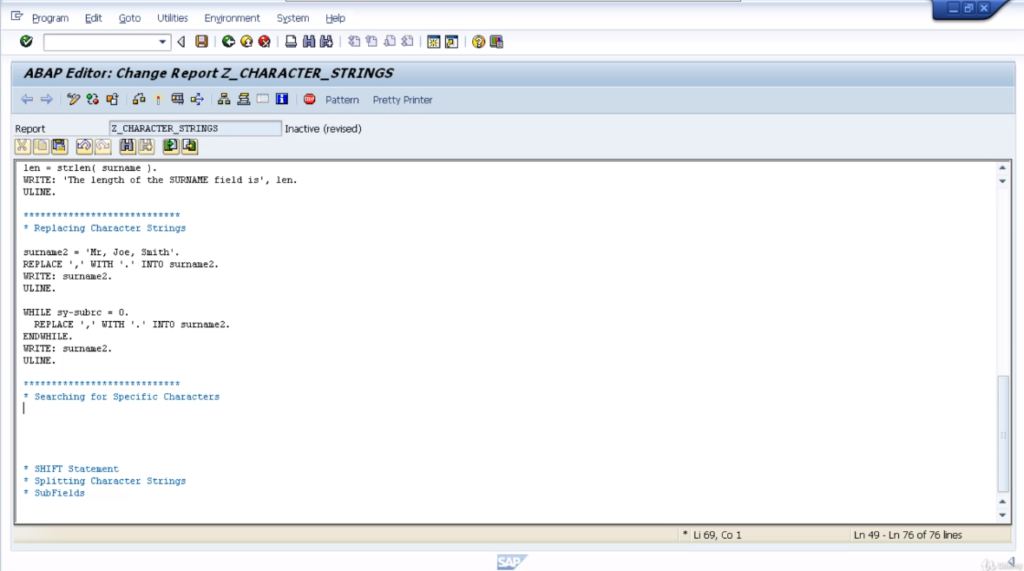
Let’s pretty it up. So, in this case, when we execute the program, we can see the comma has been replaced in both positions within our text and that’s because the replace statement was actually executed two times.
Search
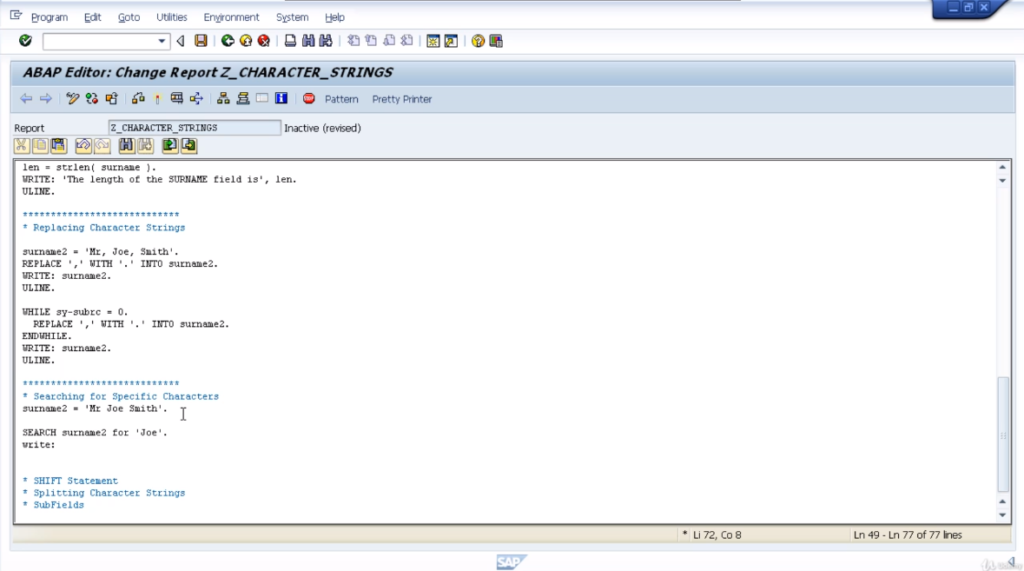
We will now take a look at searching for specific character strings within fields. We use the statement search to do this, unsurprisingly, and it has a very simple form. So we can key in the word search, and we enter the field we want to search.
So in our case let’s use surname2 again, and then specify four, and then the actual search string itself. Let’s say one, two, three, and a full stop.
Now, this type of statement is a little different from the others, in that we’re not specifying a variable, to hold any result. What actually happens with the search statements, is two system variables are used.
The first one sy-subarc, which identifies whether the search was successful or not. In the second system variable issy-fdpos and if the search was successful this field is set to the position of the character string that we are searching for in surname2.
We’ll go ahead and add some code that will hopefully explain this a little bit better. We’ll look at different variations that will introduce how these system variables can be used to determine the success of the individual search.
So if we stick with our surname2 field, obviously we’re not going to find a string of one, two, three. So let’s change this. We’ll say, search for the literal string, Joe. Now because surname2 does get changed in the statements above, let’s reset it right here.
We’ll change the content to Mr. Joe Smith. So our first search statements just look for the word Joe and it should be successful.
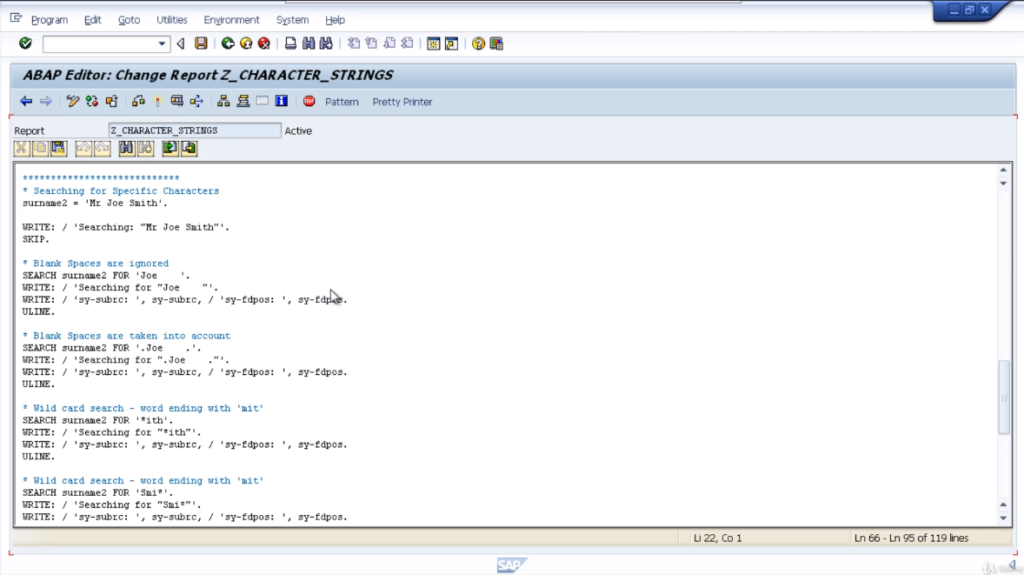
So what we will do is start to create a small report section that shows us the values of the system variables. So first off, we’re using the surname2 variable as before. SEARCH surname2, FOR and we’ve got Joe with some spaces after in quotes.
So what this is saying is, we want to search for the word Joe, but the trailing spaces with the way we’re using the search here are going to be ignored. The output would show a literal string, for what we are searching for and then, we’re going to output the system variables.
Sy-subarc. Natural value, and sy-fdpos and the actual value. So in this case, we should get a subarc equal to zero which means it was a successful search and the position of the search string will show the position offset in accordance with where it appears within a surname2 field.
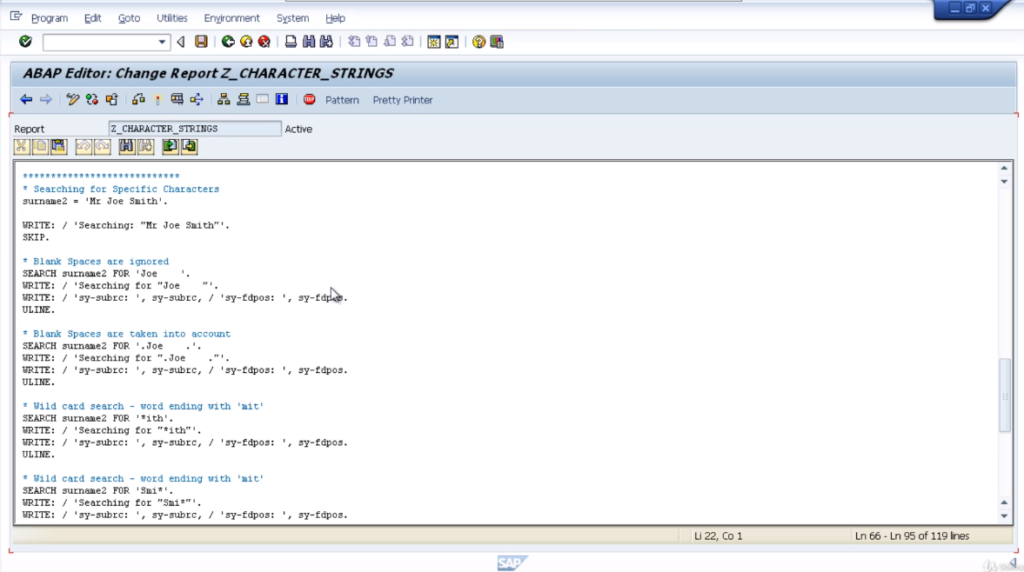
Next, we have a very similar search term, but this time the system will not ignore blank spaces. So the system will actually search for Joe with four spaces after the letter E and if we look at our surname2 field, there’s only one space after the letter E.
So it should return a subarc equal to 4, which means an unsuccessful search. Since it was unsuccessful, then the saved positive value will be zero.
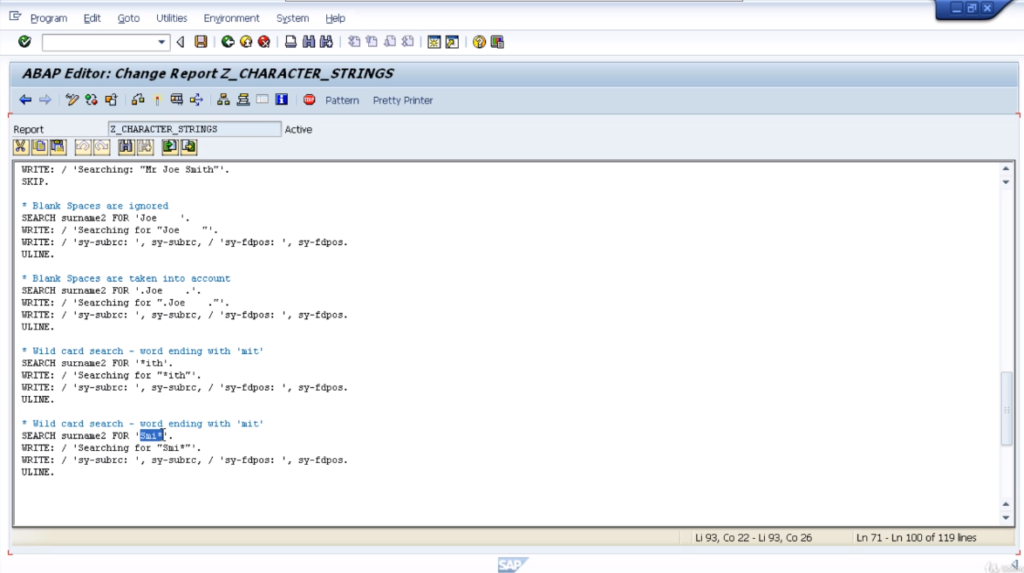
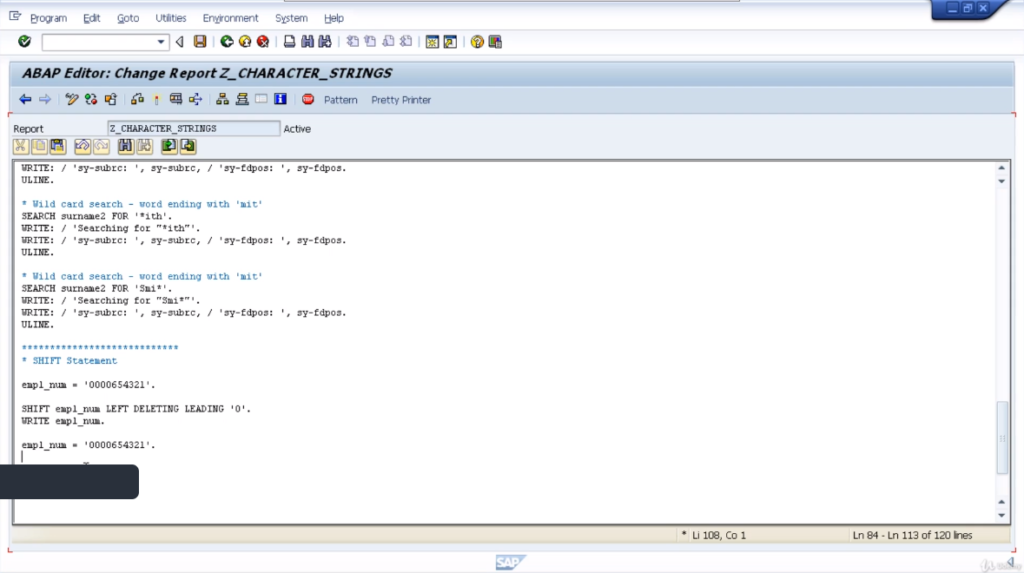
Then the next search will search for any word within the string that ends with I-T-H. Now because we have Smith, and it ends with I-T-H, H should be a successful search, and we should get the offset position, and get the pause system variable.
The last example is another wild card search, but this time we’re going to be searching for any word starting with Smi. The variable we are searching for does contain the word Smith.
So we should get a successful search. Again, the sy-fdpos system variable will be filled with the offset value relating to the position of the word. So, let’s run this test and will have a look at the output.
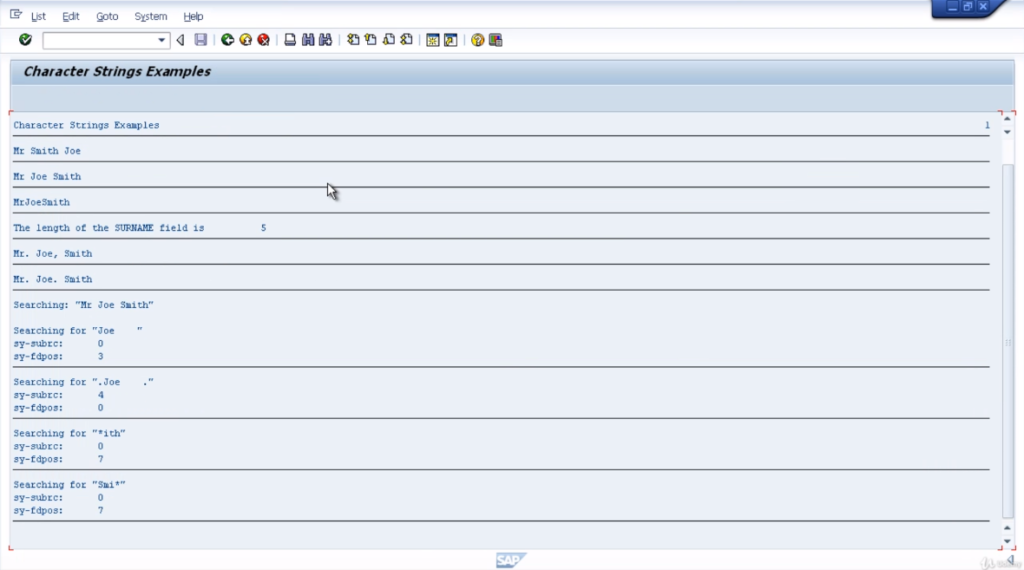
You’ll see the results in the sy fields. So we can see the search results. Here we show an actual search string, and in the first search example we can see was a successful search because sy-subarc is set to zero and the f d pulse value is set to three which relates to the third character in our string. That’s the offset.
So the search term, Joe, would start one character after the offset value. The next example is for searching for Joe again, but we include spaces. Notice the surname2 field did not contain enough spaces.
It was a failed search and the sy-subrc field is set to fall to indicate that. And because it was failed, sy-fdpos is set to 0. The third example with the wild count search where we’re looking for any word ending in ith.
It was successful and it’s showing the word starts after the value 7 offsets. So if we look at the search tab, we can see the offset value number 7, it’s the space after the letter e of Joe, telling us that the next word in the string is what we were searching for.
The last example, very similar, but this is showing words starting with SMI. Exactly the same. A successful search, indicated by subarc equals zero, and the word Smith is the word that contains SMI, and again, it’s the same position, starting one connector after the position seven offsets.
That’s four different variations of the search command. Very useful throughout your program when dealing with long character strings.
Shift
Let’s now focus our attention on the shift statement. This statement is quite simple to use. It allows you to move the contents of a character string left or right, character by character.
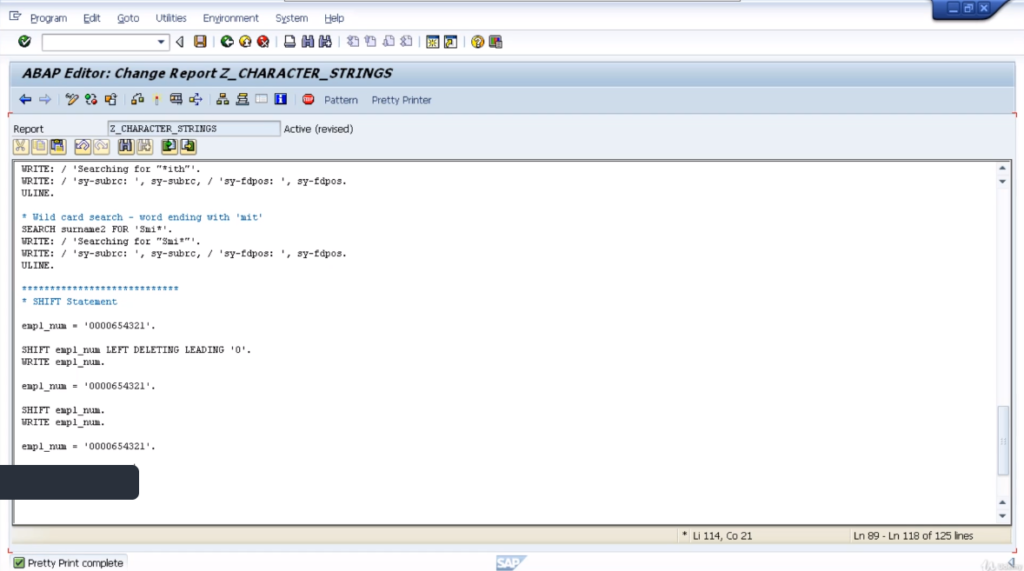
So as an example, let’ see how we can move the contents of a field to the left, deleting leading zeros. So first of all declare a new variable. Let’s call this one empl_num, for the employee number. We’ll make it 10 characters in length.
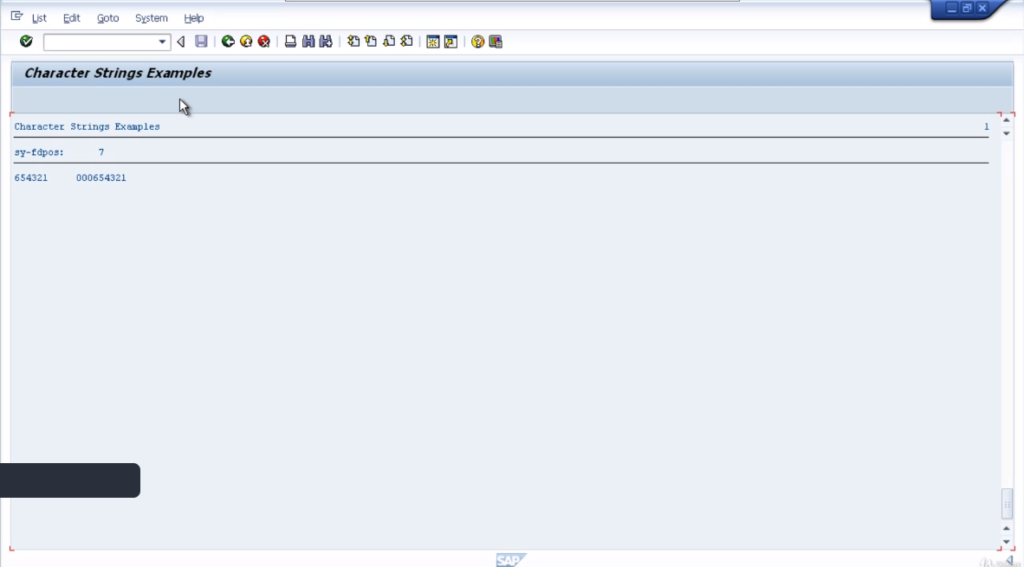
We’ll set the contents of this field to 0000654321. So we’ll fill in every character of the field and what we’re going to do with the example is remove the leading zeros and shift everything else to the left-hand side.
So to do this we just type the statement shift and our field name. It will define we want to shift the contents to the left whilst deleting the leading zeroes. Now before we run this bring up the search help for the shift statements.
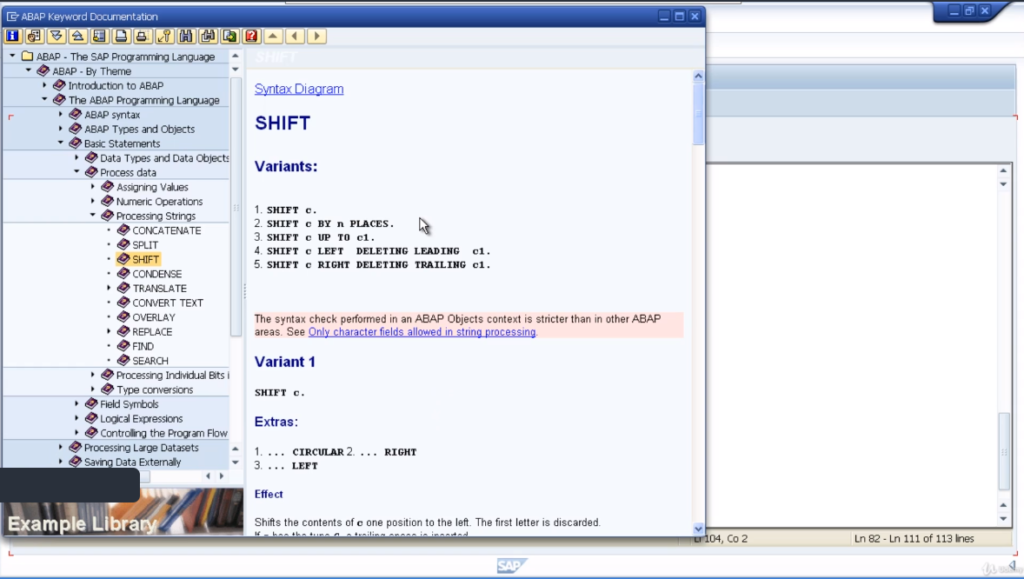
You’ll see there are various variants showing that you can shift to the left, to the right, by a specific number of places, and so on.

Let’s go back to our example, tidy up the code. Create a statement to write the output. Do a check. So let’s now test the code and we’ll see the output. Here you can see the actual output has deleted the leading zeros and moved everything to the left-hand side.
By clicking on the field you can see it is left justified and we do have spaces at the end of the field. Try different variations of the shift statement because there’s a lot you can do with a statement. It does become a very handy tool when you have to deal with strings of data.
Another example to show the shift statement in its simplest form. Now what we will see here, because we haven’t specified anything after our variable name it will use the default value of moving from right to left and the default number of spaces is 1.
So it will move to the left one character. So on the test, you can see we’ve only got three zeros in the output, and it’s moved all the contents to the left, and left us with one space at the end.
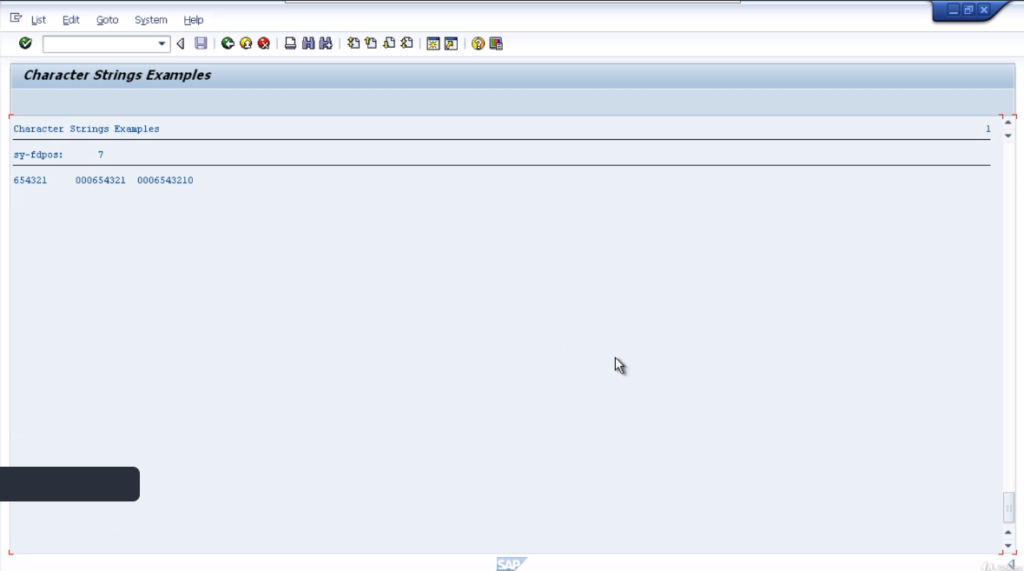
In the next example, we will use the addition circular. If we leave it with the default values, it’ll move everything to the left one character. But the character that is pushed out will be reinserted at the other end of the string. So we should see 0006543210 in the result.
Here you can see exactly that. The 000 and then the leading 0 that is being pushed out, is being inserted in the far right column.
Split
Next, we are going to discuss the split statement. You can use the split statements if you want to separate the contents of a field into two or more fields. The statement is fairly simple to use.
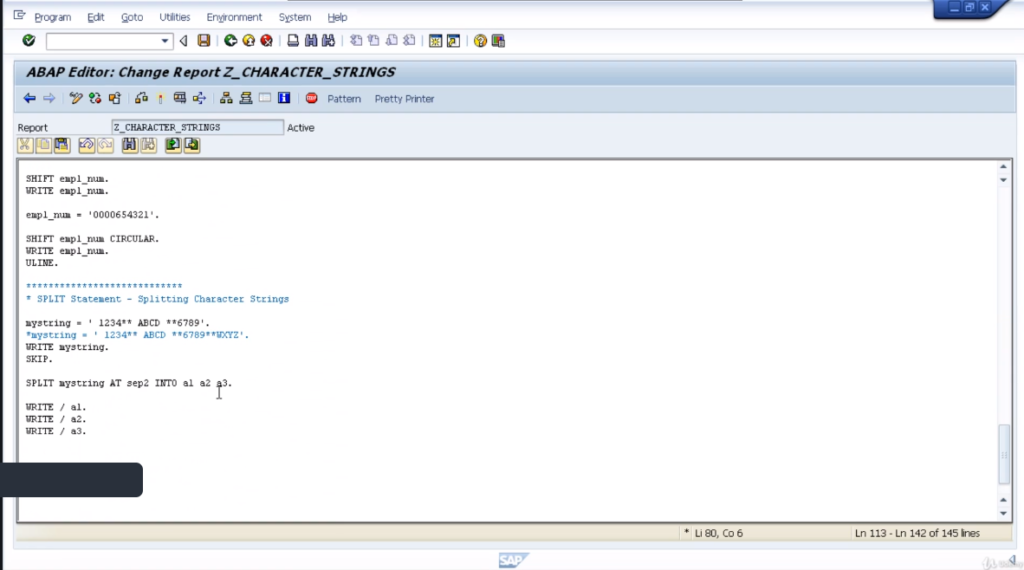
So first of all create some code and then we’ll go through it line by line. Create some new data statements, called my string, and then a1, a2, a3, and sep2, which is a separator.
The string variable is 30 characters in length and the a1, a2, a3 is 10 characters in length and the separator is 2 characters and assigns a value of double asterisks. That’s just going to be used to identify where we need to separate our string. Now take a look at the split statement.
Here are two examples. The first one is populating mystring with a value of leading space and 1234**, ABCD**, 6789. Go and write out the string on the report just so we can see it in the results and the blank line, and then, come to the split statements.
Now, this statement starts with the word split, and then you add the string that you want to split. So, in our case, we’re going to split my string. Then, we have the addition AT, and following AT we have a separator.
Now, this could be literal. In this example, we’re just going to use a pre-defined variable, sep2, which contains the double asterisks. Then these are the fields we want the split contents to be written to.
So, what we’ll end up with if we go through it, we have specifically made the string look a little bit odd, making sure we have a leading space and we have an asterisk then space and we have space before the asterisk
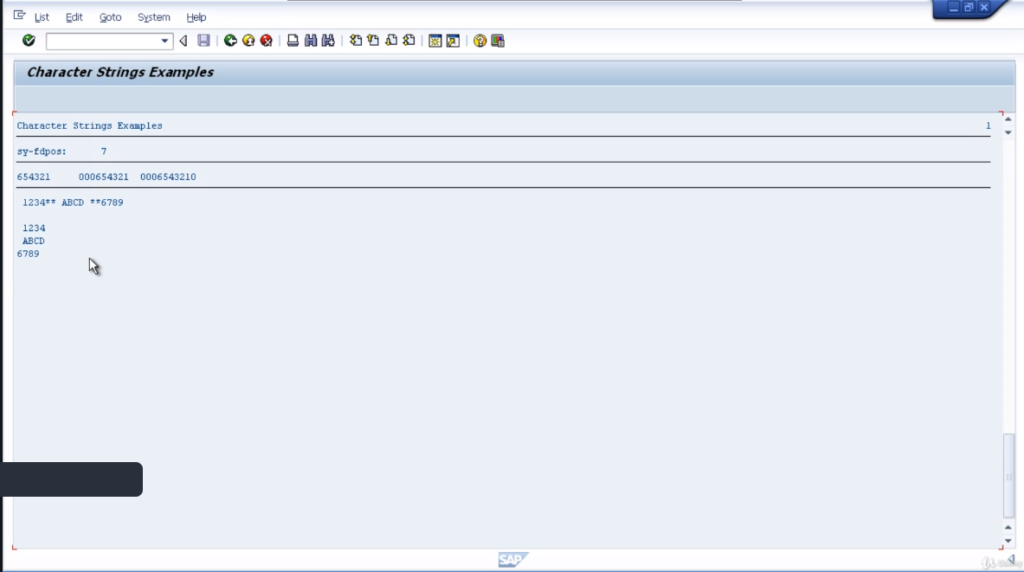
So, you can see how the split statement actually populates the fields the data wants to go into. To execute the code and we’ll go through the results. So split statement is splitting a leading 01234, asterisk, asterisk, and it’s going to split at the first double asterisk. So, we can see, our first A1 results field does contain the leading space.
It is then being split at the double asterisks, and note the result has filled in blank spaces for the rest of the field. We then have the second field filled with from the blank space all the way to the blank space before the next double asterisk.
This is A2, and also is filled with trailing spaces, and the last result is 6789, and you’ll see there’s no space after the double asterisk. So, that has gone one column further to the left and filled the remainder of the field with blank spaces again. So, that’s quite straightforward.
Let’s go back to the code, and what we’ll do this time is take a look at the second example, and the way this differs another set of double asterisks is added for our separator, and then added some more characters at the end of our string.
So we want to split the contents of the string into three fields, but when we look at the contents, because we’re using the double-asterisk as a separator, we’ve actually got enough to fit into four fields.
So, what the system does, in this case, is for the last field that’s going to be filled, it will actually contain the remainder of the string as well. So, we’ll execute the code.
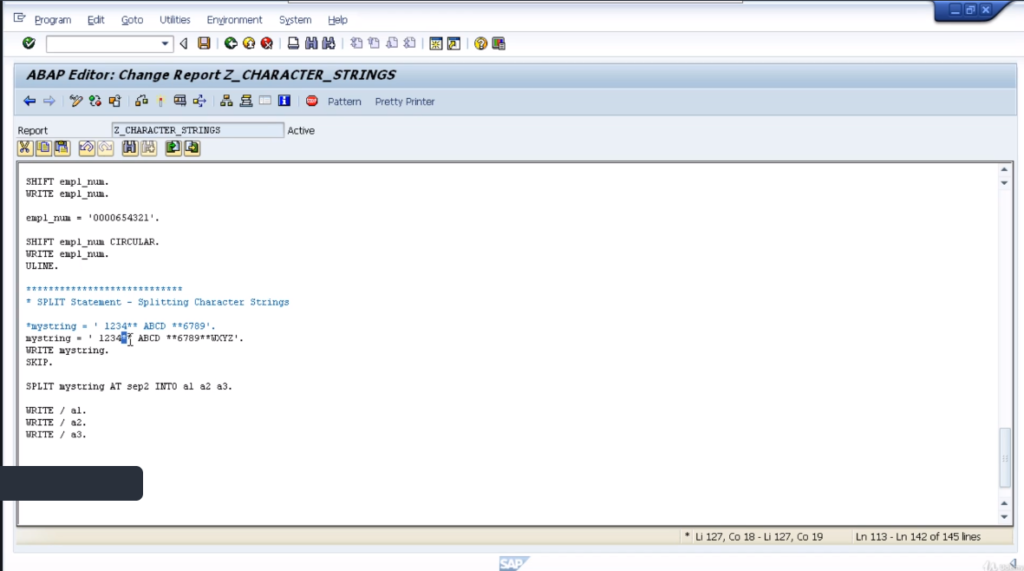
So the difference here is, our third field is filled with 6789, but because we have a double asterisk again, we’re trying to split the remainder of my string into another field. Well, we haven’t declared a fourth field, so this becomes the remainder and it gets appended into the last field we have declared.

So, it’s important to keep in mind that if your separator would result in more splits then there are fields available for the contents to be moved into and the remainder will be put into the last field. If the last field isn’t big enough, then it will be truncated.
One last point, just a note that if the field you are trying to split does not contain a valid separator string, then the whole contents of that field will be moved to the first field that you are trying to split the contents into.
Sub-fields
It’s now time to have a look at what we called sub-fields. Now we have the option of referring to specific characters within a field. This is referred to as processing sub-fields, whereby we reference a specific character position within the field itself.
Let’s have a look at an example. We’ll go through it line by line. So you become familiar with how to use this. Add some code first. The first section shows we’re declaring three new variables- International telephone number, country code, and telephone number.
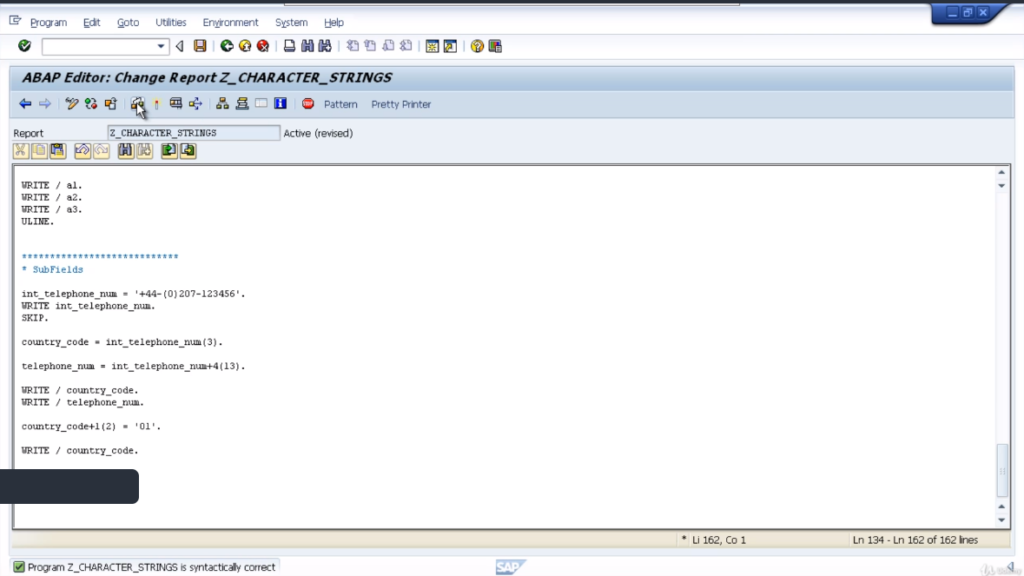
You can see the different sizes of each field. In the first line we have, I am assigning a character string to an international telephone number, write in the results to the screen, followed by a blank line.
Then we come down to the actual sub-field processing itself. So our first line of code shows that we are filling the country code field with the first three characters of the international telephone number field.
That’s quite straightforward. Let’s have a look at our second line. In this example, we can see the field telephone number is going to be filled with 13 characters of the international telephone number field starting after the fourth character.
So how we’d write this is telephone number equals international telephone number plus 4, which means start after the fourth character, open brackets 13 close brackets, which references 13 characters. Then we’re going to move the output to the screen.
Then the last example we have is instead of just moving specific characters of the international telephone number field, to a telephone number. We’re actually going to be updating the country code sub-fields with the literal 01.
Our country code field +1 which means stat after the first character and fill the next two characters. So the country code field is only three characters in total anyway, so in effect, it’s going to fill the last 2 characters of this field with the value of 01.
The last line of the code is just going to produce the outputs on the screen for us to check. Have a quick check of the program, make sure the syntax is correct. Activate it, and then we’ll run the test. Here we can see the results.
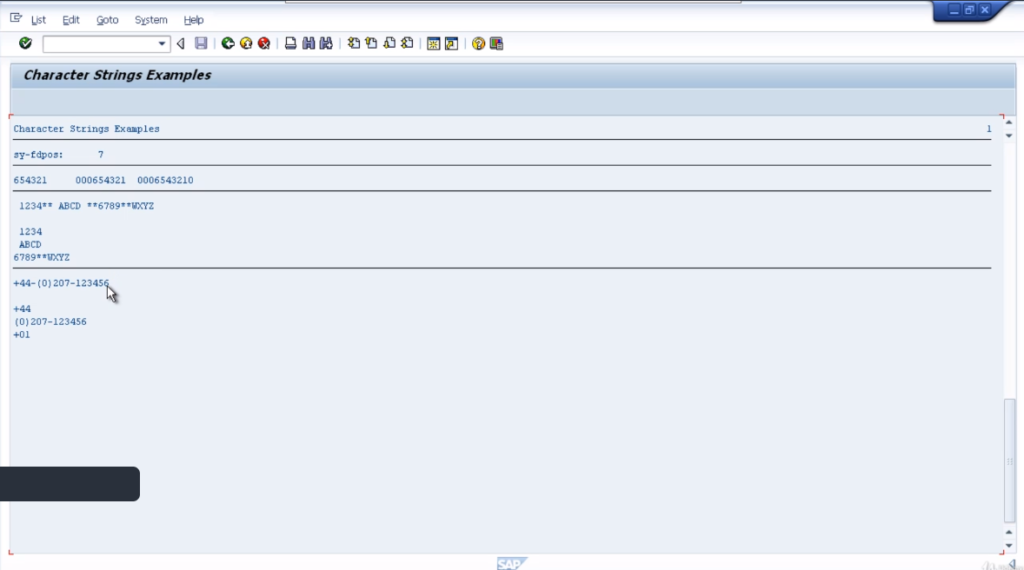
So first of all, we’re outputting the full international telephone number to the screen. Then the next field, the country code field, we filled with the first three characters of the international telephone number field.
The next one, the actual telephone number, we reference 13 characters after the fourth character. So the fourth character was the Dutch sign, so we can see the next 13 characters start with the open brackets and ends with the number 6.
In our last example, it updated the country code field but as a sub-field. So it only updated the second and third characters of the field. So it’s quite straightforward. You’ll see this used a lot in SAP programs, and you’ll probably find yourself needing to refer to sub-fields quite often, and instead of creating brand-new fields, holding values there.
This is often a lot easier just to use the subfield ten times, instead of holding additional values as a variable in memory.
That’s all in this module. Hope you enjoyed it.