Getting started on Udemy with SAP ABAP Programming for Beginners by Peter Moxon is just a matter of few steps. First of all, create your Udemy account by simply signing up. Log in to your account and purchase the courses you wish to study. Once you have purchased, you have lifetime access to the on-demand videos. You can get a brief idea about what this course contains from here.
The course- SAP ABAP Programming for Beginners is a 13 hours video lecture lesson. There are a total of 13 modules and today we shall describe module 2. In this module, Peter Moxon has laid emphasis on the Data Dictionary of the SAP ABAP programming. The entire module is of 48 minutes. The module is split into 7 parts. The videos are short and to the point. Each part is described in the upcoming sections.
1. Data Dictionary Introduction
This module focuses specifically on the data dictionary. A data dictionary is a tool that is used to enhance the database and database tables used by the SAP system. It helps in creating tables, viewing standard tables that are delivered by SAP, and more. There are many other features involved in the data dictionary but first, the basic features would be discussed.
The first step is to create a database table that involves creating fields, data elements, and domains. Each of these is necessary for building tables. Once the tables are built, the users will become familiar with the tools to check errors in the table.
Once the errors are removed from the tables, the tables can be activated to be used within the system. Then the maintenance of the technical settings of the table would be looked upon. And lastly, we can enter data into the table and have a look at the entire data using the standard SAP transactions available in the SAP system. So let’s get started on building our first table.
2. Create Your First Table 1
One can start to build a table by launching the SAP system. Once we are on the SAP GUI, we can find the data dictionary in the SAP menu on the left-hand side of the screen. Click on the Tools menu and choose the ABAP workbench. Click on the development folder to see a list of items.
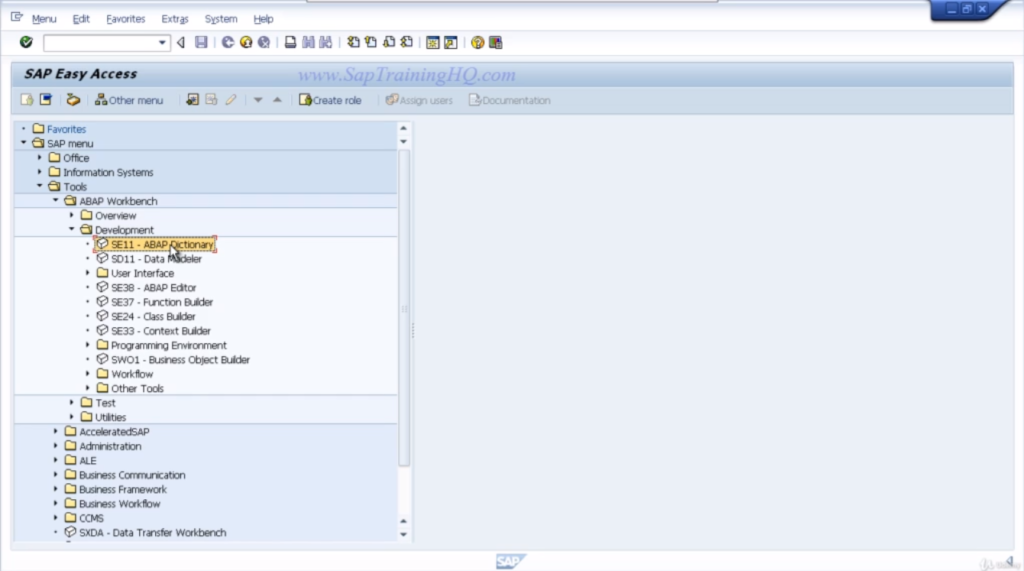
Click on SE11 ABAP dictionary and now you’ll be presented with the first screen of the ABAP dictionary.
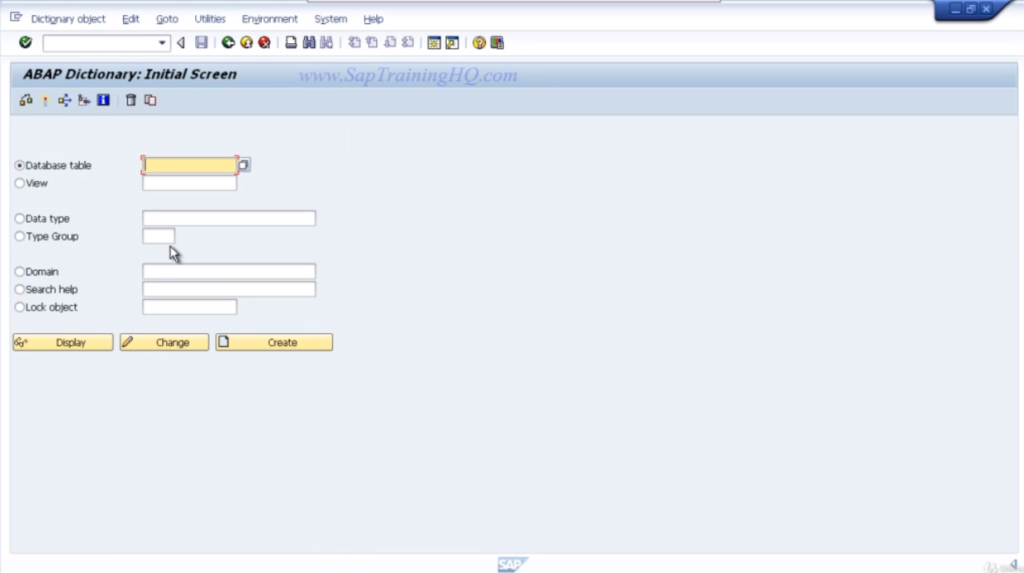
The first screen of the ABAP dictionary has different options. The first one is database tables. This option is where we can enter the table name. The view option is similar to a table but doesn’t contain any data. The data type option is to choose a type of data to be entered. Type group, domains, search helps, and lock objects are some of the additional features on the initial screen of the ABAP dictionary.
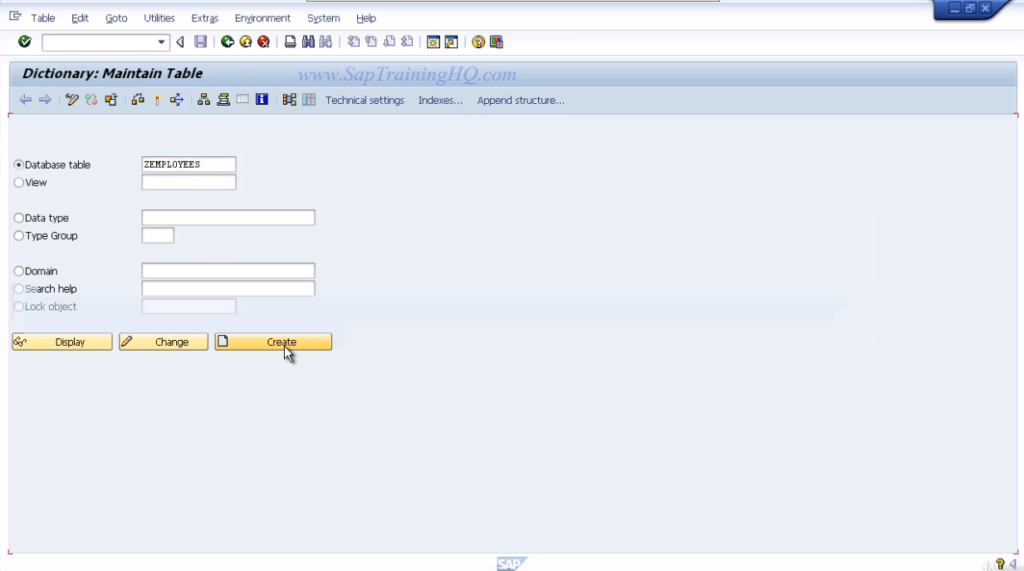
So let’s start creating a table. First of all click on the database table option. We are going to create a transparent table. However, there are other types of tables such as Calista tables and pool tables. All we will focus on is creating a transparent table.
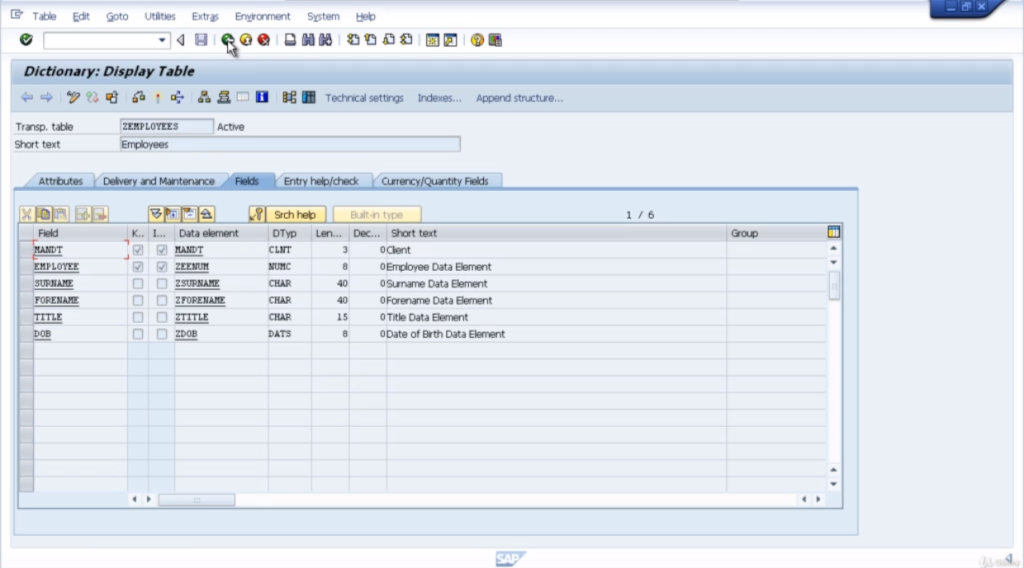
Whenever you create a table, always ensure that the table name adheres to the customer-defined namespace. It means that the tables should start with the Z or the Y. However, most commonly the letter Z is used. In this example, we are going to create a table for the list of employees working in a company.
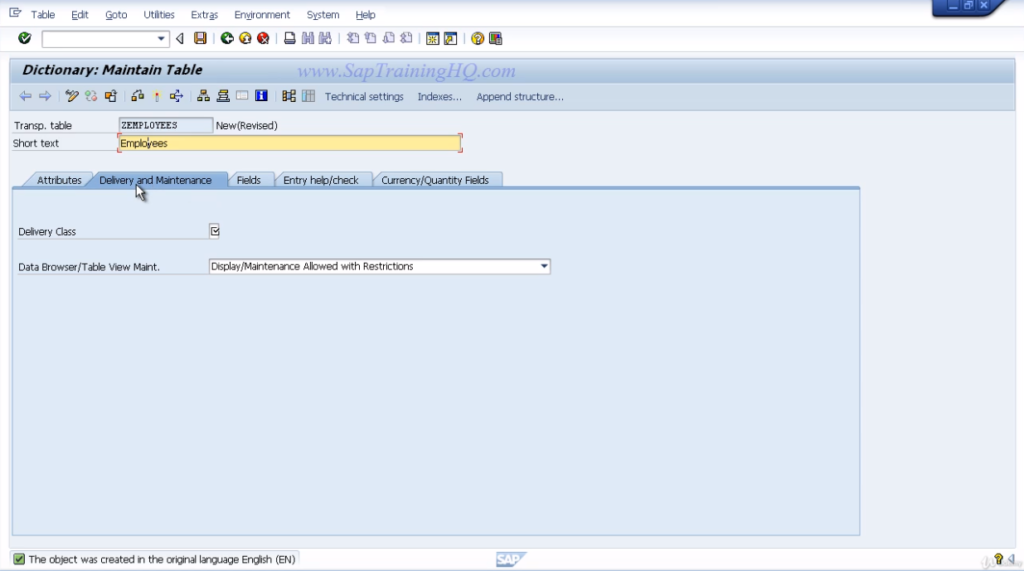
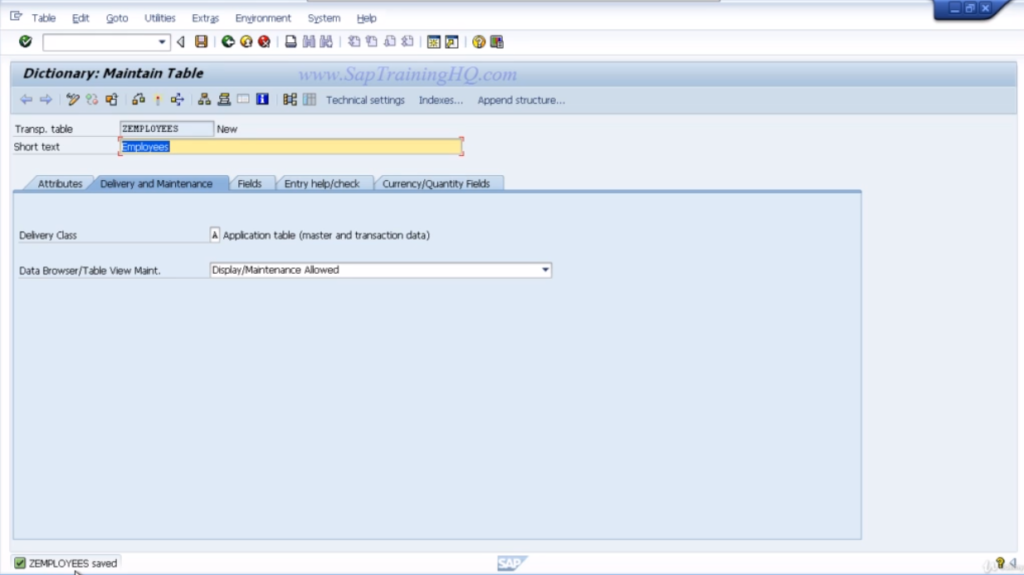
In the database tables field enter Z employees and click the create button. A new screen appears and the cursor is on the short text field. Enter a description for the table here. Type in employees. Under the short text there are various tabs present. The delivery maintenance tab is highlighted here.
For the delivery class, click on the field and click the drop-down button. This shows a list of delivery classes that you can choose for your table.
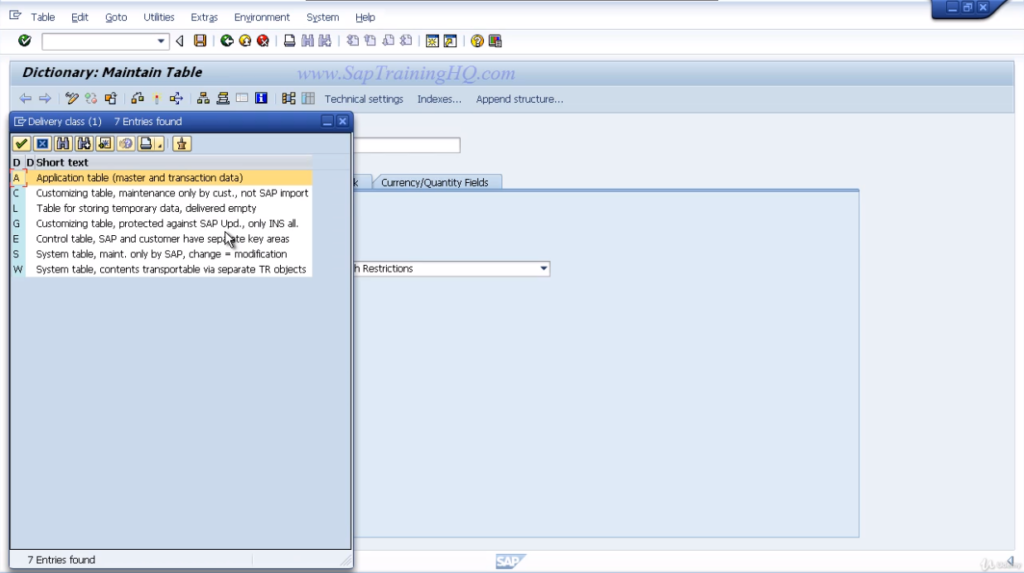
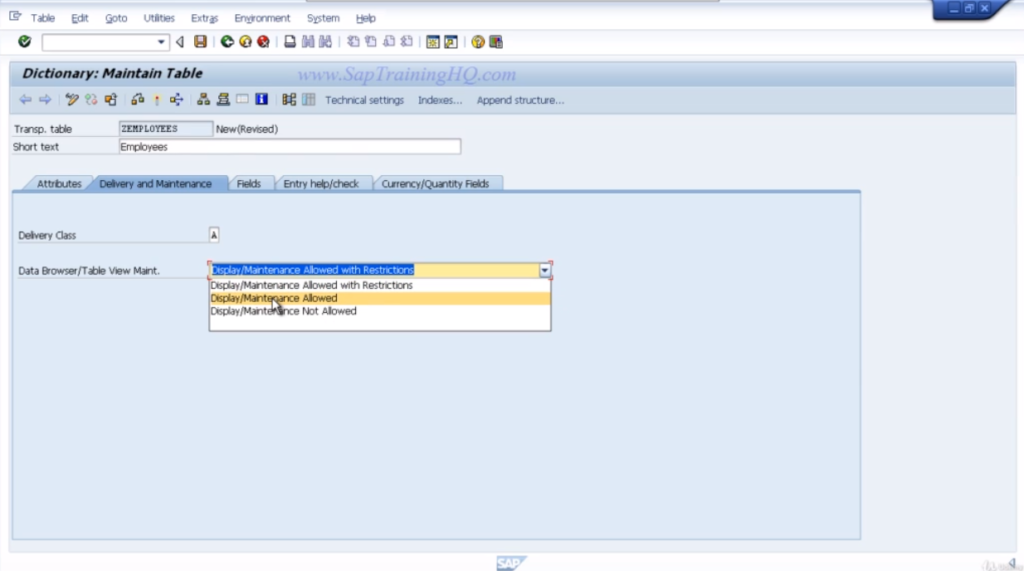
Choose the application table from here because we are going to use master data or transaction data in the table that we are creating. In the data browser/table view maintenance field, click the drop-down and choose display maintenance allowed. It allows us later on to enter data directly into the table. Click the save button before going any further.
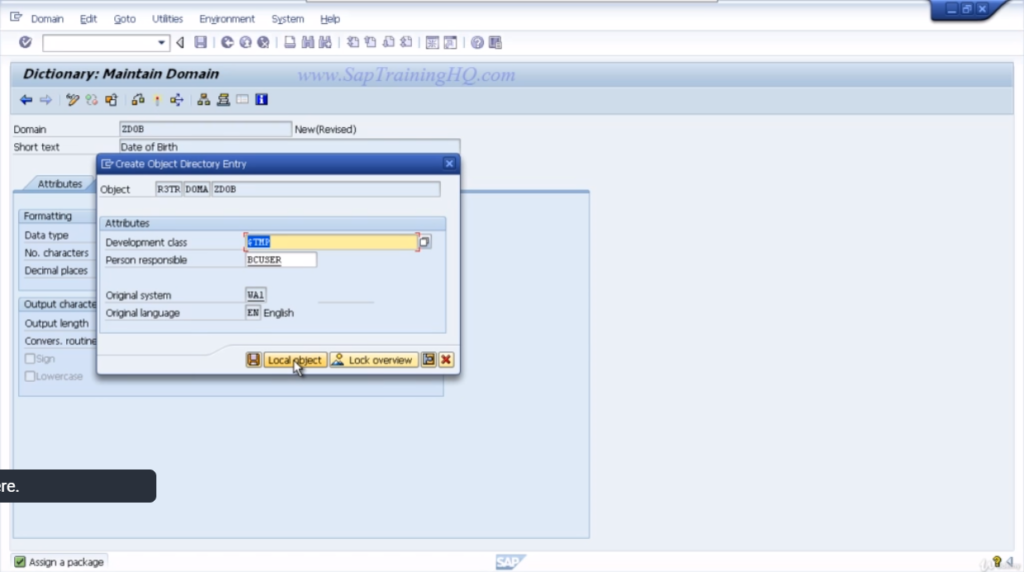
A new window pops up create object directory entry. It is for any development we do within the SAP system. Often the users do development in the development environment and have to move the development through to our quality assurance environment and then through to production.
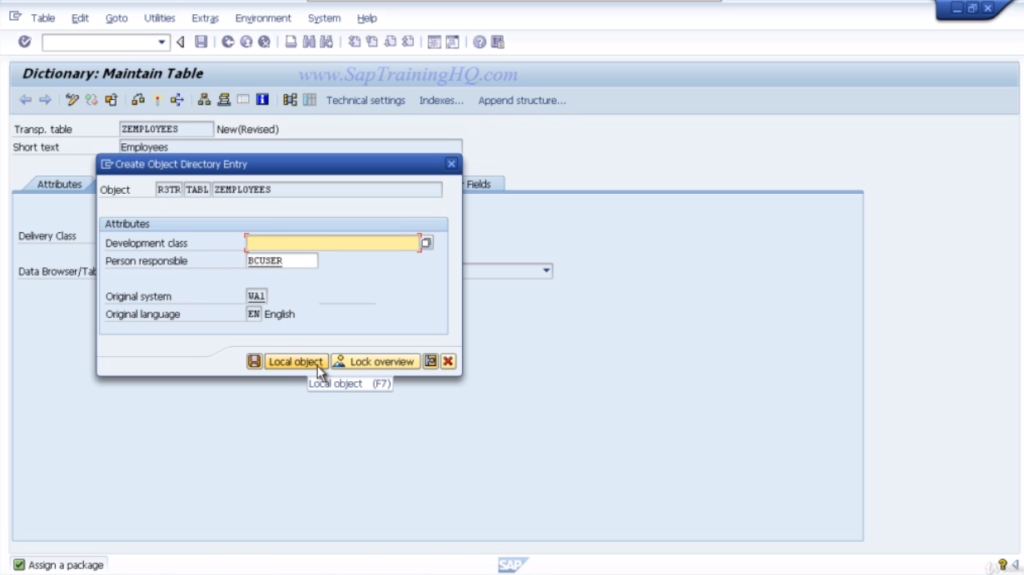
This window permits to choose the development class which has configuration behind it, the actual transport routes that we want to use for our development. In this Example, we don’t want to move developments to another system. So we need to click on local object. This means that the object exists in the development environment and it is not needed to be transported any further.
On clicking local object button we can see at the bottom of the screen that the table is being saved.
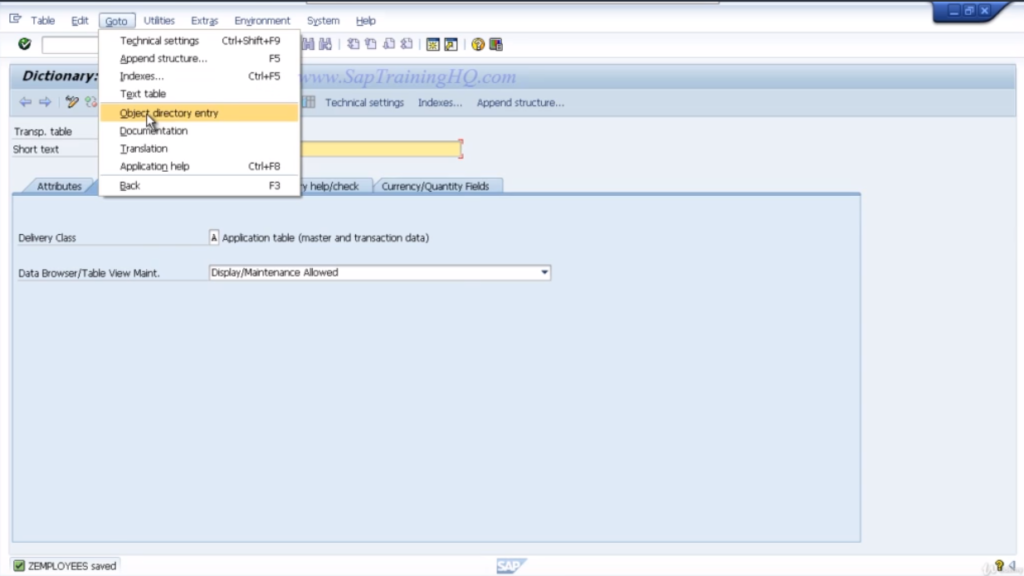
Now go to the menu and choose object directory entry. There we can see the change object directory entry pop-up box which is very similar to the previous one.
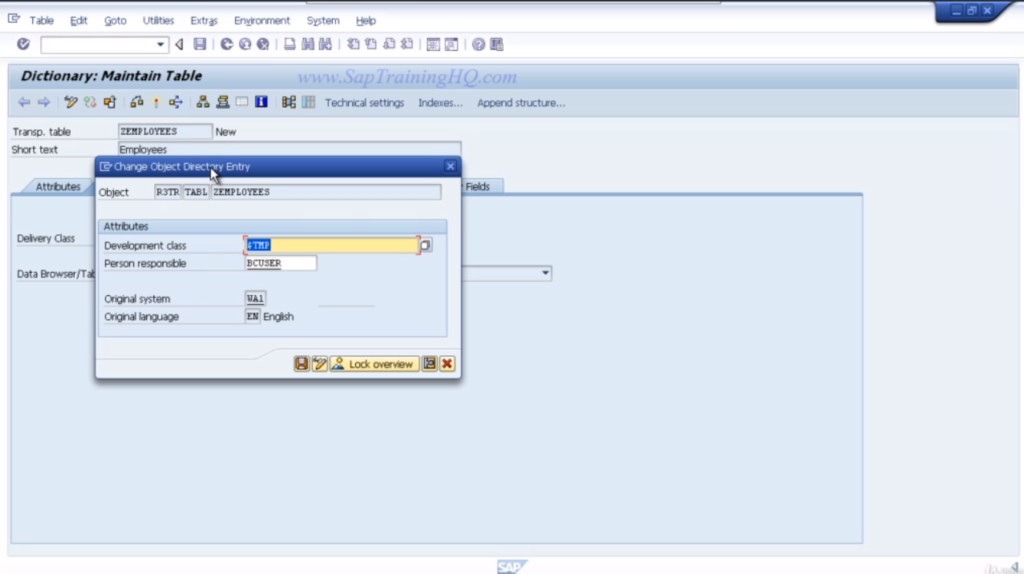
We can see that the development class has been changed to $TMP.
3. Create Your First Table 2
So now once the table has been created we have to start entering the field names for the table. There are a few guidelines that should be kept in mind while creating fields in the table. First of all the field names can start with any letter. They do not have to begin with the Z or Y like the table names.
The field names can have a maximum of 16 characters and must have at least one key field. This is used later on for searching and sorting data and identifying each record as being a unique record. You can also assign an initial value to a field. For example, we had an employee class.
The majority of the employees are going to be regular staff so let’s say we have an initial value of S for its staff but we do have some employees that are directors. Let’s assign a code D to them. So now we can say that the initial value would be an S But will allow the user to change the value to a D later on.
Every field used in the table is made up of what we call a data element. Data element defines specific attributes of each field. One tip here, data elements must adhere to the customer namespace. So let’s start off with entering the first field and this is going to be an important field within an SAP system.
This field identifies the client that the records are associated with. In the field name enter client in the data element, we will enter MANDT. All the data elements already exist in the system. Now press enter and you can see the system automatically fill in the data type, the length, number of decimals, short text for the actual data element itself.
It is important to ensure that the client field is made a key field within the table. The next field we are going to enter is going to be a self-created field. It would be the field for employees. Let’s make it a key field and we are going to use a brand-new data element called ZEENUM.
Click on the Save button. Always click on the save button as you proceed. Now here, you will notice that ZEENUM does not exist. So we have to create the data elements. Even though it’s letters, enter them here. If we try to activate the table or just check the table we should see an error message.
So because we haven’t got a data element called ZEENUM in the system, it tells us we cannot activate this table within our system. Press F3 or the back button. Now we are going to use forward navigation to create the data element. Another way of doing this is to open up a brand-new session.
So go to SE 11 again and start creating the individual objects following this way. We can also use the forward navigation by just double-clicking on our brand-new data element. A window appears called create data elements and it instructs the user that the element does not exist do we want to create them.
Answer yes and then we get to the maintain element window which is similar to the first screen and we saw when we created our table. The data element window asks for some short text so here you can enter the employee data element. Under the short text, you can see four tabs.
The one highlighted is the data type. The elementary data type called the domain can be seen. It needs to be defined for our data element and it is important to do so. Domains must adhere to the customer’s namespace.
Now we are going to create a brand-new domain using the same name we use for the data element. Enter ZEENUM and once again we are going to use forward navigation to create the domain. Double-click the entry. It tells that the data element has changed and we want to save it before creating our domain.
Choose yes and go ahead. The create object directory entry window appears. Save this development to the $TMP development class. Click on the save button or local object button. Since we have used forward navigation, it tells us that the new domain we are trying to create does not exist.
Choose years to create the domain and enter some short text that describes what the domain is going to be used for. Enter employee domain. Under the short text, we can see three tabs and the one that is highlighted says definitions. The fields available to us say data type.
Click the drop-down on data type and you will see lots of generate data is already present in the ABAP dictionary. Choose any of these for employee field or domain. Choose NUMC which includes a character string with only digits. Double-click the entry and that fills in the data type field for us. Put of characters, enter eight which means this field is going to contain a maximum of eight characters
We want zeros for decimals which is the default for the NUMC field. Select the output length of eight and hit the enter key. Now we can see that we have entered the NUMC. It brings us back to the description of this field which tells us that it’s a valid entry. The next thing is to look at the value range tab.
This tab is for setting valid value ranges for the domain. If an asset of the value range is chosen and the user enters the value in a field outside the range an error message would be displayed. There are three choices for the value range. The first one is the single values where you actually enter a list of individual valid values that a user can enter.
The next is intervals used for a lot of values related or in a sequence. Enter the lower limit and the upper limit for intervals. For example, the lower limit can be one and the upper limit can be nine. Users can only enter a value that falls within the ranges specified.
The last option is the value table. When there are a large number of possible entries, a value table can be used instead of a value range or list of single values. The value table specifies a complete valid value table entry list. Note when you use this option you must also introduce foreign keys to the tables to ensure users’ entries are tested against the value stored in the value table created by you.
There is no need to enter any value range for this domain. Click on the Save button. Object data entry pop-up box appears. Assign this object as a local object by clicking on the local object button.
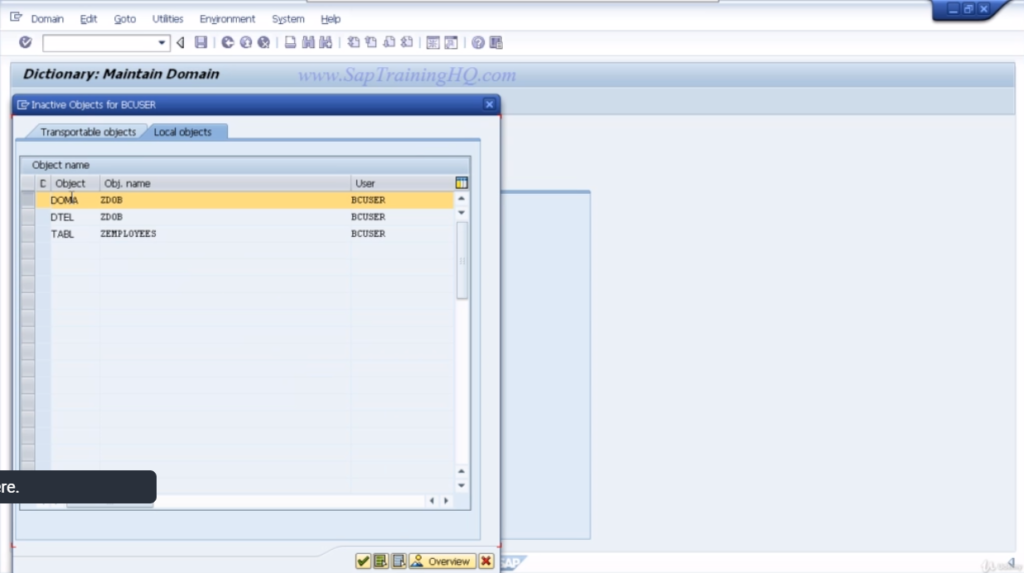
Now try to activate this object. Creating an object doesn’t mean that it is ready to be actively used in our table. Set the object is active for including it within the system. On the toolbar, there is a little matchstick icon. This icon says activate when you put the pointer on it.
Or you can also press control and the F3 key together. Click on the activate button and a pop-up box with lists of three different objects that are currently inactive appears. You can activate all the objects together but it is advised not to do this. When you’re working in a typical development environment, there are multiple users creating developments at the same time.
Often, the objects list of others appears along with your list. Or maybe there are a number of other development projects that are inactive and created by you. Now activate the domain that you only want to activate. On the top entry object type DOMA, you can see ZEENUM. Click the green tick.
The system goes away and checks all the entries we have made for this domain. It checks everything and then activates the object. Add the status bar at the bottom of the screen, everything is okay and the table creation procedure proceeds. Remember that we used forward navigation for generating the domain so we need to do is step back.
Click the F3 key and you’re taken back to your data element maintenance screen. On activating the domain now we can see text for our domain has actually come through and been placed, assigned the ZEENUM entry that we have entered before. This has brought back individual domain properties that were created.
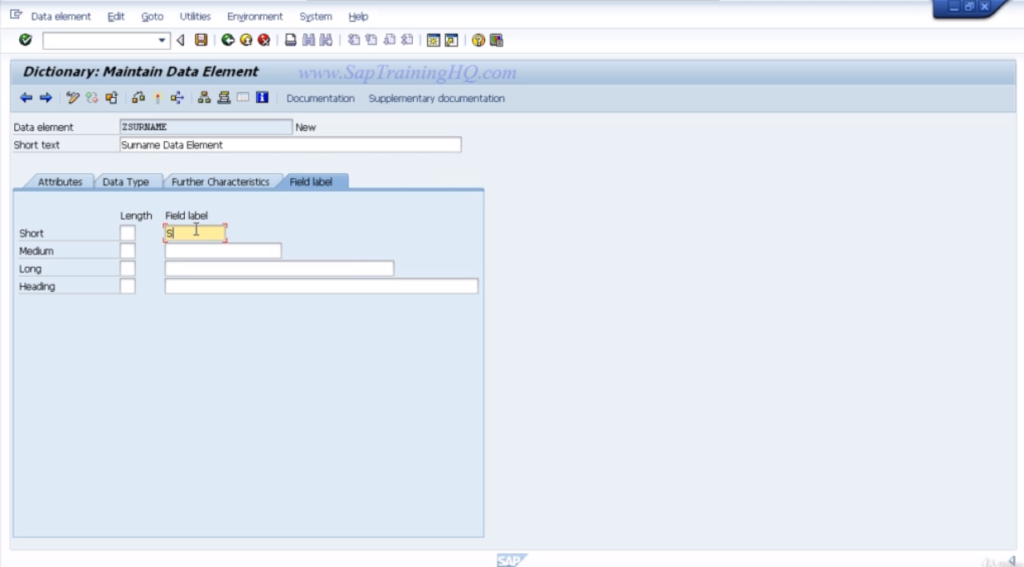
The next thing we can do is define the field labels. Click on the field labels tab and here we need to define the Short, Medium, Long, and heading field labels for a data element. Here you can apply a little shortcut.
As we have already answered the short text, so if you highlight that and use your control C key to copy the entry to the clipboard then you can come down to each individual field label and just control V or paste it in one at a time. Now you can see for the short field name employee data element does not fit into the field label.
Go ahead and edit it to make it sensible. Remember the food labels entered here are going to appear as field labels on the table. We don’t actually want it to say data but to say employer or employee number. In this case, choose employee N, employee number, and copy that to the remaining field labels.
On the left-hand side you can see there is the length field which on purpose is not filled yet. Because once you put the entries in the field table and press the enter key it automatically calculates the length of the entries that you have typed in. Once it is complete, save the data elements and then activate it.
A window appears showing the inactive objects. This time there are only two objects and activate the objects we want to work on right now. Highlighted object type DTEL is the data element. Click the tick button. If everything is checked and is correct the status bar at the bottom will show objects activated.
Again use forward navigation from the table to create a domain. Press the F3 key or the back button. Now you’re back to the table maintenance extreme. The employee field we created can be seen here.
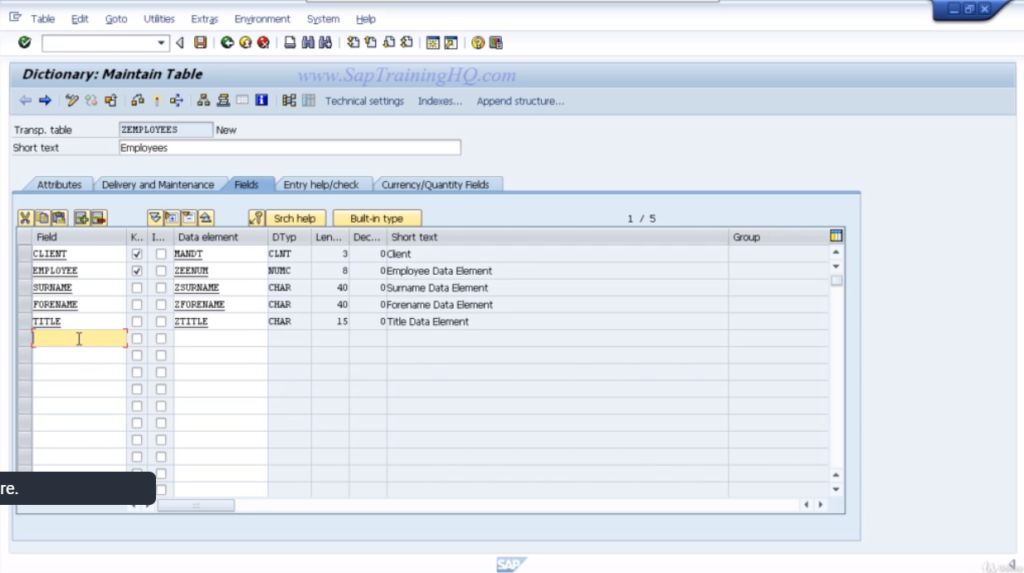
The data element entry that we keyed has the appropriate data type, Length, decimals, and short text brought back into our group to indicate everything is working fine. This was a sequence describing the steps to create a data element and do mean that we use for our field. This practice can be repeated in the exact way to create four additional fields.
4. Create Your First Table 3
The next field we want to create is the surname field. So key in surname.
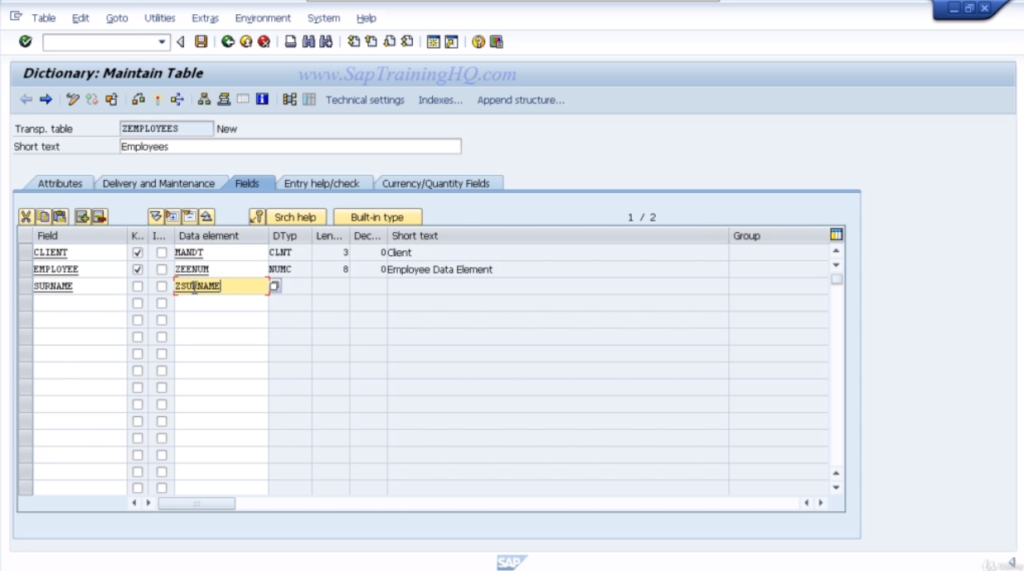
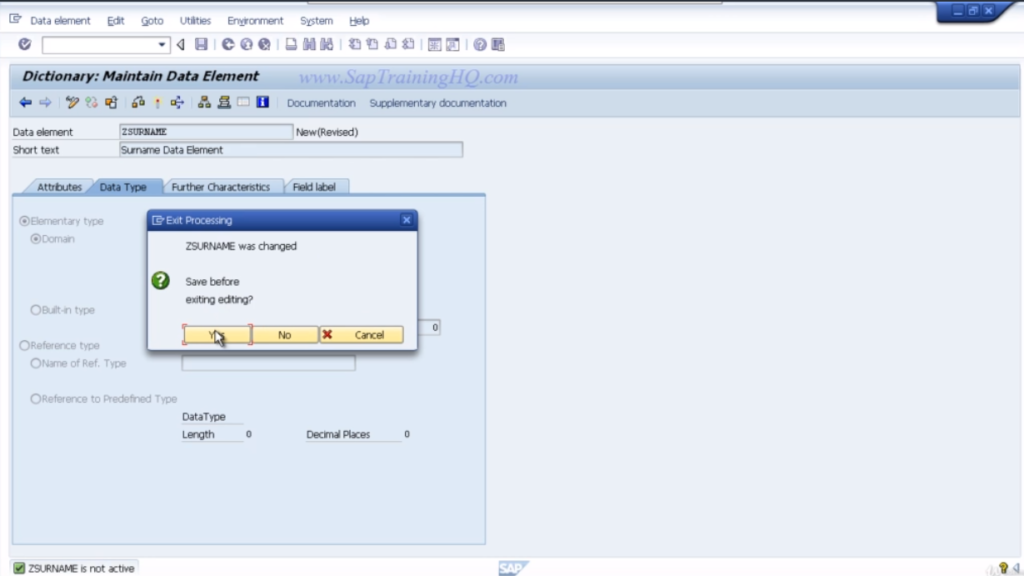
We don’t want to make this a key field. In the data element let’s create an element called Z surname. We’ll use forward navigation. Double-click on ZSURNAME.
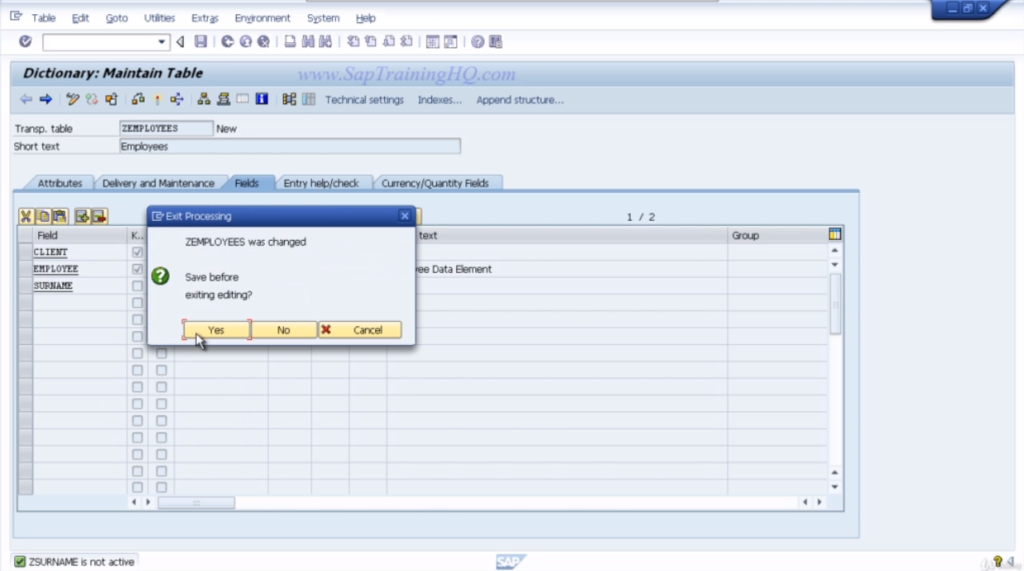
Choose yes to save the table
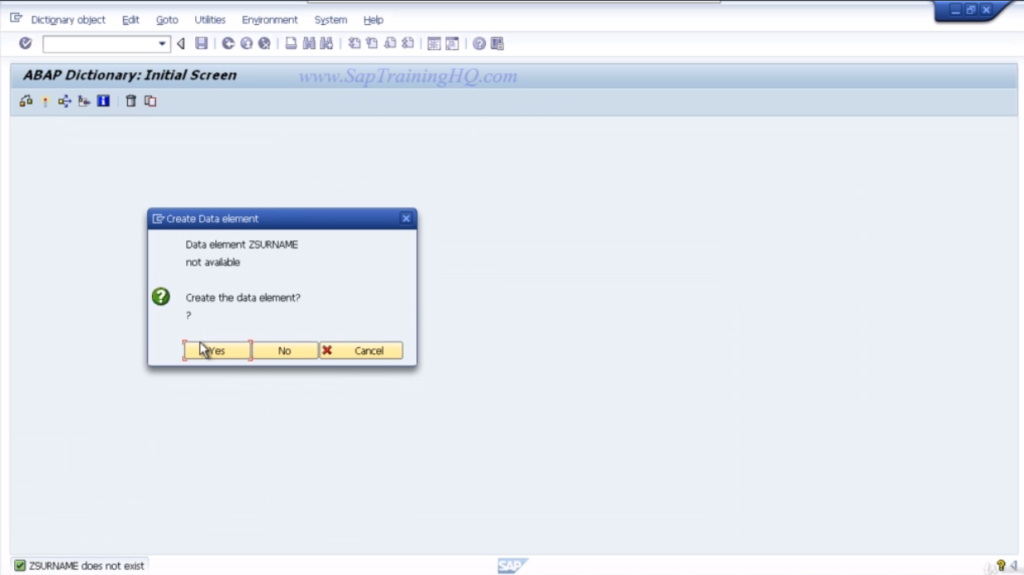
Choose yes to create ZSURNAME as a data element. Add Key in the short text- Surname data element.
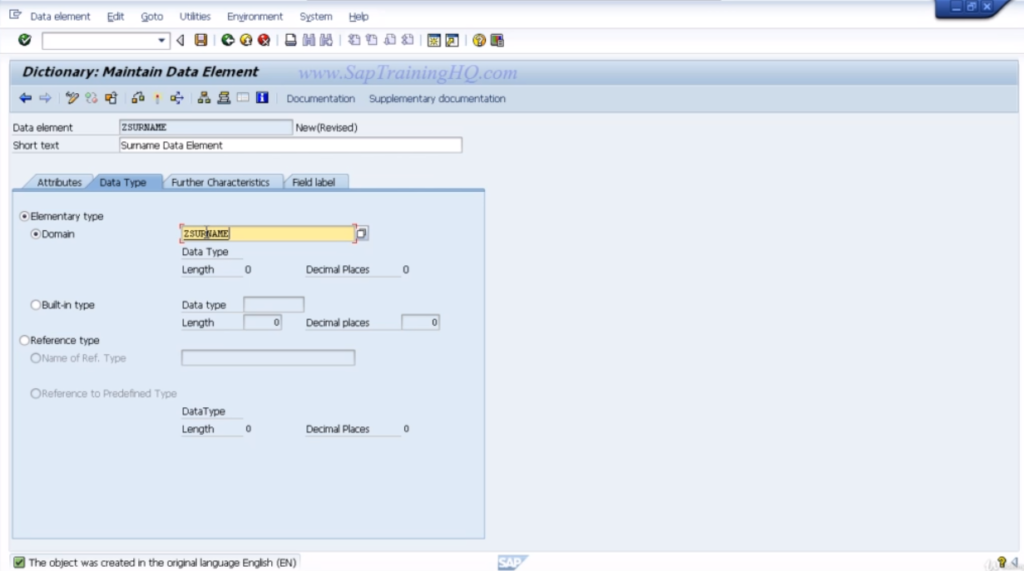
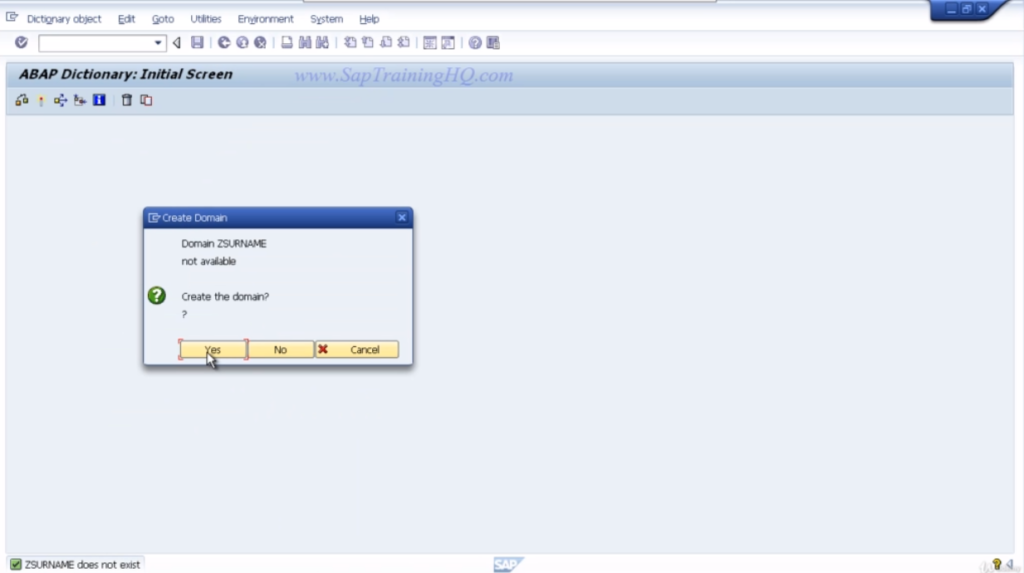
We will create a brand new domain and use forward navigation again. So double click on ZSURNAME.
Choose yes to save the data element and assign it to the local object.
Choose yes to create the domain, and then add the key in a short text.
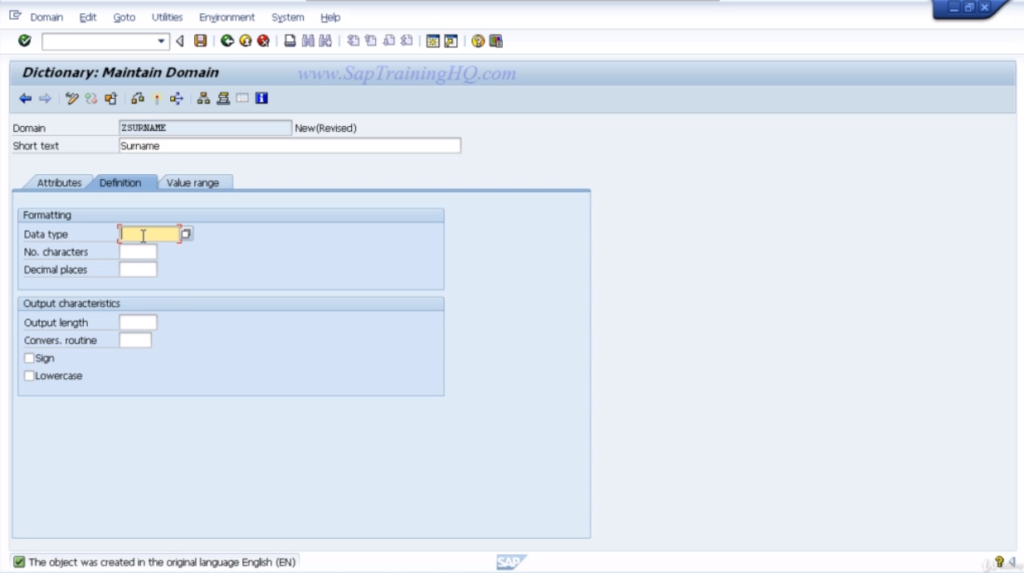
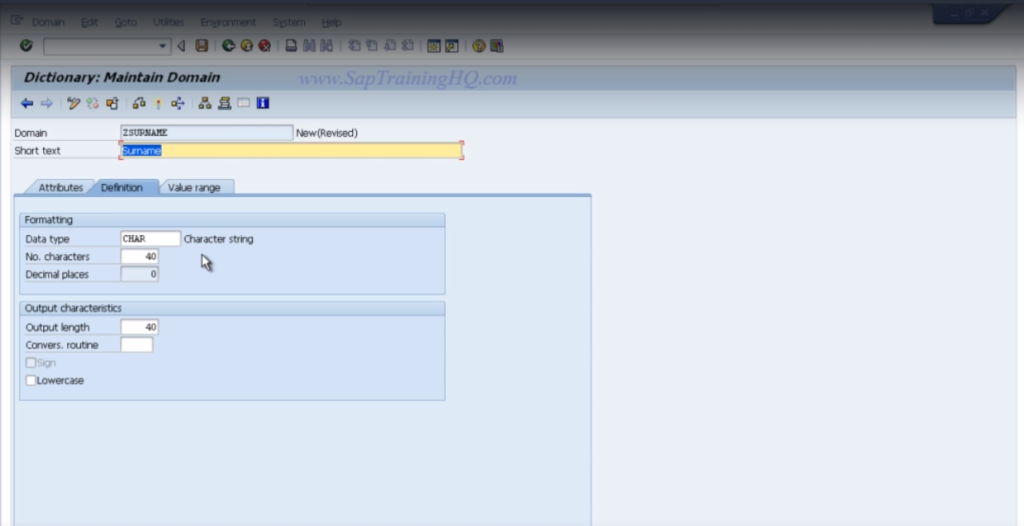
We’re going to choose a data type of character this time. So it’s the second one on this list. Use the drop down bringing up the data types in the ABAP dictionary drop-down box.
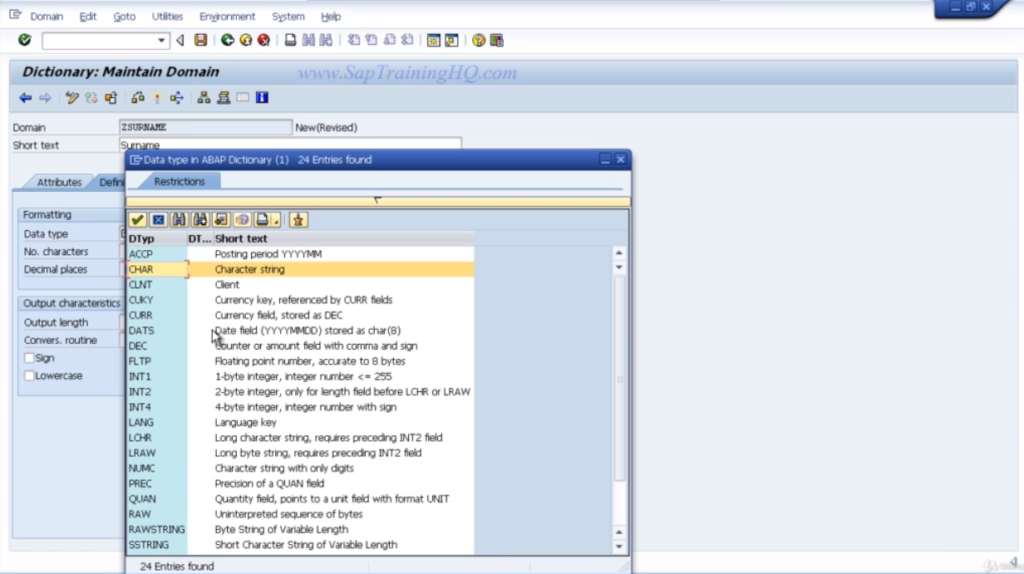
Choose CHAR, which is a character string. Set the number of characters to 40 and output length to 40 as well.
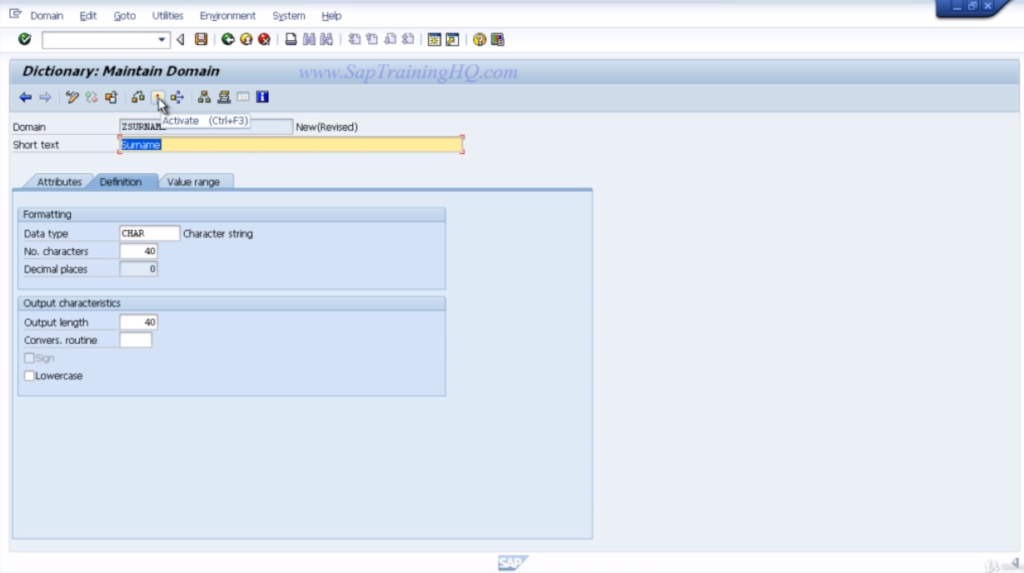
Hit the enter key, to make sure everything is okay. Choose, the activate button. When we click the activate button, it will save the object for us.
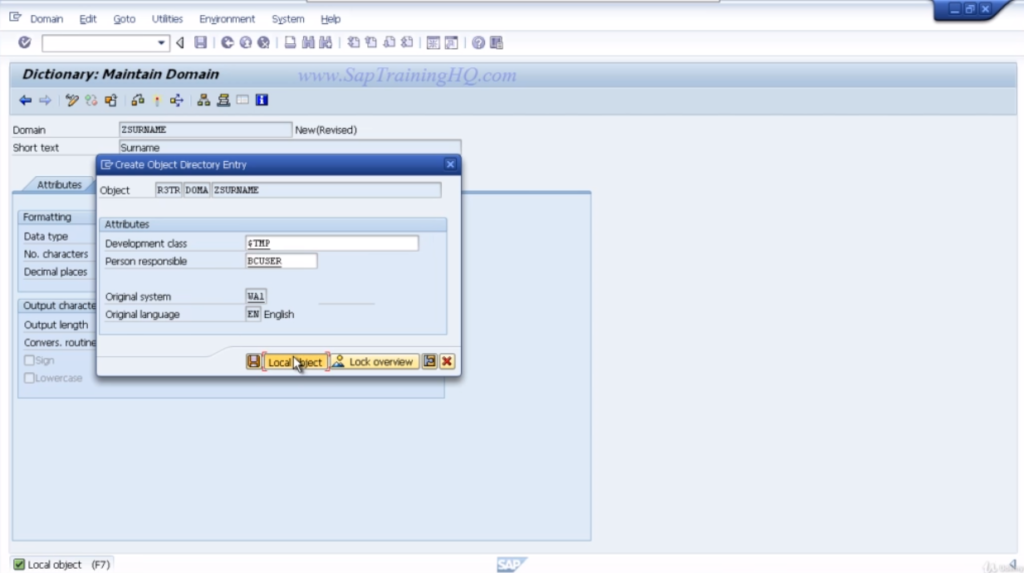
Again, choose the $TMP development class. Choose the object that we want to activate which is a surname domain. Check the status bar to make sure everything is activated correctly. Press the F3 key or hit the back button to go back to the data elements. Make sure that the main attributes have come through.
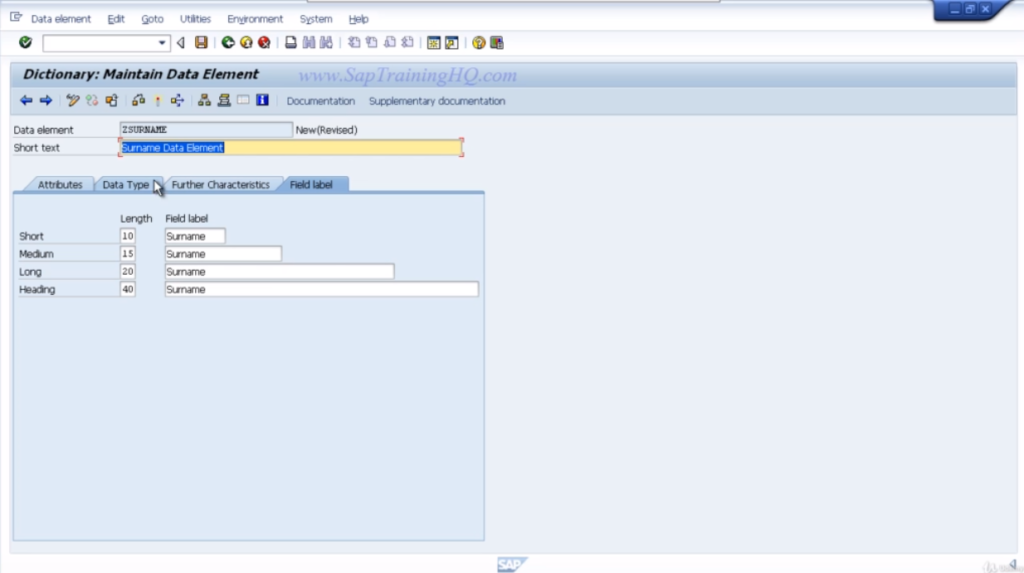
Go to the field labels tab. Enter surname into every single field label. Click enter. The length is automatically filled, then activate your data element.
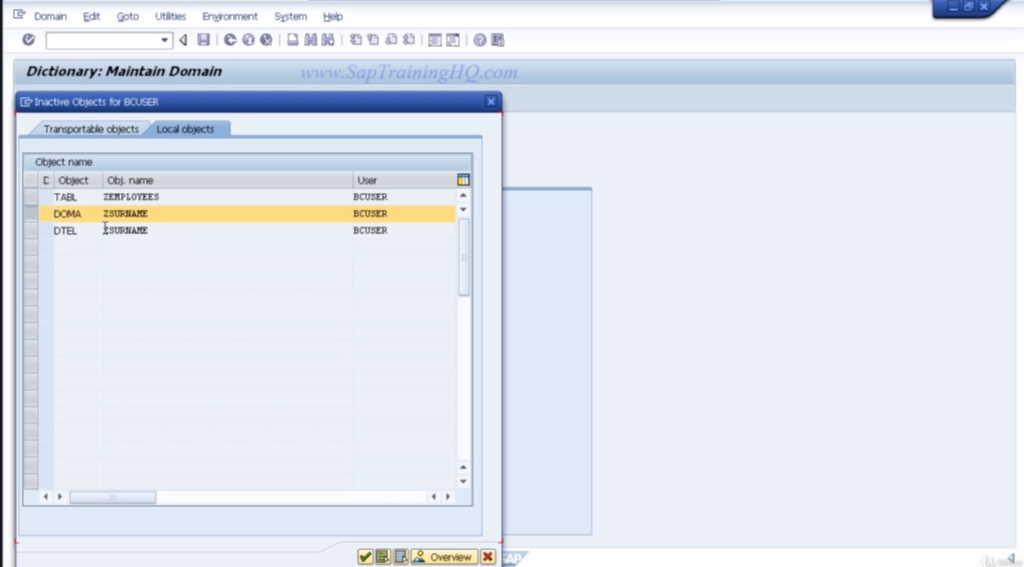
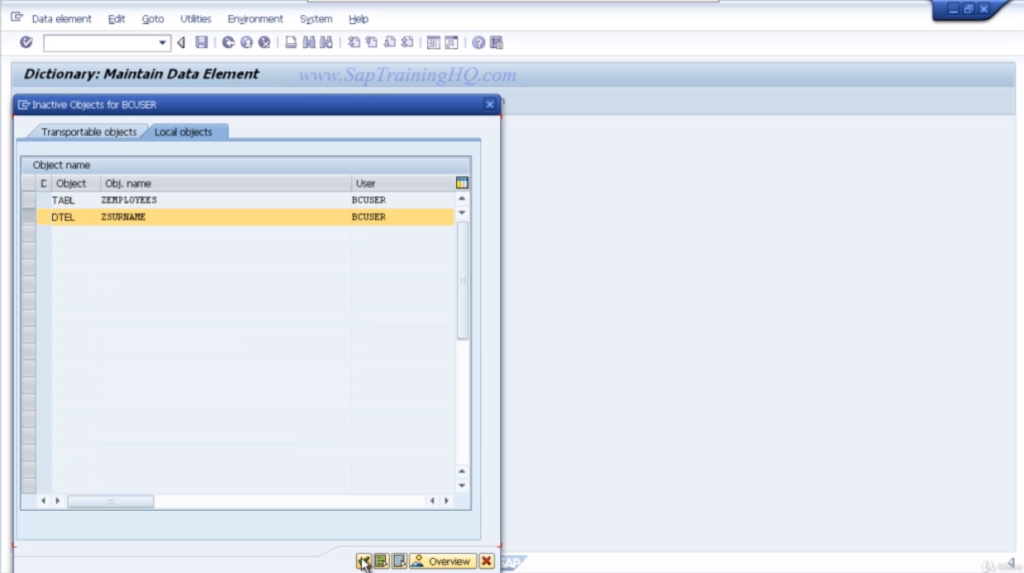
Your data element will be selected in the Inactive Objects Window again, so just click the Continue button. Then check the status bar along the bottom to make sure everything has activated correctly. We’ll press the F3 key to step back. We can see the surname data element, and domain attributes have been brought through into our table entry.
The next field we want to create is Forename. We’ll choose ZForename for our data element. Then we’ll click the data element, to create the object. Click yes to save the table. Choose Yes to create the data elements. Enter some short text for the Forename data element. In this case, choose the Forename data element for the domain.
Enter ZForename. Double click the domain, choose yes to save the data element. Assign it to the local object, development class. Choose yes to create the domain. Enter some short text for the domain.
It is similar to the surname field we created. We’re going to choose a character data type CHAR, the length of 40 and output length of 40. Now activate the object. Assign it to the local development class. Make sure your object is selected and the Inactive Objects Window and choose the Continue button to activate the domain.
When activated successfully, press the back button to go back to the data element. Ensure, the domain properties have come through which, they which have in this case.
Now go to the field label. Enter the word Forename into all four field labels. Press enter to automatically fill in the length. Reach field label. Click the activate button. Select your data element in the Inactive Object Window and click the Continue button.
Check the status bar. Everything is been activated successfully. So press the F3 key to step back, to see our table. Again we see the data element and domain properties have come through for this field, so we know everything is working correctly. The next field we’re going to enter is called Title.
We’ll create a data element called Z Title. Double click the data element using forward navigation to create it. Choose yes to save the table. Choose yes to create the data elements, enter some short text for the Title. In the domain, again creates a brand new domain. Call it Z Title. Double-click it using forward navigation to create it.
Choose yes to save the data elements. Assign it to the local object. Choose Yes to create the domain. Fill in the short text. Now enter the word Title. In the Data, type uses the character string again. But this time, just a length of 15 and also output length of 15. Activate the domain. Assign it to the local development class.
Ensure, your domain is highlighted in the Inactive Objects Window. Click the Continue button. Once everything is activated, press the F3 key to step back to the data elements. Click on the field label and enter the word Title to each field label. Press Enter to automatically fill the length of each field label field and activate your data element.
Once again, select the object in the Inactive Objects window and click the Continue button. Almost everything is activated successfully. Press the F3 key to step back to view your table.
5. Create Your First Table 4
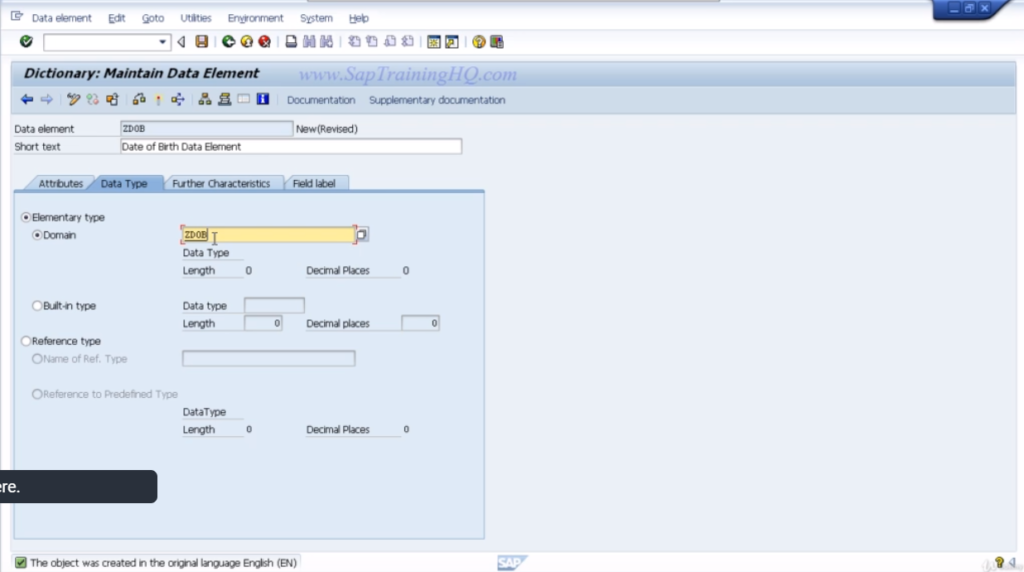
The last final field that we are going to create is the date of birth. So key in DOB for the field. Create data element ZDOB.
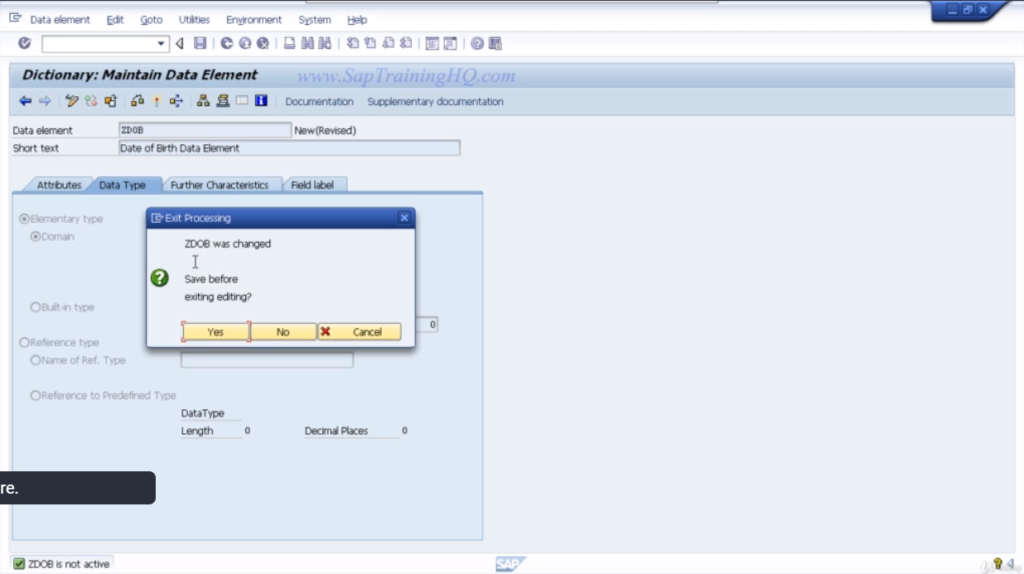
Use forward navigation to create it. Save the table and choose yes to create data elements. Enter date of birth data element for the short text. For the domain once again enter ZDOB. Use forward navigation to create the domain.
Choose Yes to save the data element.
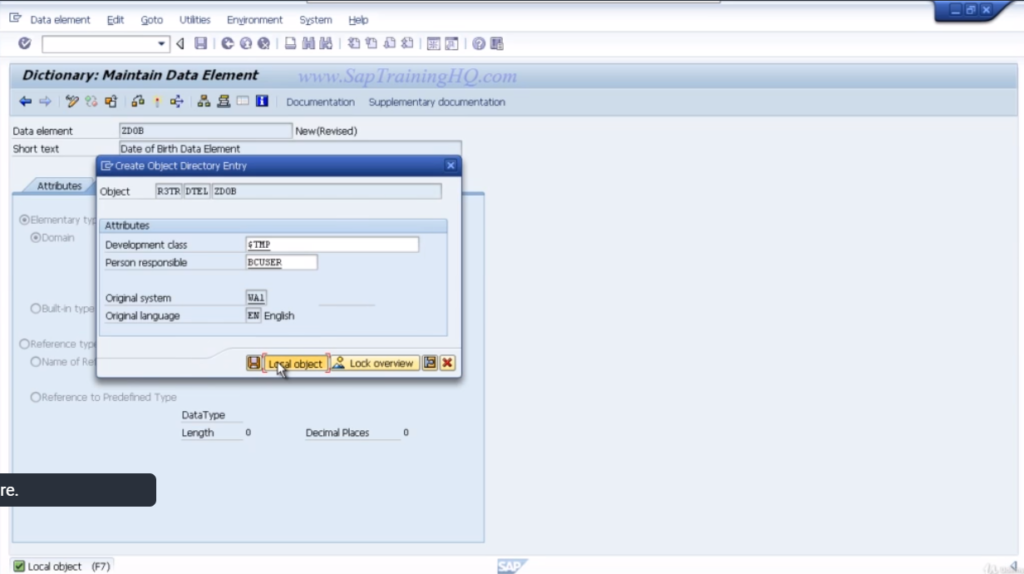
Assign it to the local object.
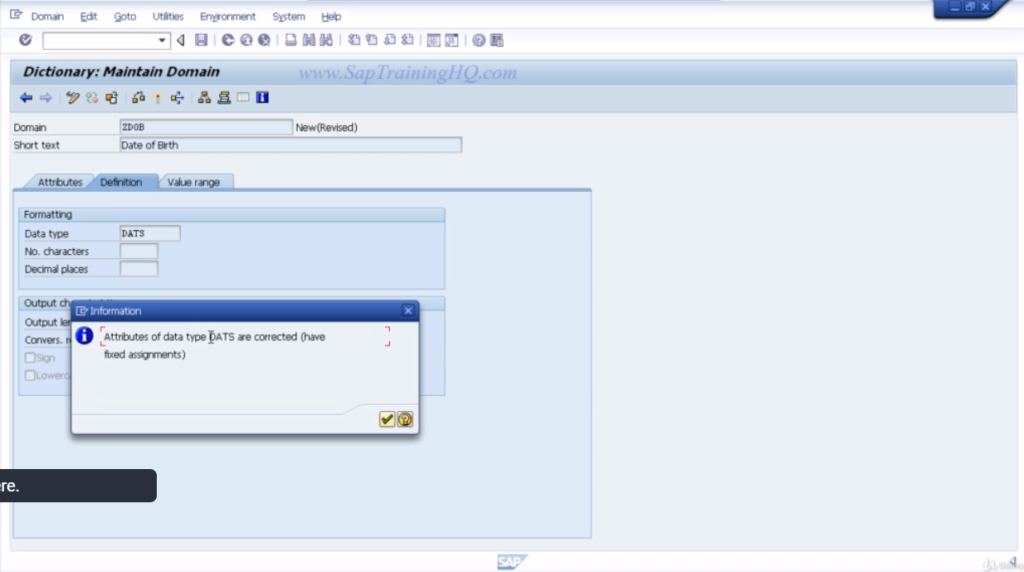
Choose Yes to create the domain. Enter some short text- Date of birth. Now for the data type, date of birth is a date field. So we want to choose the appropriate day field from the drop-down box. So press the F4 key to bring up the drop-down box and choose the entry that says DATS.
Now press the Enter key, and you can see an information box has popped up. Just to tell us the attributes of the DATS field have been assigned to this domain. So just click the Continue box, and it’s filled in the number of characters for us, and the output length.

Now the output length is different to the number of characters because it will actually insert the back slash to separate the days, month and years of this field. So activate the object. Assign it to the local object development class.
Ensure your domain is selected, in the inactive objects window and choose Continue, and check the status bar to ensure everything is activated and saved successfully. Press the F3 key to step back.
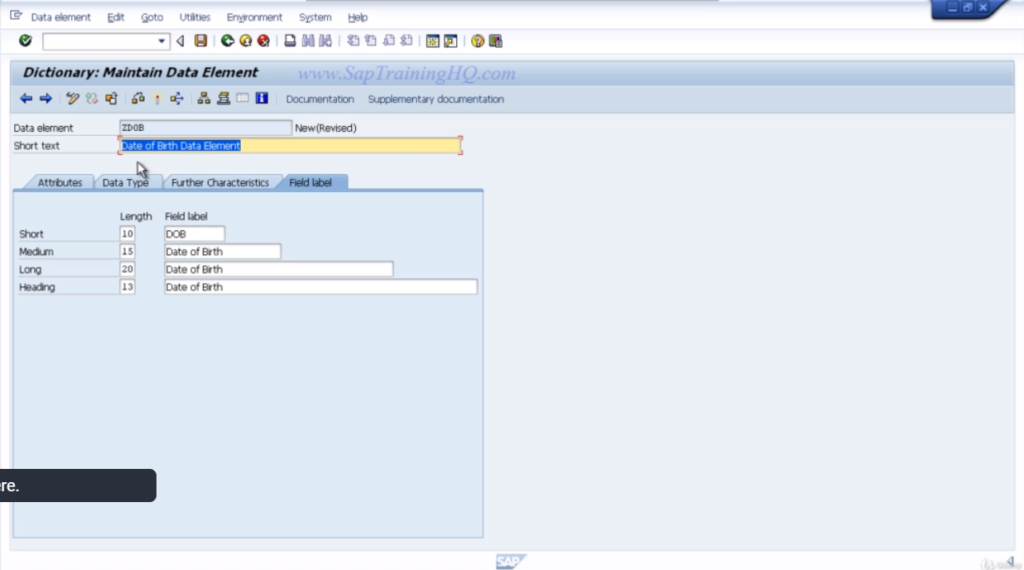

On your data elements field, go to the Field label. Here we will enter the Date of Birth in every field. But, the whole text, Date of Birth, does not fit in this short description, so key in the DOB. Press Enter to automatically fill in the field label length and activate your data event.
Once the object has been activated and saved successfully, press the F3 key to step back, and we can see all our fields have been entered into our table. All the short text and individual data elements and domain properties have come through onto our screen.
So that indicates everything is working just fine for us. Now the next thing we want to do is just click the Save button. So we can just save our progress up to now.
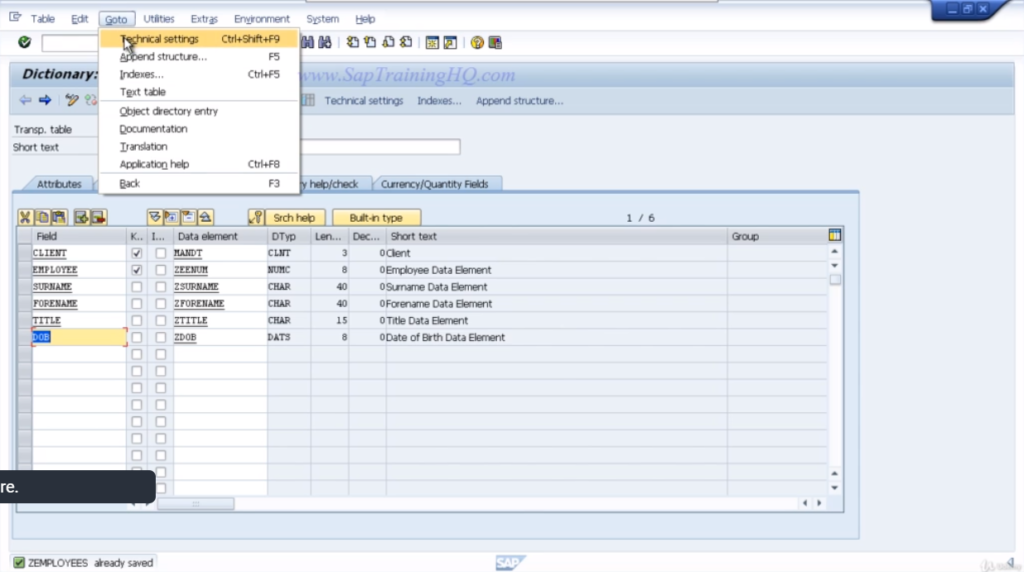
Then we’re going to move on to maintain the technical settings for our table. Now, SAP needs to know a little bit more information about the table that we are creating before it can create the back-end database tables, itself.
So you can either, now, click on the Technical Setting button, on the toolbar or go to the Goto menu, and choose the Technical Settings option which is Control+Shift+F9.
We now need to tell our system what development class we want to use. So if you click the drop-down button, you’ll see that we have five options to choose from. If you just read the descriptions, you’ll get an idea of what this is all about.
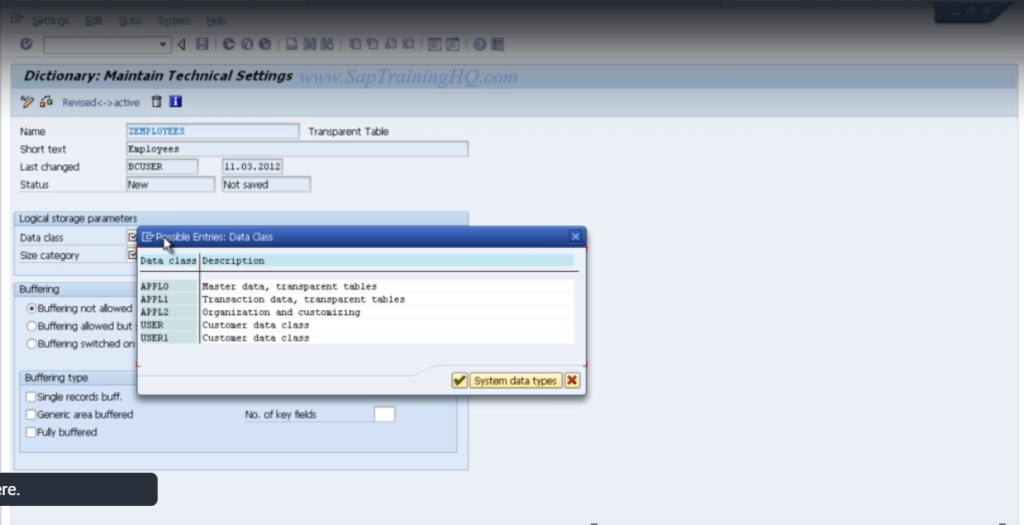
We want to choose the first entry, which is A-P-P-L-zero which identifies this table as holding master data in a transparent table. Double-click that entry and then for the Size category field, click the drop-down again.
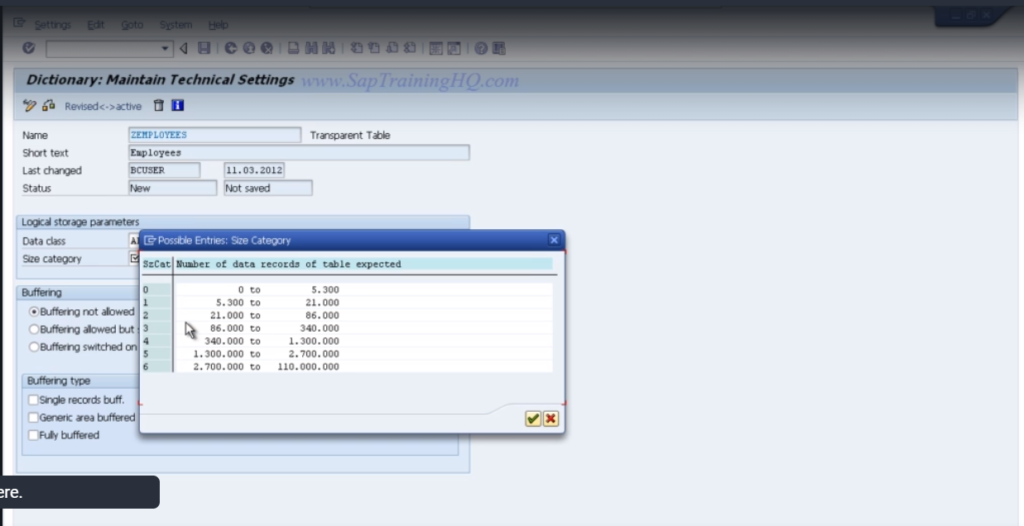
And here we are just estimating to the system itself how many records we are going to be holding in this table and it will use these values to make an educated guess of how it should actually create the tables in the underlying database. We’re not going to be holding a lot of data in our table, so just choose the first option which is size category zero.
Once selected, now we’ll move down to the Buffering options. We want to ensure that buffering not allowed is selected.
What this means is basically, do not load the table contents into memory for reading, and this prevents the table from being read in advance of us selecting the records in our programs. So you may be thinking it would be more advantageous to hold the data in memory for speed efficiency and you’d be quite correct, but now in that example, we don’t actually need that.
If speed was an issue for the development that you were working on you would most definitely want to be using Buffering switched on, which would ensure the data is read into memory. So if you have large tables that are being read very often, but only being updated infrequently, choose this option.
That’s all we need to fill out on the screen. So you can click the Save button, and then press the back key. Now if all goes well we can activate our table and move on to entering records. So click the little match stick icon to activate your table. Check the status bar at the bottom to ensure everything has worked successfully. In this case, it has.
6. Enter Data into Your Table
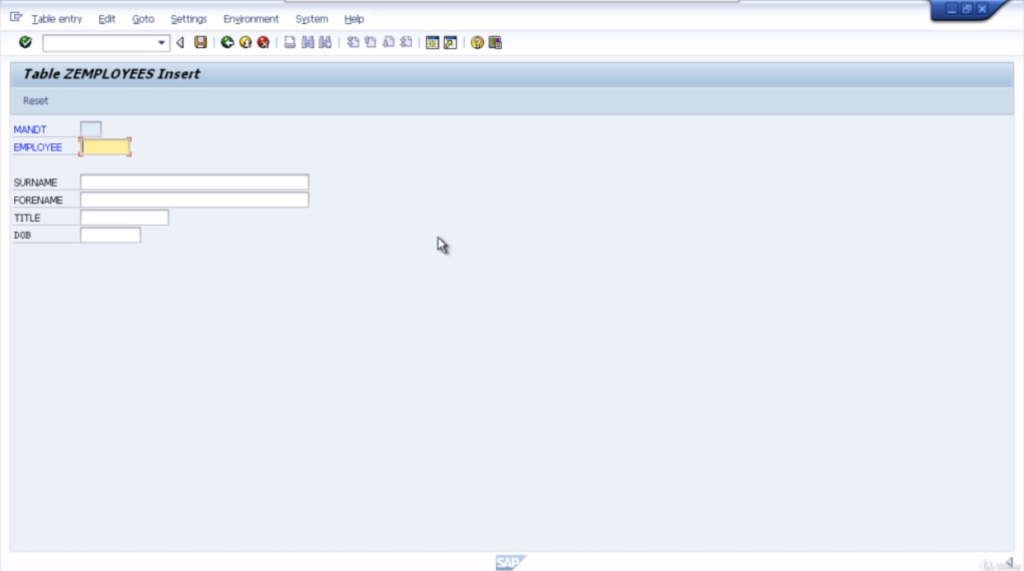
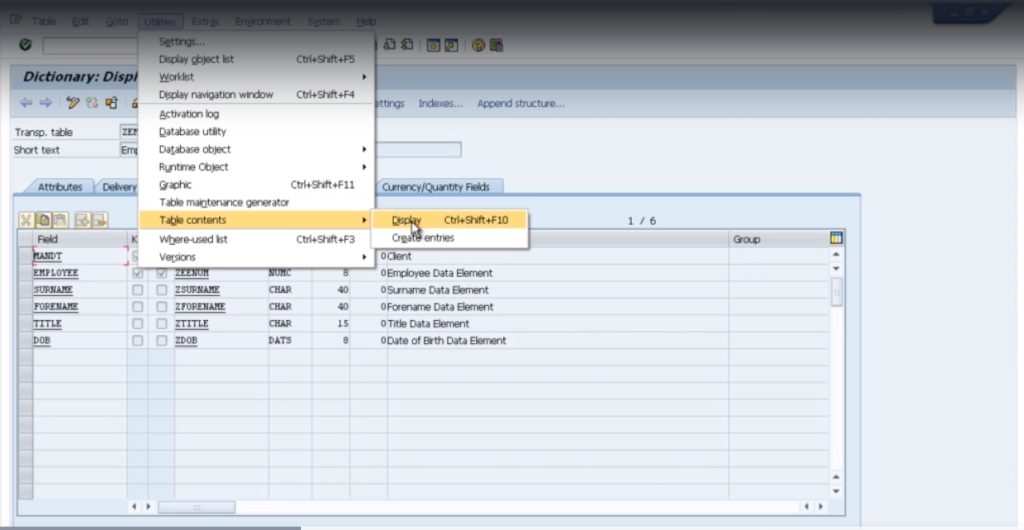
Now we have created our table it’s time to enter some data. So to be able to enter data into our table, go to the utility menu, go down to the table contents option and select create entries. This will now take you to a data entry screen that has automatically been generated for us.
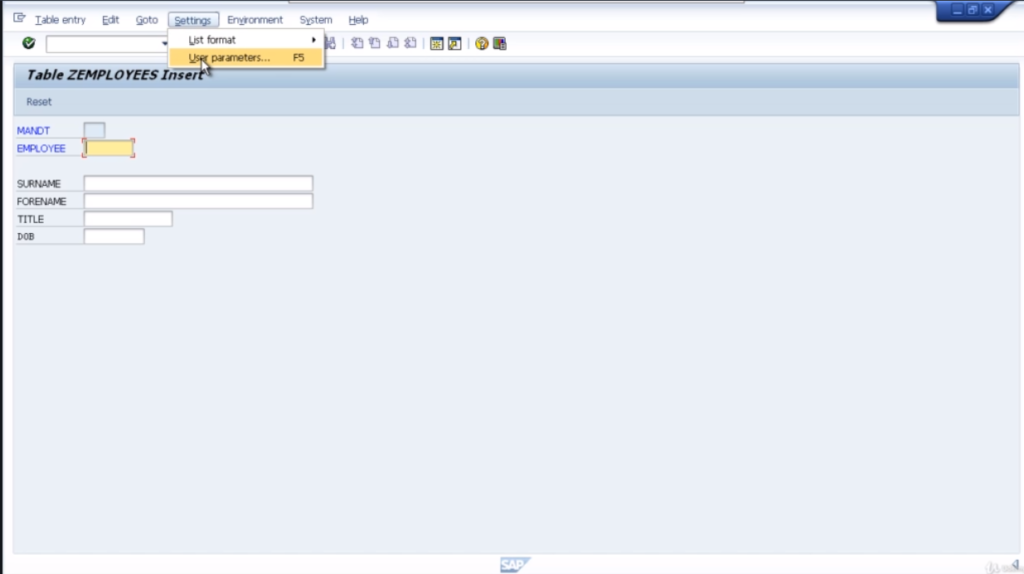
Now before we enter some data, you’ll notice the field names of the actual technical names of the field that we declared. For each field, we entered some field labels. So change the look of the screen so the field labels appear instead of the technical names. Go to the settings menu and select user parameters.
Now, this option allows you to tailor how tables look specifically for your user ID. Every user can do this. We want you to show us the field labels.
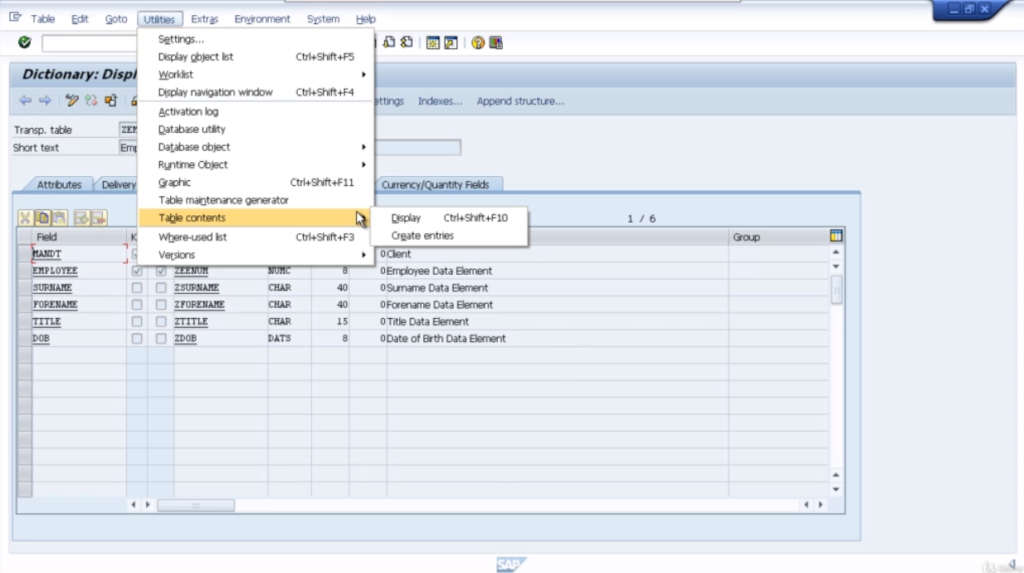
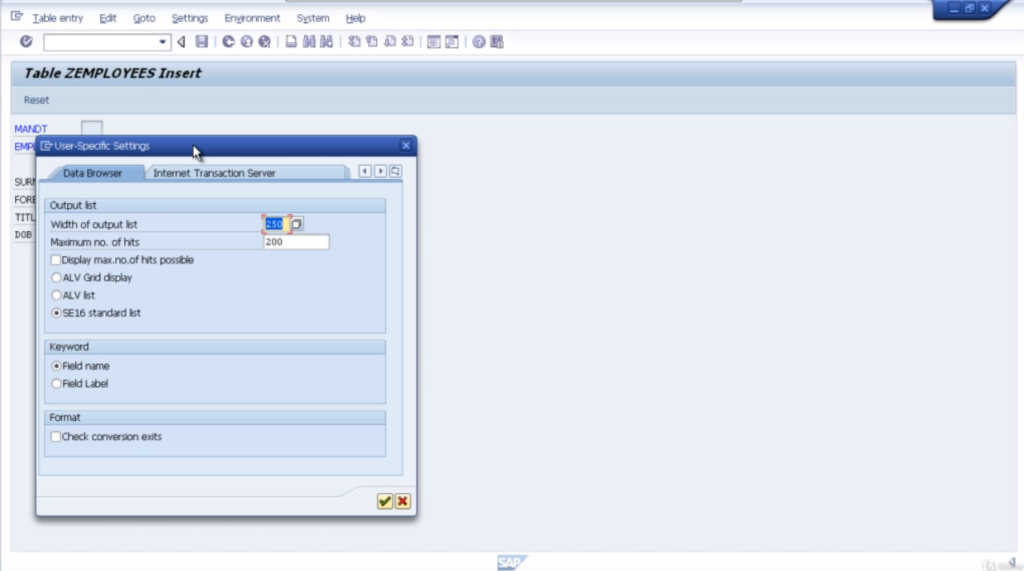
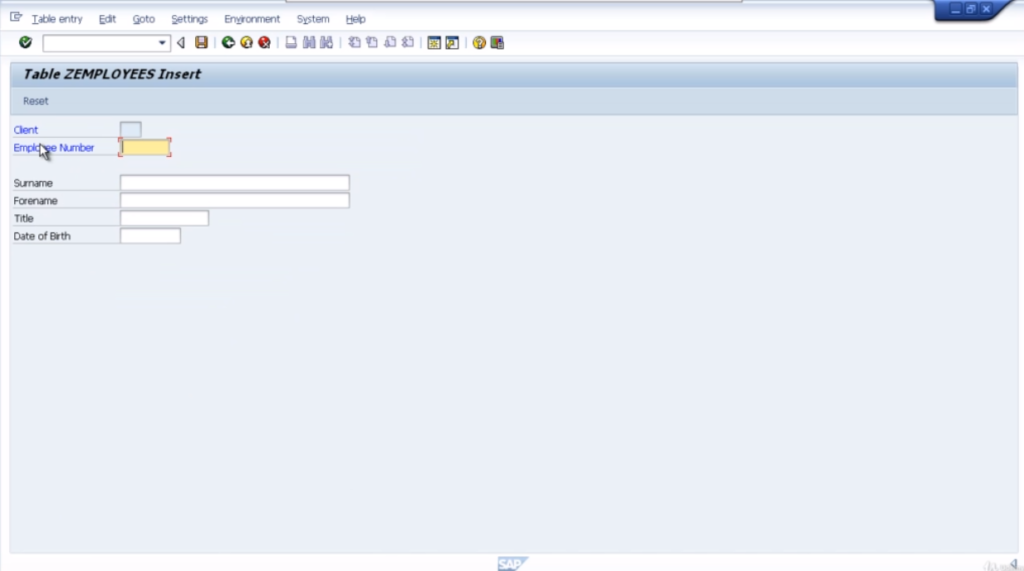
So click field labels radio button and click the continue key. Now you can see the field labels have come back just as we define them and create in the table. So now let’s enter some records. So the employee number is an eight-character field, and we defined it as NUMC, so it can only be numeric characters.
So the five fields have been entered, press the enter key. Just watch what happens to the fields. Notice the surname, forename, and title field have been changed to upper case. The system automatically validated every field to ensure we entered the correct values. So just click the save button. Check the status bar at the bottom and you can see the record has successfully been saved.
So what we’re going to do next is just click the reset button and it’ll reset these fields back to their default values. Now we’ll enter our second record. Press the enter key. The system automatically validates all the fields and does any conversion that it needs to do.
In this case, the date of the birth field put the correct formatting for us. Click the save button. Let’s enter another record. Click the save button.
Now put a slash while entering date of birth. See if it gives us an error and it does. You see it tells us to enter the correct date format. Take that out and press enter. It accepted the data. Click the save key and we have just entered 5 records.
7. View The Data in Our Table
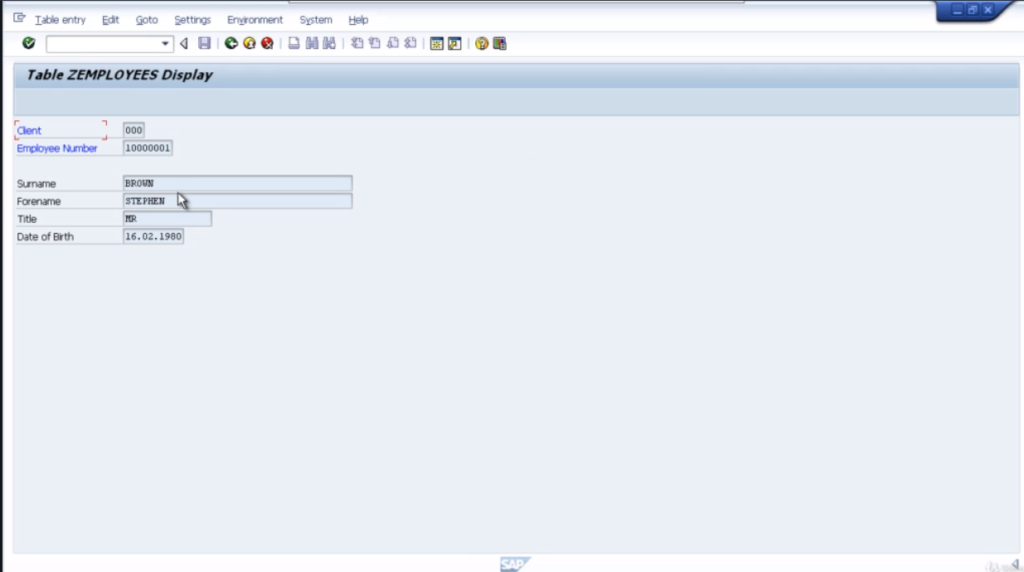
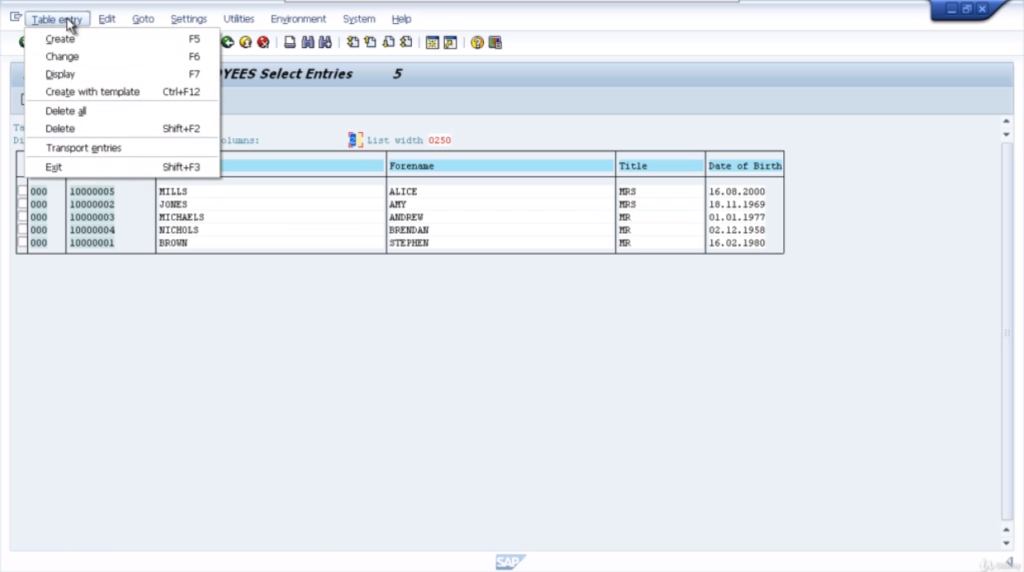
So, now we have entered data into our table, we’ll do the last few steps in this module and view the data. So, let’s press the back key. We’re back to the database table creation screen. To view data in the table, we’ll go back to the utility menu, to the Table contents, and choose Display.
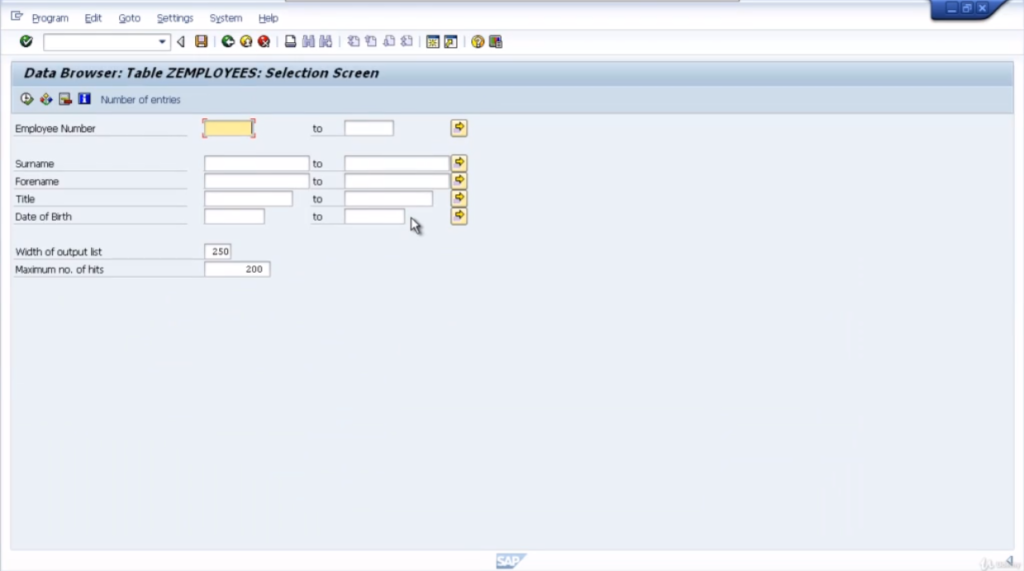
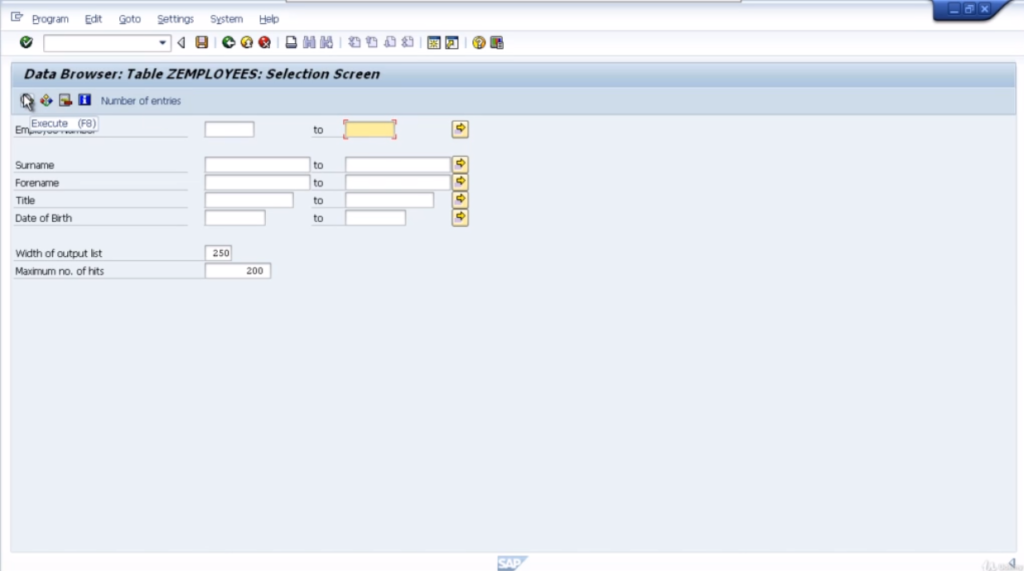
Now whenever we view a table through SE11 or SE16, SAP automatically generates a selection screen for us. So if we don’t want to view all the records initially, we can enter some filter values so that the system will only show us the records that we want to focus on. Now in our case, we only entered five records. So there’s no need to do that. But what you can do, if we did.
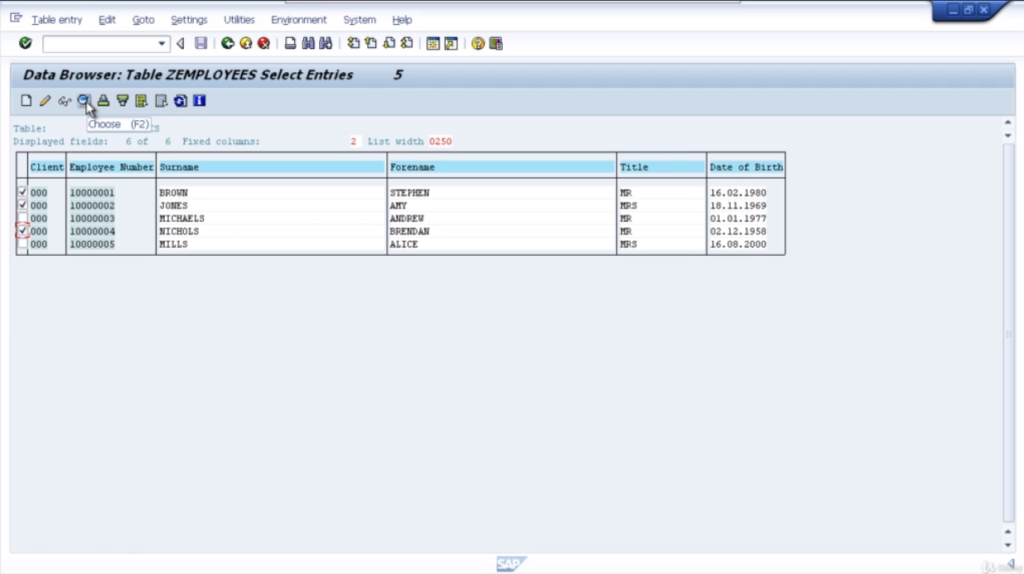
Let’s say we want to focus on one specific employee number, you can key it directly into here, or key arrange the start and the end. All we want to do is view all the records. So just click the Execute button or press F8. There you can see all five records that we entered.
If we had many more fields on the table, the screen would scroll to the right hand side which means you wouldn’t be able to see all the fields on the screen at the same time. But one thing you can do is either double click on the field and the screen will change to just focus on that one record.
Alternatively, if you click the little check marks here we’ll select three records. You can then press the Choose button, which is F2, and the system will then allow you to cycle through the three records that you chose. So you see now, we’ve got this little Next Entry button that’s appeared. So on clicking, we can go in to the second record and we can see a back and a forward.
We click it again, hopefully it will show the fourth record we entered. Press back and back again to go to the start. To go back to the default view, the grid where it shows all our records just press the back key and we’re back to where we started. Have a play around with the screen because you’ll notice that, all the buttons that appear on the toolbar that will allow you to filter and sort the records however you wish.
So as an example, if we wanted to sort this data in let’s say alphabetical on forename. Just click on the Forename field and then click the Sort ascending button. Now you can see it is reordered records for us.
There are lots of things you can do with this table view, and you’ll find that over time, it becomes a real useful tool, when you want to check on the data within an SAP system, without going to the actual transaction screens themselves. So that’s it for this module.
You’ve created a table from scratch, you’ve added fields. With the fields you’ve added data elements and data domains. You’ve defined specific field labels for each field. You’ve ensured you’ve generated a key for your table and configured the necessary technical elements to ensure it can be saved in the back-end database. After that, you entered some data and now you’re viewing the results.