Getting started on Udemy with SAP ABAP Programming for Beginners by Peter Moxon is just a matter of a few steps. First of all create your Udemy account by simply signing up.
Log in to your account and purchase the courses you wish to study. Once you have purchased, you have lifetime access to the on-demand videos. You can get a brief idea about what this course contains from here.
The course- SAP ABAP Programming for Beginners is a 13 hours of video lecture lesson. There are a total of 13 modules and today we shall describe module 3.
In this module, Peter Moxon has laid emphasis on Introducing the ABAP Editor of the SAP ABAP programming. The entire module is of 55 minutes. The module is split into 6 parts. The videos are short and to the point. Each part is described in the upcoming sections.
1. Create your first program- Part 1
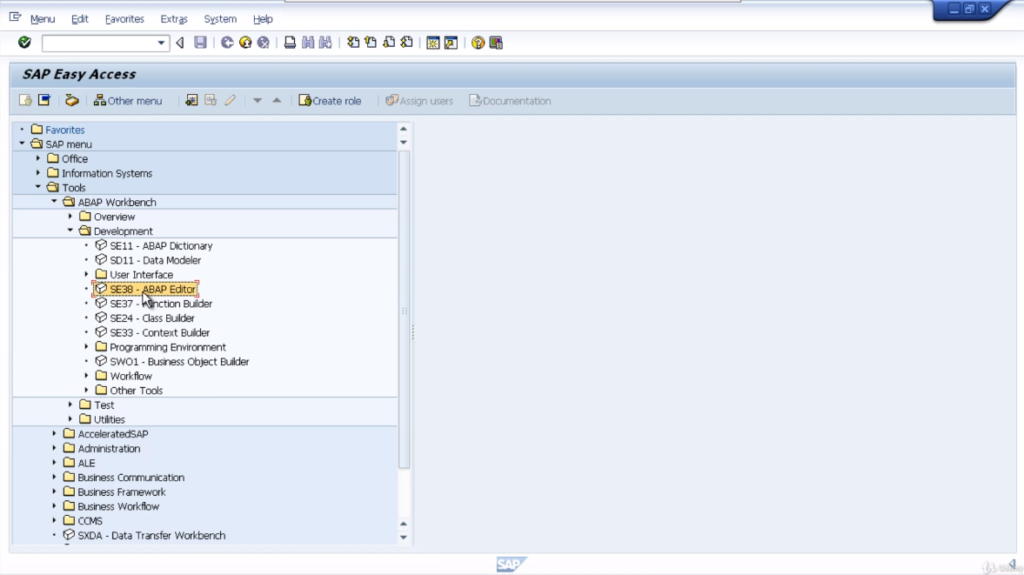
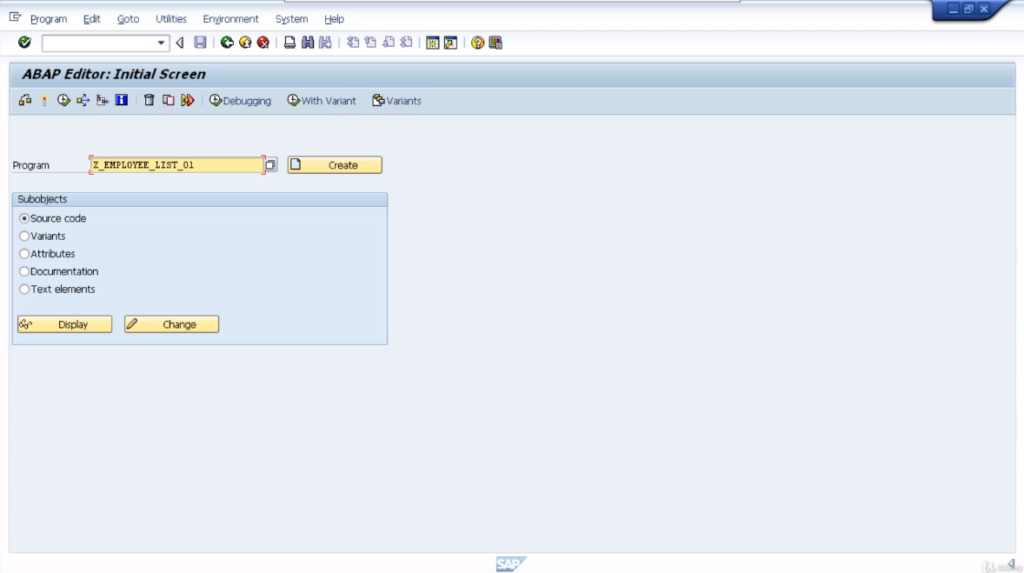
To create our first program from your SAP GUI you can either key in transaction SE38 or you can navigate to the ABAP Editor through the SAP menu tree. Go to tools, ABAP Workbench Developments, and there you’ll see SE38 ABAP Editor. Double-click and execute it.
Now, just before we create our program, just something to keep in mind. Try and keep your programs as simple as possible do not make your programs any more complicated than they need to be.
Add lots of comments into your code, so that anybody else, and yourself, that comes to look at the program, later on, can easily understand what the program is doing, and the flow of the logic as it’s executed.
It makes everybody’s life just that much easier. So let’s get going. We’ll enter our first program name.
Now, remember, we have to use our customer naming conventions. In this case, that means we’re going to start the program with the letter Z. After a Z, you can name it whatever you want.
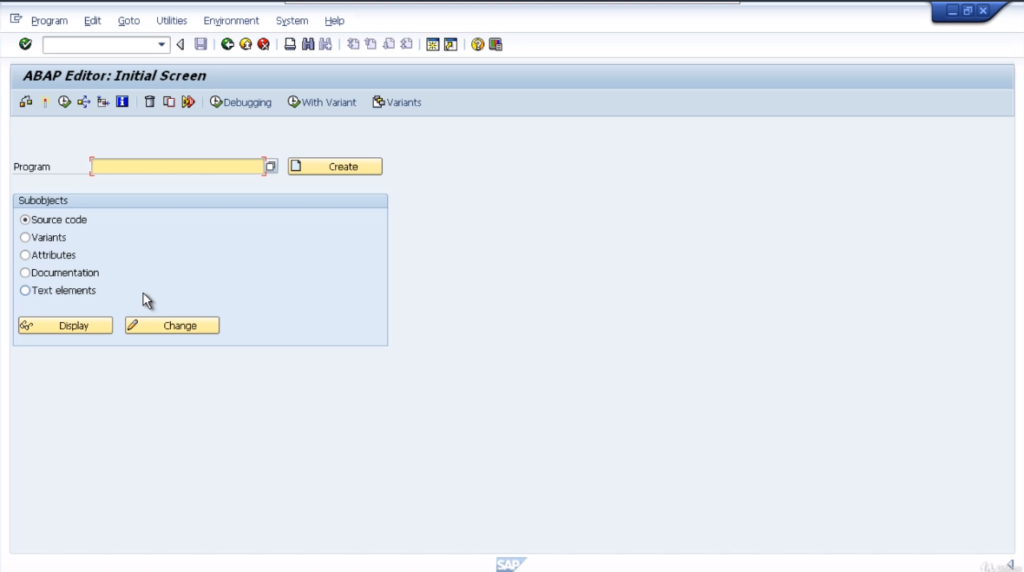
We are going to stick with the employee theme that we used when we created our table. Enter Z_employee_list_01. Underscore is used to separate the words within the program.
Just to make things a little easier on the eyes. Ensure that the source code radio button is selected then click the Create button. We’re then presented with the Program Attributes window. The first thing you need to key in is the title of your program.
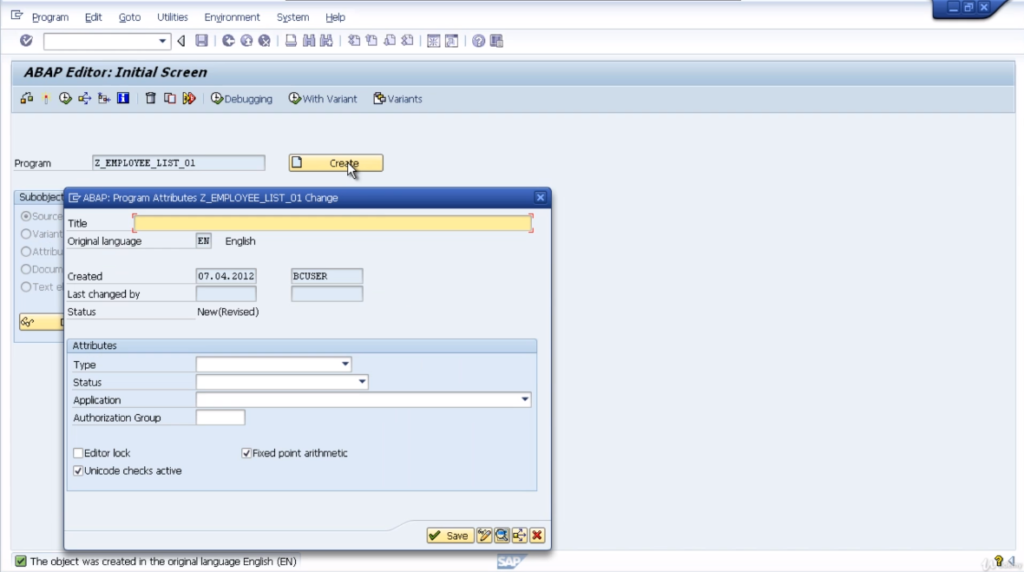
Enter some text that describes what the program does. Title: My Employee List Report. Ensure that the original language is set to EN, which it is by default.
The language of the program has an effect on what text entries are displayed within certain programs. You will see that the original language field has automatically been filled in with EN, for English.
It’s important to note that any text entries you create within your program are language-specific and can be maintained for each country by using a translation tool.

Now come down to the attributes and you’ll see the type click the drop-down button and select executable program. It means that our program can be executed without the need for us to create a transaction code.
It also means the program can be run as a background job. We’ll set the status of our program to test program and we’ll set the application to basis. Now, these two fields are just used to help manage the program within the sub-system itself.
It describes what the programs will be used for, and also the program development status. Leave the Authorization Group, Logical database, and Selection screen empty.
Make sure the Editor lock field is left clear. If you do turn on Editor lock it will prevent the program from being edited. Leave Unicode checked active and it is suggested to always leave it active for every program you create.
This ensures your program can cater to multibyte coding. Ensure you leave the fixed point arithmetic checked because without this any packed decimal fields that we use within our program will all be rounded to whole numbers.
We will leave the start using variants check box blank. We will touch on variants later on, but for now, just go ahead and click the Save button.
You should be familiar with this object directory entry box and because we’re not going to be transporting our programs, just click the local object button to assign our program to our temporary development class.
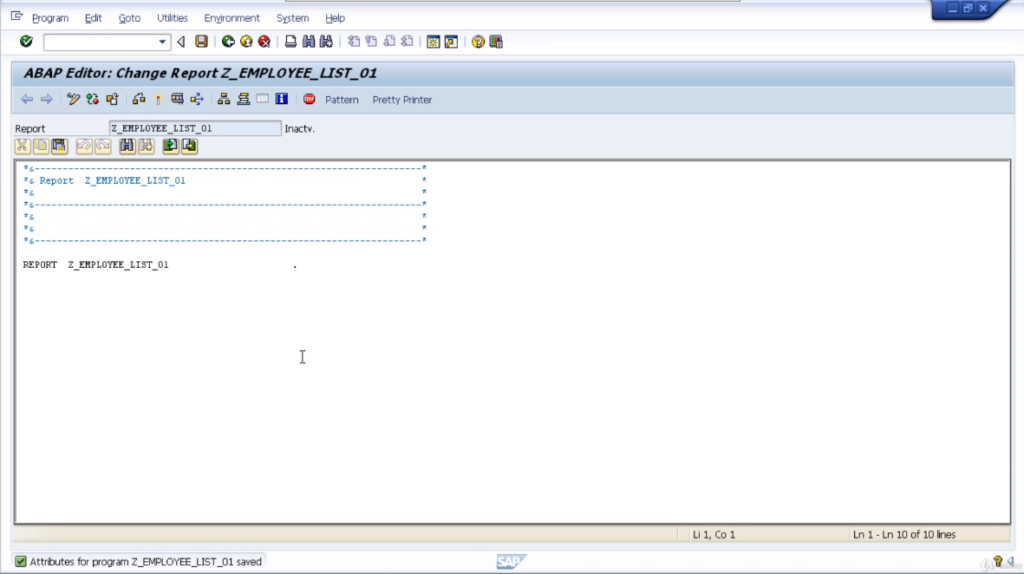
And now you’ve made it you finally got to the coding screen.
2. Create your first program- Part 2
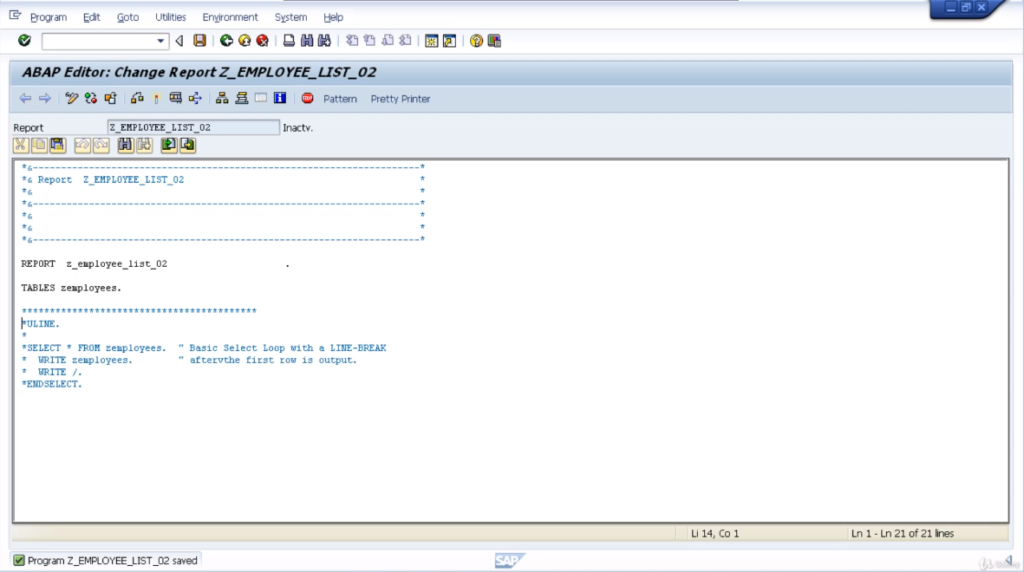
Now let’s go down and focus on the coding area. You can see when we created our program, the first set of lines are comment lines. There are seven comment lines that ideally can be used to start commenting on the program.
Now comments in ABAP can appear in two ways. First of all, an asterisk at the start of a line. If you put an asterisk there, it turns everything to the right of the asterisk into a comment.
It’s important that the asterisk has to be in the first column. If you make it in the second column or beyond, it’s no longer a comment. The other way of writing a comment is within a line itself.
So we can go to the end of this report line, insert a few spaces and when we do the double quotes, everything to the right turns into a comment. This becomes really useful to comment on programs line by line, or at the very least, a few lines of comments for each section of your program.
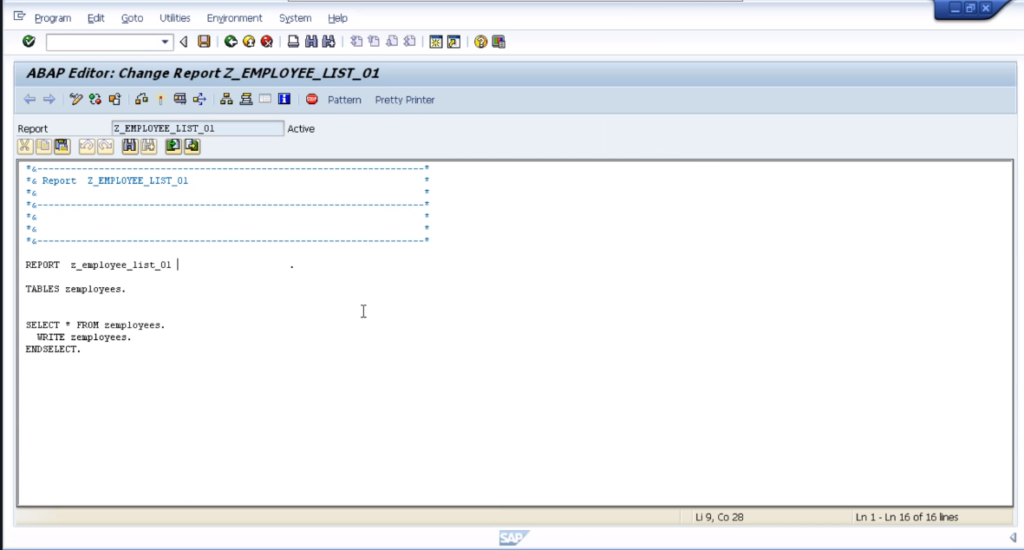
The next line of code that we see starts with the word Report. This is called a statement. A reported statement is always the first statement in any executable program we create.
The statement itself is then followed by the program name that we created. The statement line is terminated with a full stop. The full stop is way beyond the end of the actual program name.
Doesn’t really matter where it appears as long it appears after the program name. It could appear halfway or appear right at the end. It is important to note is that every statement in ABAP must finish with the full stop or period.
This allows your statement to take up as many lines in the editor as you wish. As long as we’ve got the period at the end of the statement everything will be fine. Here’s the period that says when the statement is finished.
Now just before we get on to writing our first piece of code understand the help options. If you place your cursor on any ABAP statement you can then press this help on the button which we discussed earlier.
It will then bring up a window automatically filling in the keyword and then press the continue button. The system will display help on that specific statement and give you an explanation of what it is used for on the syntax.
So click the continue button and up pops the ABAP help and you can see it’s navigated direct to the port statements and tells all the different additions that you can add. This goes for every single other statement within an SAP system.
Now as with SAP there’s always more than one way of doing things. So what you can do as well is just click on the statements, and then press the F1 key. You’ll notice it misses out that first step, a middle screen that we were shown.
Now one useful tip is on a new transaction. So we’ll open up a new session and this transaction is called ABAPDOCU. A-B-A-P-D-O-C-U is SAP’s ABAP documentation with examples.
So if you navigate the tree view on the left-hand side, and double click on any of the entries, this transaction will give you an example code that you can use to base your own code on.
You can either copy and paste it into your own ABAP editor or play around with it directly here. So we can execute this code by clicking on the execute button and the example program will run.
This is a really good transaction to help you with learning ABAP because it gives endless examples of how to use the different statements. So let’s go back to our program there.
Enter our first line of code. So first put the report statement back to how it should look. On a new line, key in the written statement, followed by “Hello SAP world”.
If you’ve done programming before, you must be familiar with that statement. It will write whatever we put in quotes to the output window. Here we’re asking it to output the text “Hello SAP world”.
The right statement looks very simple and it is. But there are lots of different additions you can add to it to help format the output. We’ll come to those later. But right now see this report run and find the spectacular output.
So what we’ll do is, first of all, save our program. Once it’s saved we can then check the syntax of our program. Everything is correct and we need to activate the program.
Once it’s activated you can see the status has changed. We’re ready to test it. So just press the test button. Now we can see our report title, and then the text as output.
You’ve just written your first program.
3. Write a Statement
Expand the program a little bit and add a few more ABAP statements. Step back to the coding screen. We will access some of the data records that we created when we built our first table in the ABAP dictionary.

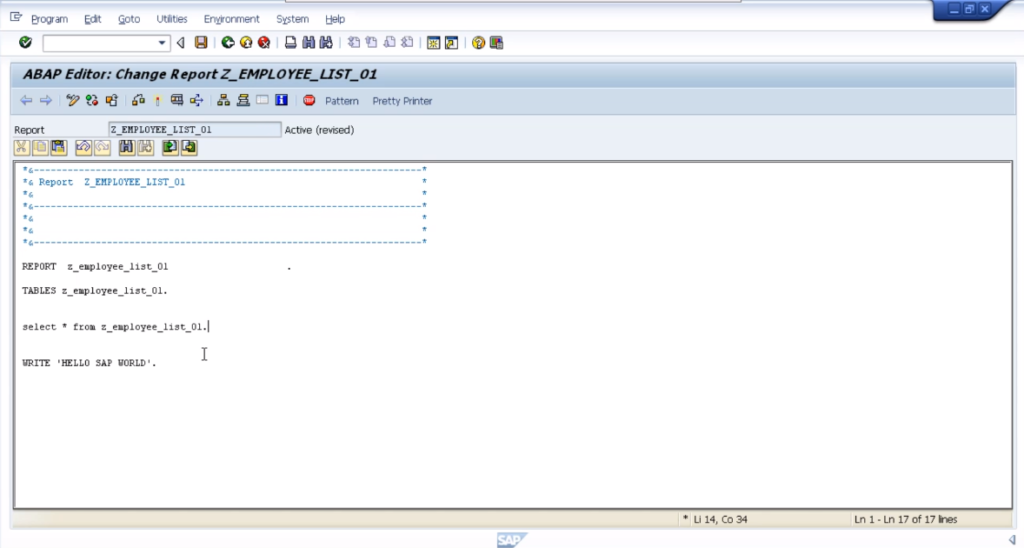
The first thing we have to do is include the table statement in our program. We’ll place the table statement just below the report states. Create a few blank lines. Add Key in tables.

Now following tables, we key in the actual table name that we created. For z_employee_list_01.
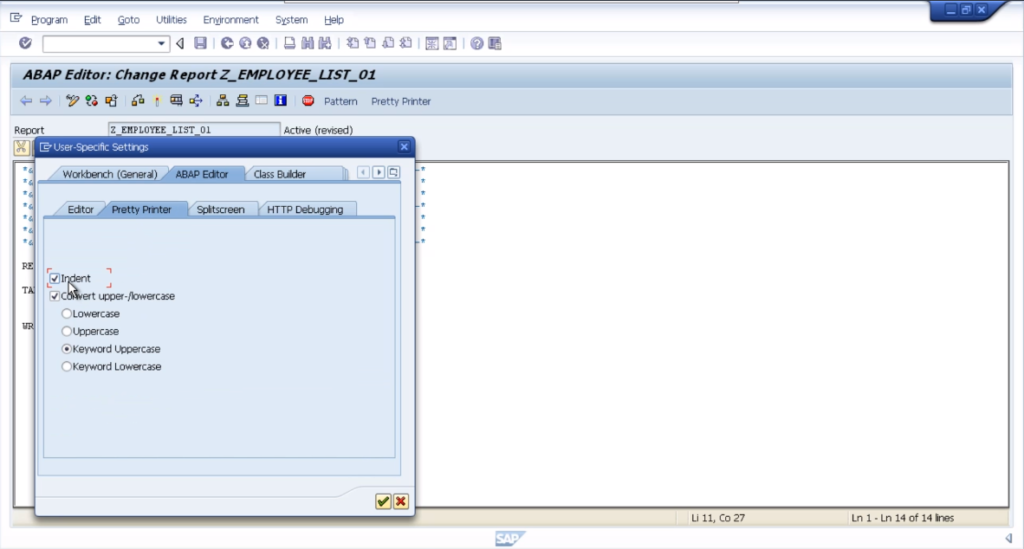
Click Pretty Printer, and the table statement and the written statement get converted to uppercase. The actual table and program name have converted to lowercase. You can play around with how the programs look for you.
You’ll be able to do that through the utility menu, go to Settings, from the ABAP Editor, go to Pretty Printer- automatically indent, convert upper/lowercase, and convert keywords to uppercase.
So let’s quickly review what the table statement does. When the program is executed, this table statement will create a table structure in memory based on the structure that we defined in the ABAP dictionary of our z_employee_list_01 table.
The table structure will contain all the fields that we created. This will allow us to read records from the table and store them in this temporary structure for our program to use.
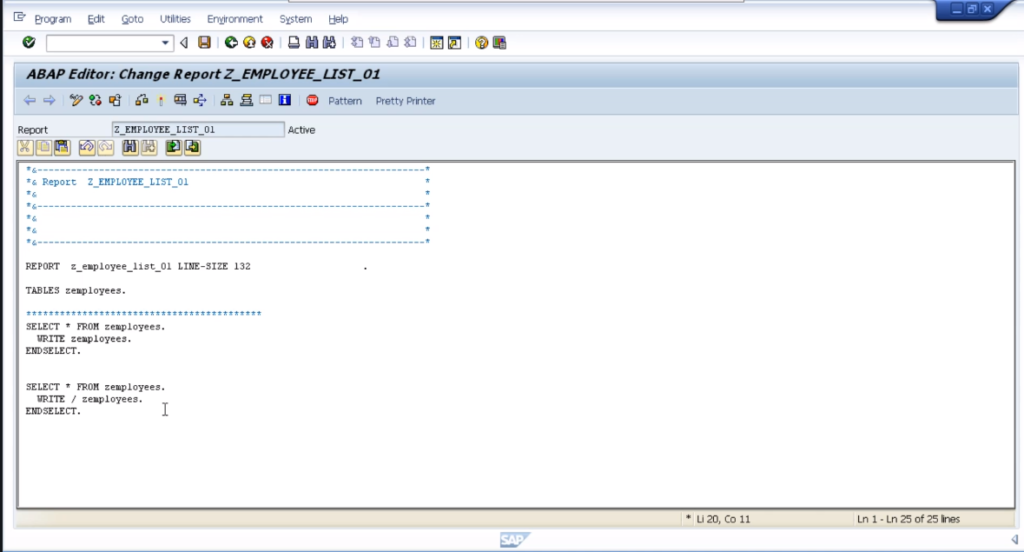
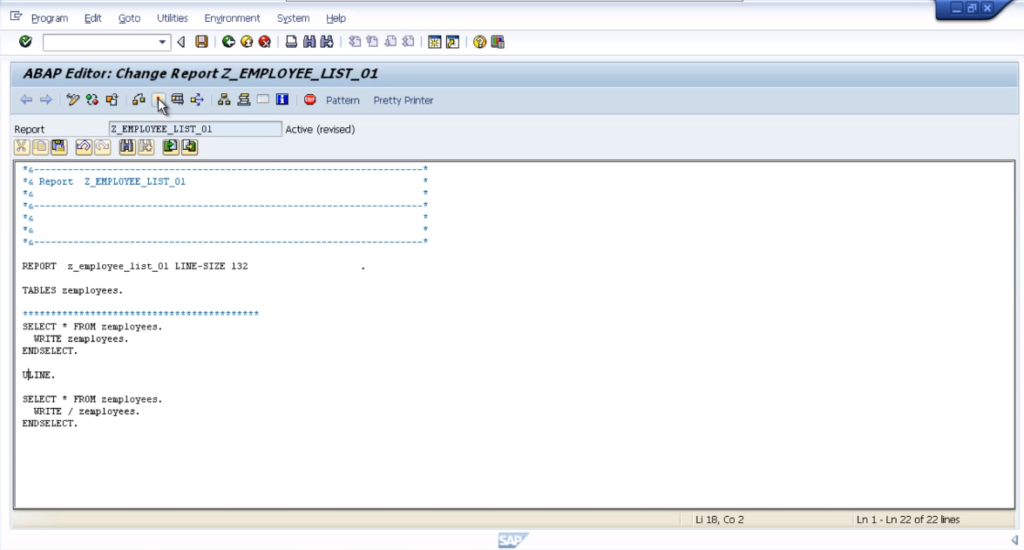
So, to get these records into our table structure, we’re going to use the select statement. So we’ll key in select *asterisk from z_employee_list_01.
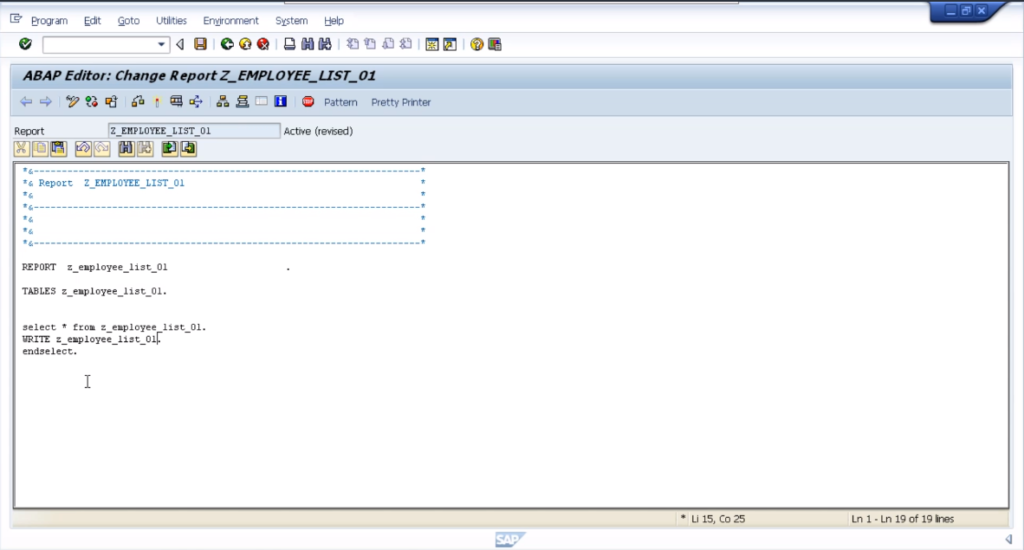
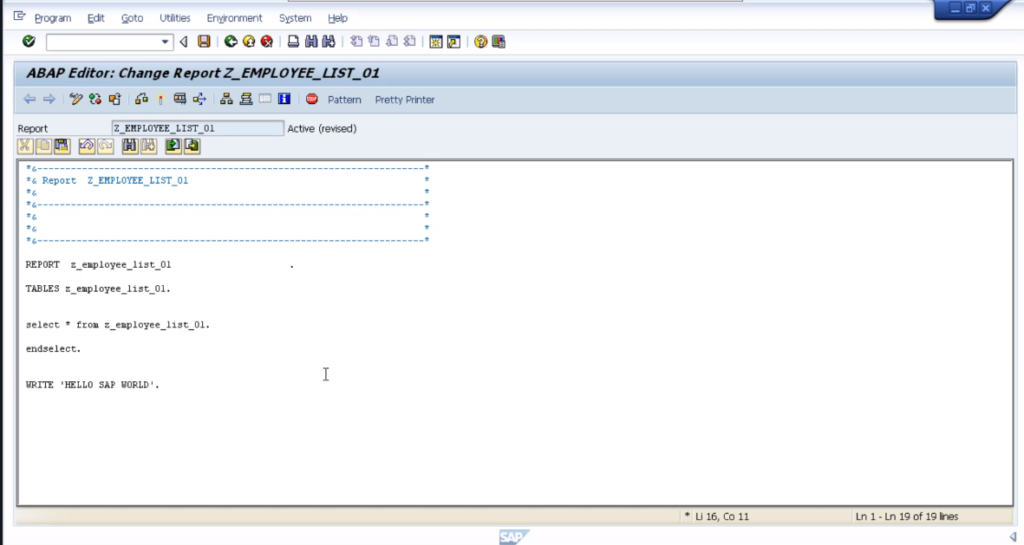
We need to tell our program where the end of the loop is because the select statement is a loop. We do that by keying in endselect. The loop starts with a select and ends with an end select.
So if this statement is now going to read every row of the table into our table structure we need to do something with it.
Now use the write command that we have used before. Instead of saying write, hello SAP world, we are going to say- write a whole row at once to the output window. Click Pretty Printer. Now we have our select loop, we’re going to write out every row of our table and display it to us in the output window.
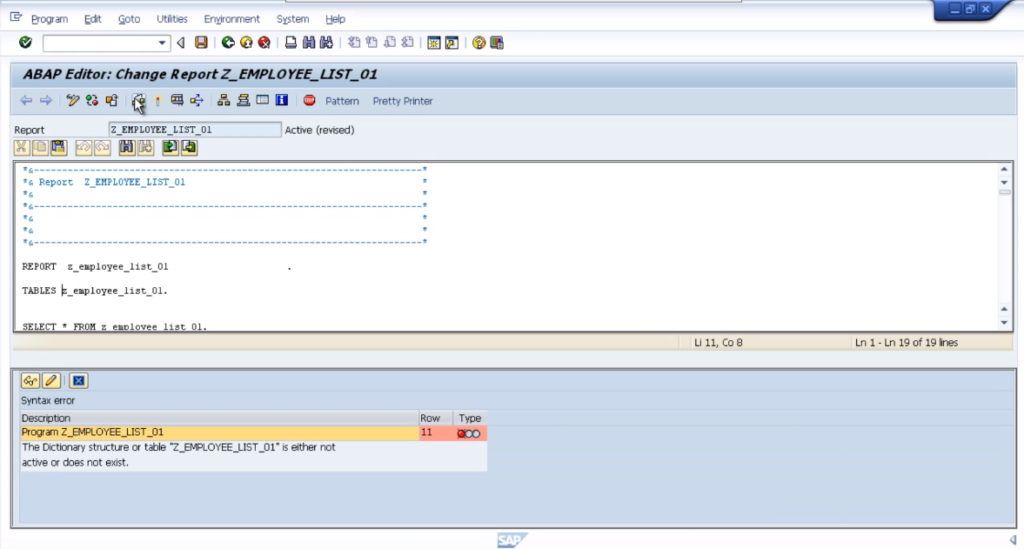
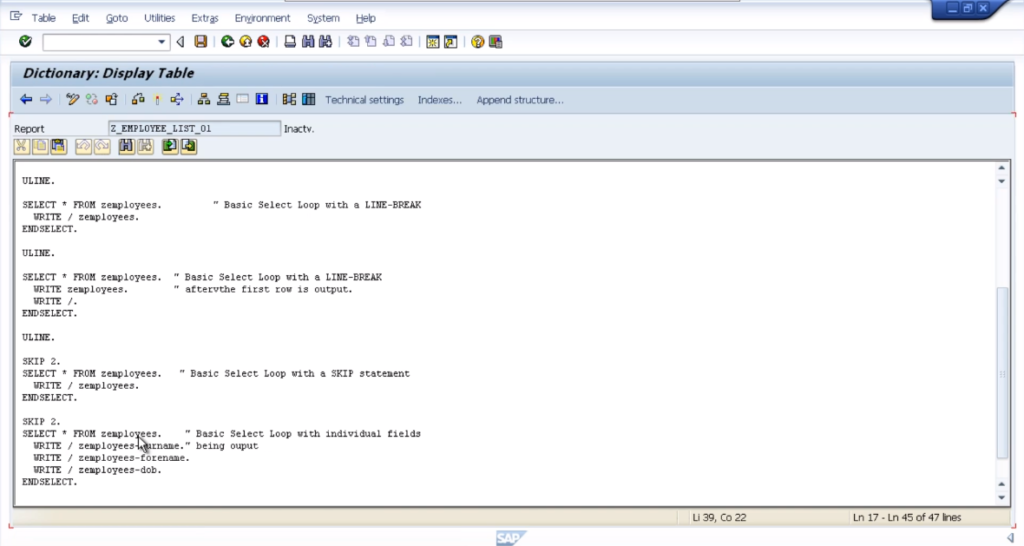
So let’s check our code. We can see we have our first syntax error, and if you notice, the cursor is changed position and it’s gone to the table statement at the start of the actual table that we identified.
It’s telling us the dictionary, structure or table is either not active or does not exist. So it’s likely that this name is wrong.
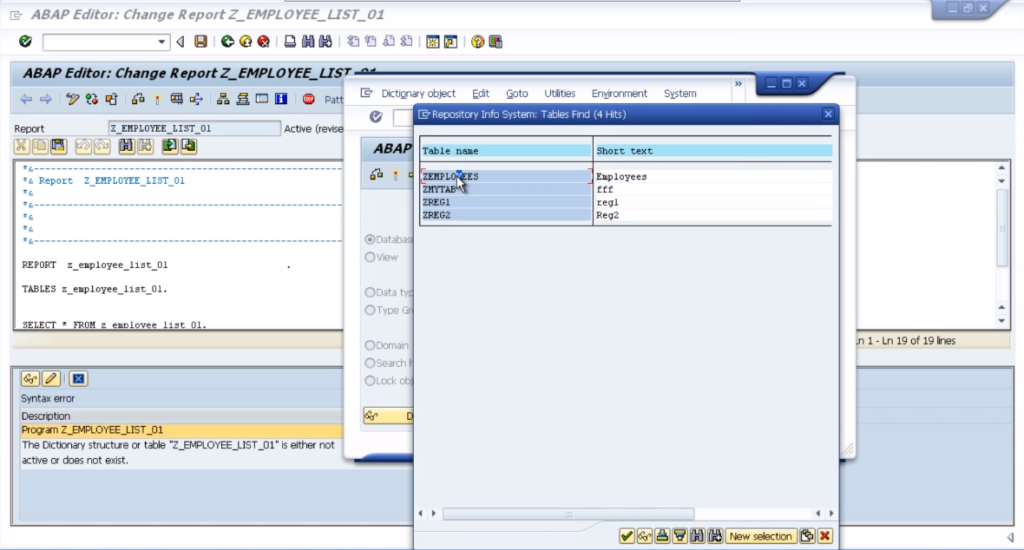
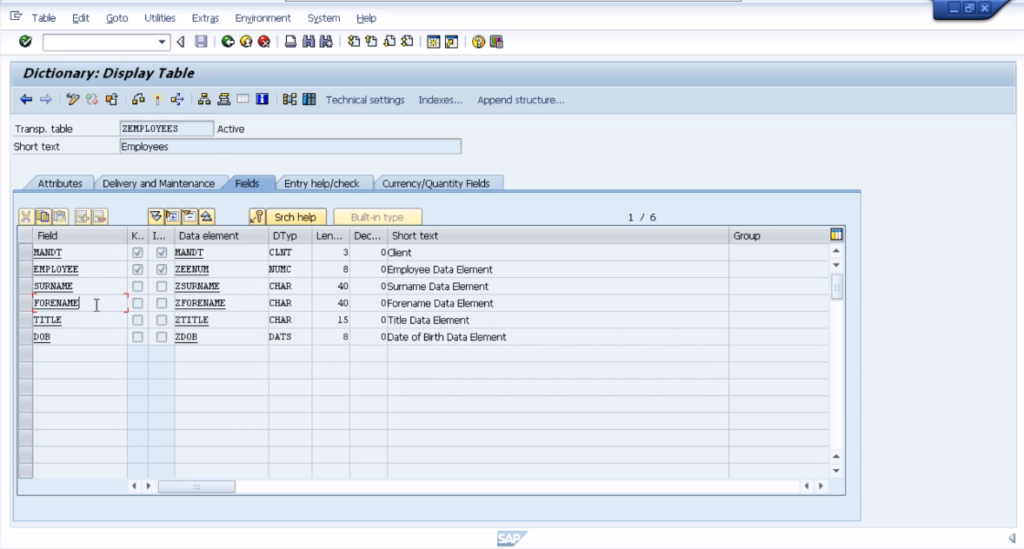
So all we need to do is open up another session. Go to SE 11 and we can see we actually called our table Z employees. Copy this name to the clipboard, close that window, get rid of the syntax error, and paste the proper table name.
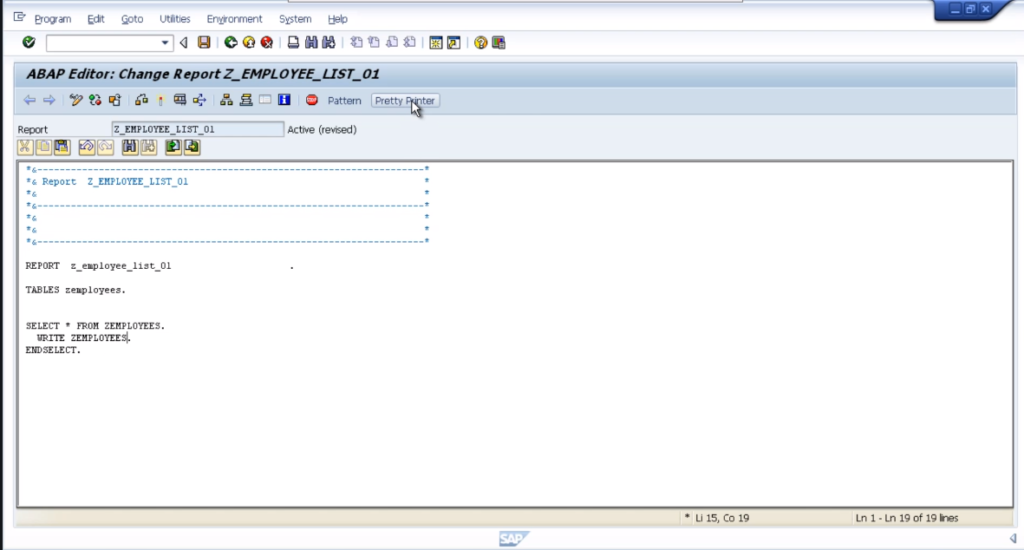
Click Pretty Pinter again and just format it. Now, because we changed the table name up here, we also need to replace any of the occurrences that we have. Pretty Printer again and save the program. Check the code and now everything is fine.
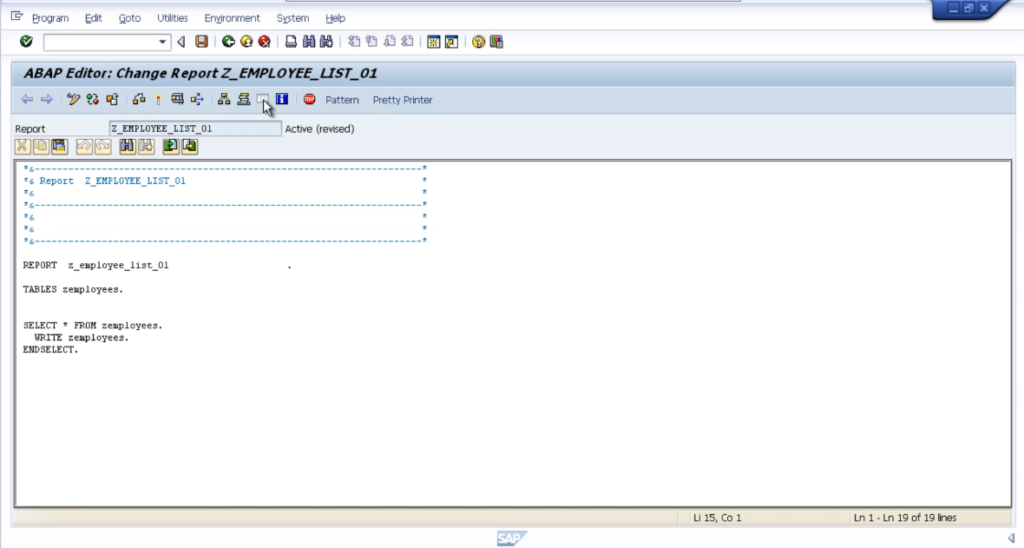
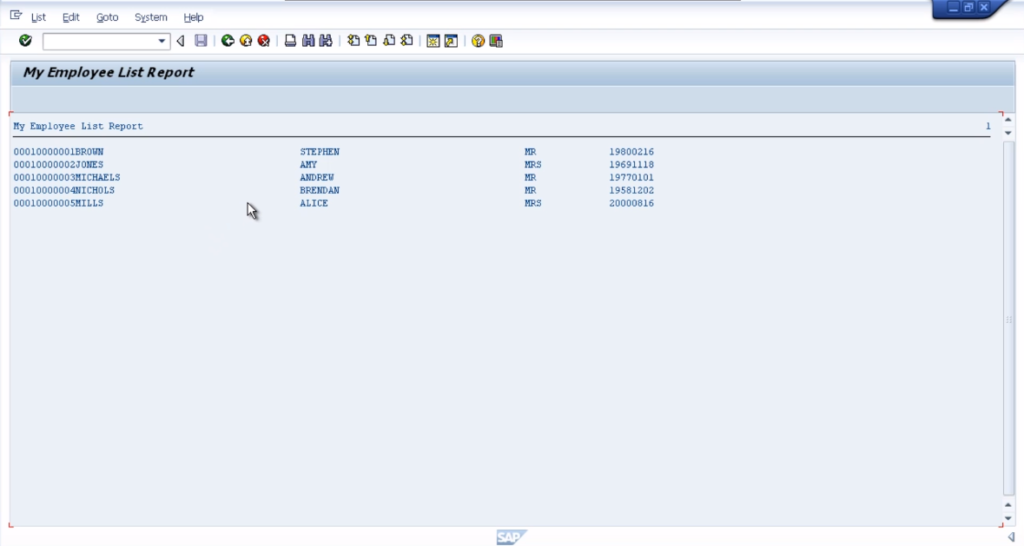
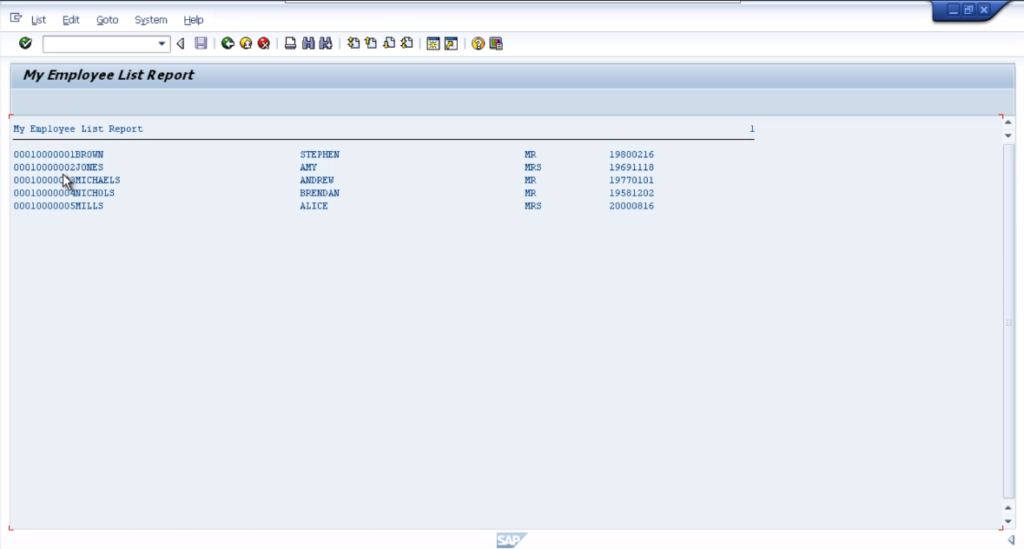
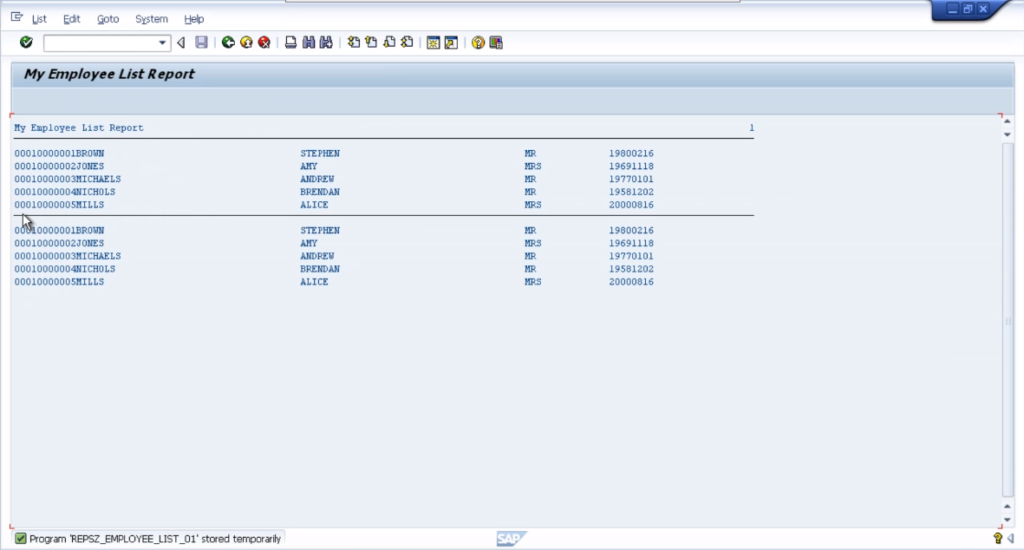
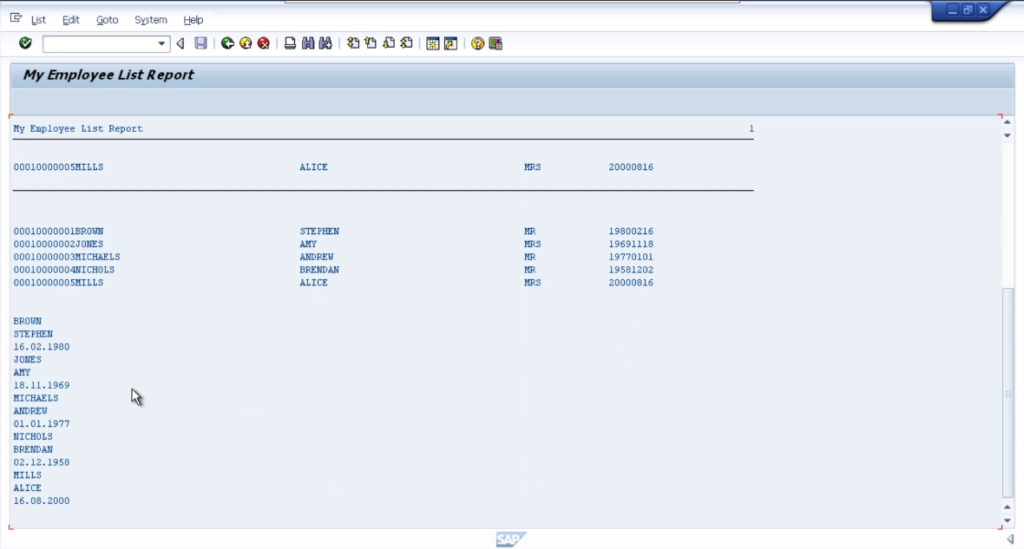
The tables are recognized, and we can test our program. So click the Test button or just press the F8 key. Our output window shows every row of our table. If you remember, we add the employee number as the first field and the surname, and the forename, and then the date of birth.
So if we keep the output window in mind and go back to our code and just have a look at the SELECT statement again, we can see that a loop happened.
Every row of data was written to the output window. Now let’s dig a little deeper and have a look at the output window again. We can see that the system automatically puts each line from the table on a new row.
The WRITE statement that we had in our program didn’t know that each new row had to be output on the new line. But this was forced because of some default settings held within our system about our own individual screen settings.
Now if we try to print this report there are too many columns, or too many characters to actually fit on a standard piece of A4. This will be determined by the width of the paper specified in the printer settings.
The output is not necessarily in the right format for the reports you create. Use addition to the report statements and specify the width of each line.

If you click on the report statements and press the F1 key you’ll see the line size column addition that we can add up. It says if the line size specification is missing, the line length corresponds to the current screen width.
You can check the screen width by referencing this built-in system field. It tells us the maximum width of the list is 1,023 characters. Specify a line size. Add the addition to our report statement. Take out the less-than sign.
In this example, limit the line size to 40 characters and see the effect on the output. Save the code, check it for syntax errors, activate it, and then test it. The line gets broken at 40 characters in length which is the right output.
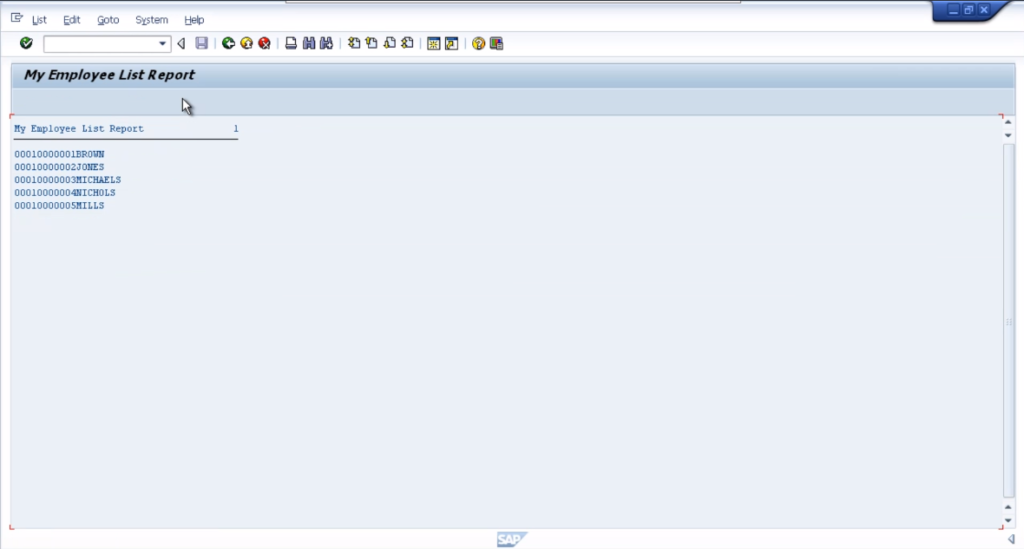
Keep in mind that if you’re outputting your list to paper, for 132 characters as specified in the Help section, and if you do landscape, it’s even bigger. Anything greater than 132 will be truncated automatically. So if we did 132 and activate it which automatically tests it.

See the full output and there are 132 characters.
Let’s now enhance our program a little bit more by adding some specific formatting to the write statements. So what we’re going to do is insert a line break.
At the start of every row that we output within our select statements. So first of all, copy the code and paste it again. Separate the table statement from the code and we’ll work with the select statement.
So what we need to do, is where we go to write a statement, include the forward-slash which will trigger a new line for the write command. So let’s save the code and execute it.
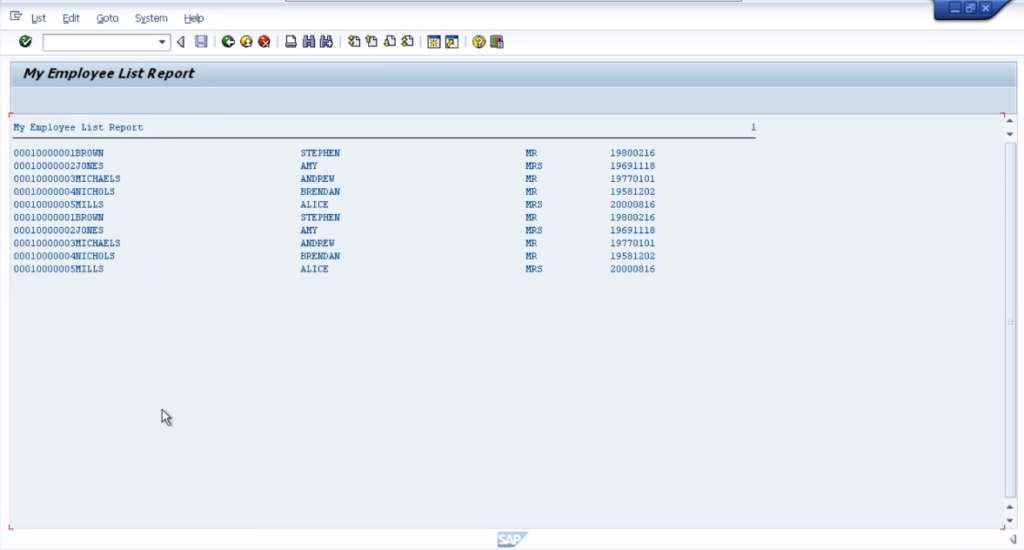
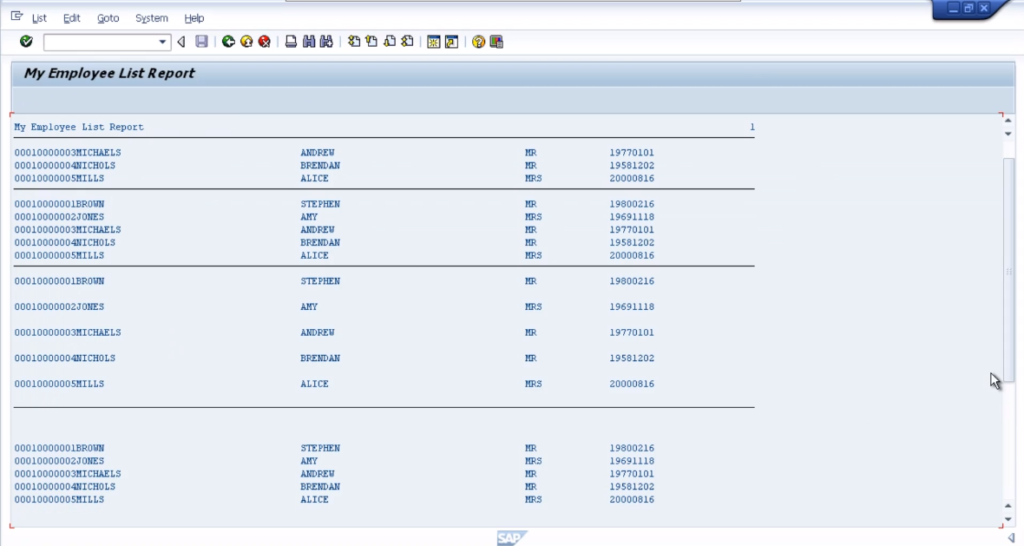
The first select loop that output the first five rows, the second select loop, output the next five and it’s identical. Why do we think it’s identical? Well, it’s all down to this report statement again.
Since we specified the line size of 132, the system automatically wrapped the first select loop at 132 characters. So every row that was output, once it got to 132, it then caused a brand new line to be written.
If we increase this, let us say 532, we should see the effect of this write statement wrapping along just a couple of rows. So let’s test it out and here we go.
The first row finishes but then because we said we want the output to be 532 characters long, the next row was output immediately after the first one. If we scroll along, we can see it then output the next one as well. All the way until it got to 532 characters before it then forced another line break.

It is actually the first four records were output on the first row, then the fifth was output on the second one. Then came our second select loop and because we’ve forced a line break before every row was output, they all appear correctly under one another in our report.
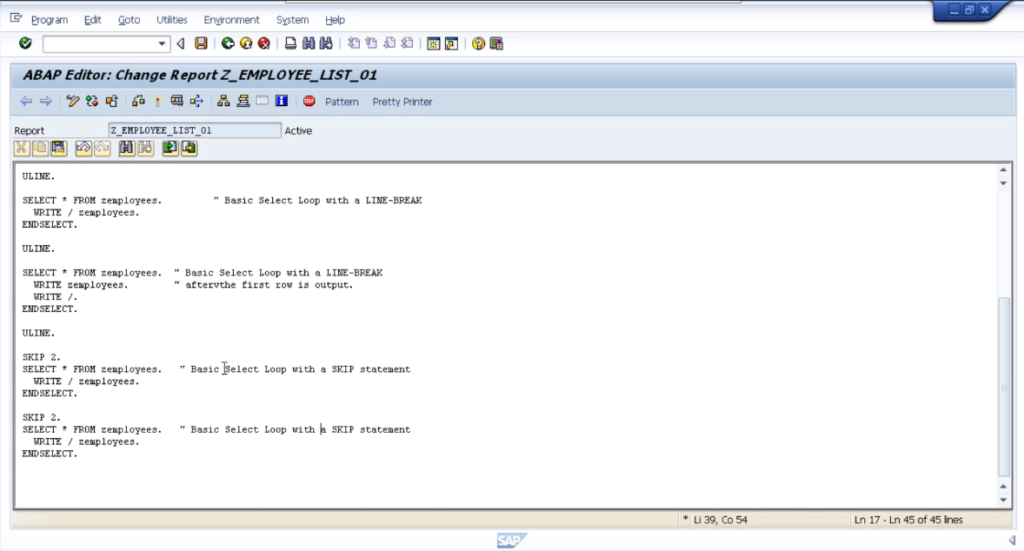
So let’s step back. Put this back to 132 and what we will do is add another little bit of formatting just so that we can see the separation between the different select loops. So type, ULINE, and ULINE means underline. Press the F1 key and an explanation pops up.
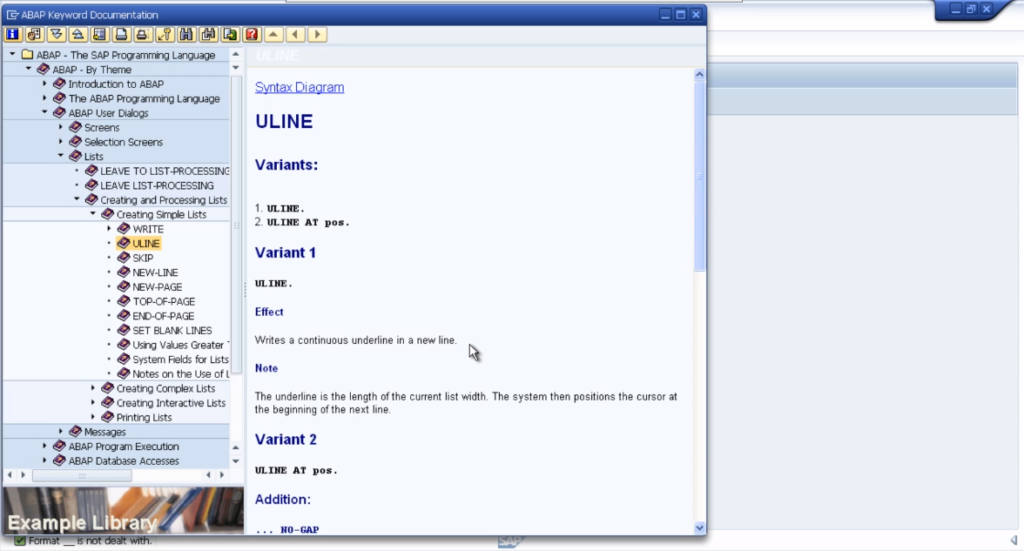
It will help separate the different select statement outputs that we have on our screen. It’ll be a little easier on the eye. So if we execute this and we can see this nice underline showing us our second select loop.
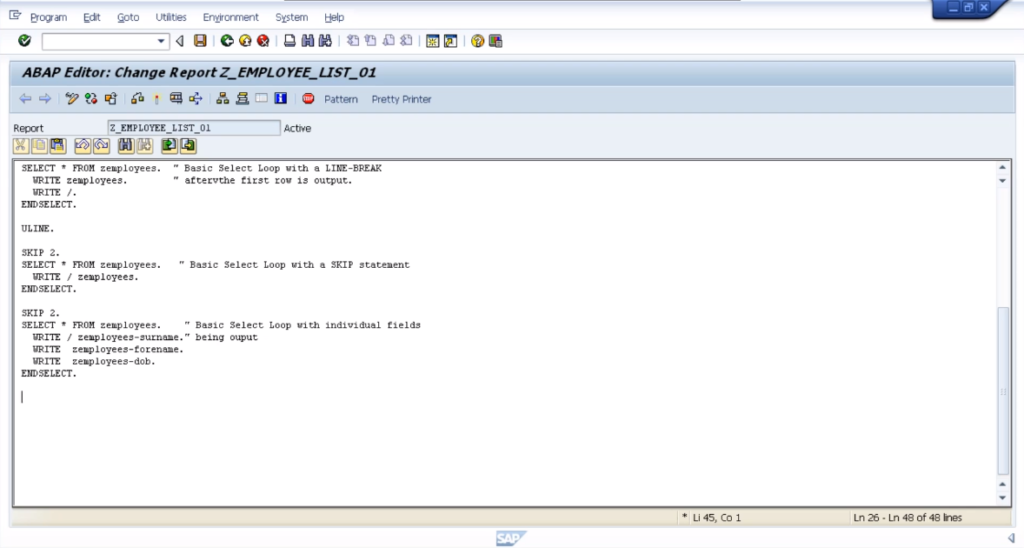
The next thing we’ll do is just change these select statements a little bit. So we’ll copy it again and create a new underline. Remove the slash before the new row as output and adding a written statement with a slash on its own. It means a new line will be output at the end of the previous line.
So we’ll check it under our Pretty Printer. We can see a new line is being written after a row is outputting.
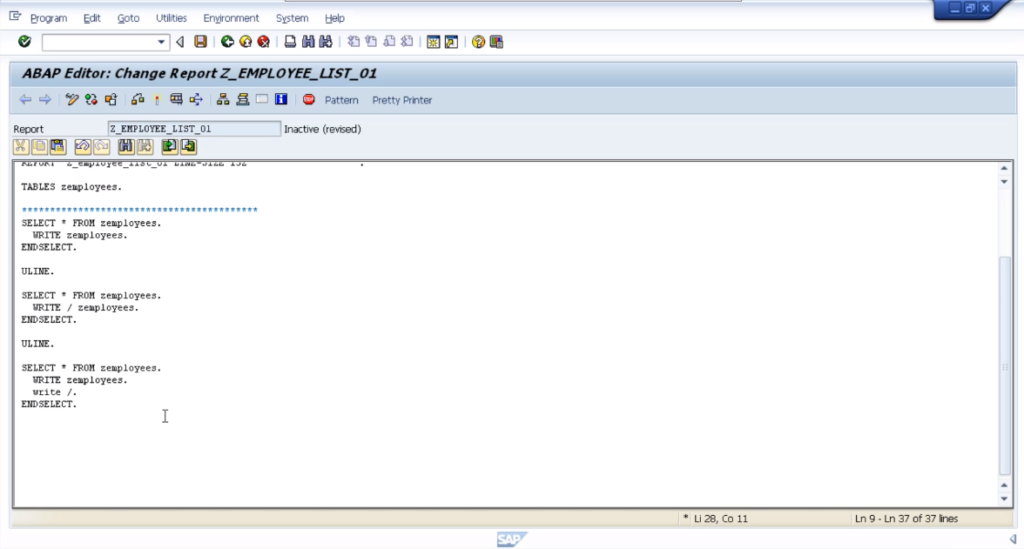
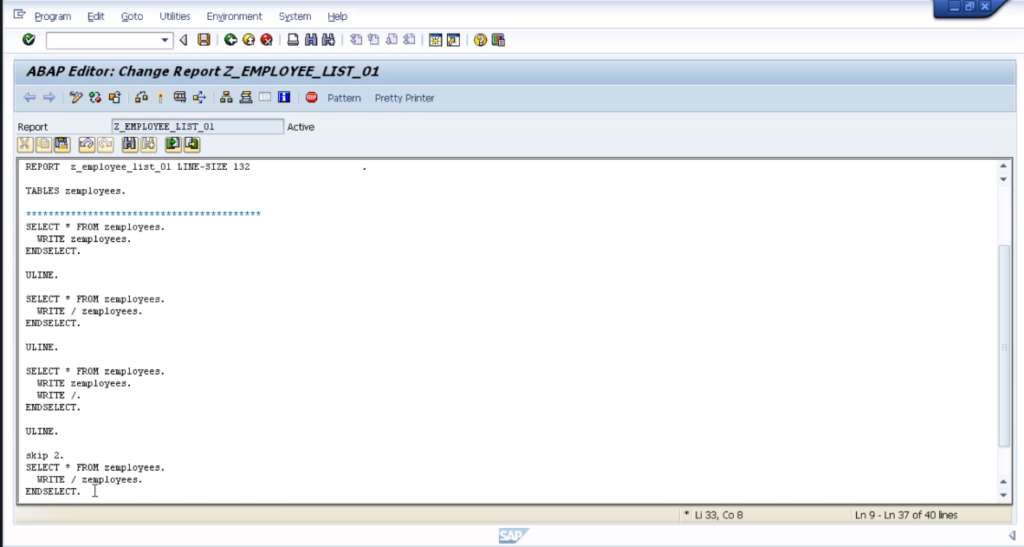
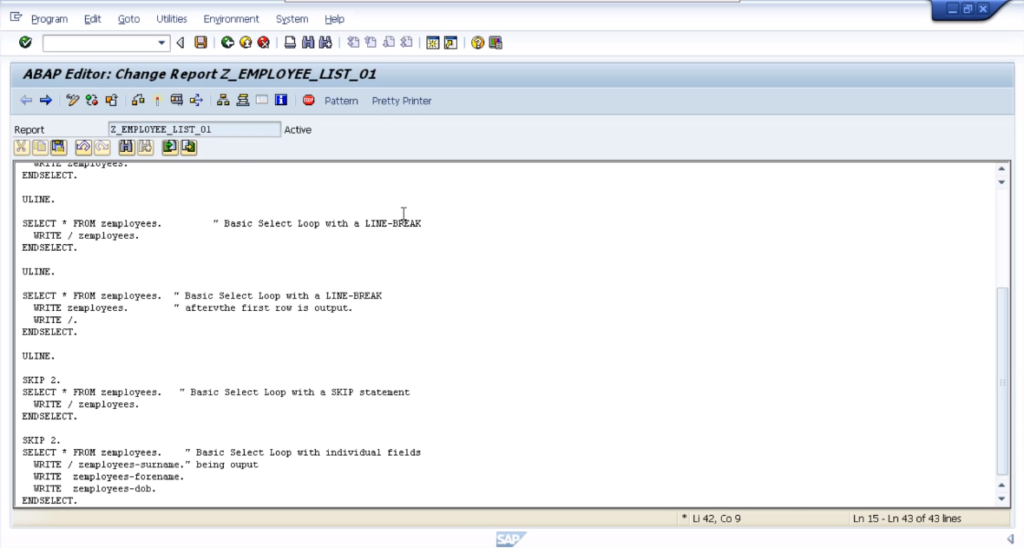
Let’s go back and just change things up just one more time. Go back to the SELECT statement with the /employees like so. But, we’re going to include one more statement, which skips that means skip a line.
You can have added with the skip statements to allow you to skip multiple lines, so in this case, we’ll say skip two lines. Press the F1 key on skip. Just to see the help on it.

Click Pretty Printer and execute our code. Using the same select statements that we have copy it down. But we included the skip two lines right there.
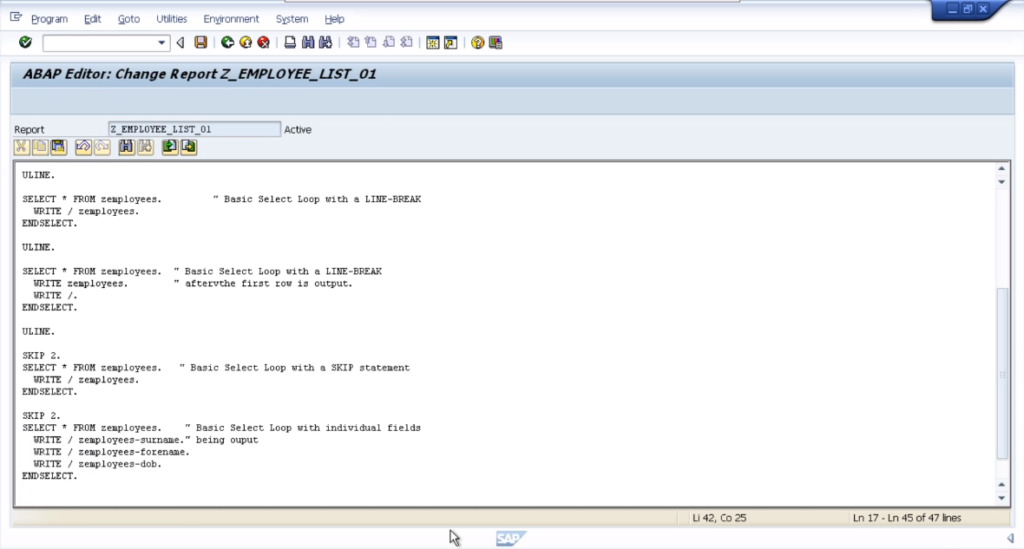
Now, let’s change things up just a little bit more and this time, instead of outputting the whole row of the table, we will output individual fields.
So let’s create another SELECT statement. Since we’re duplicating lots of lines, and it’s starting to look complicated, let’s add some comments and this one we’re going to work on.

Another basic select statement, but this time outputting individual fields. So how do we do this? We need to do is specify the individual field.
So here we have the table name, and when you want to specify an individual field, you use a dash, and then the actual field name. So we have surname, forename, title, date of birth, and the first field was employee number.
So let’s just choose a surname. Forename and then we’ll do date of birth.
Use forward navigation and check Surname, forename, and date of birth.
So now, we’ll do a syntax check. Everything is good. Activate our program, and then test.
So as we scroll down, we can see records. So our first record is Brown, Stephen, with details on date of birth, and we can see it on individual lines.
Now let’s tidy this up, because, maybe we just want three fields on one line. So we’ll take out this line break in front of the second and third field.

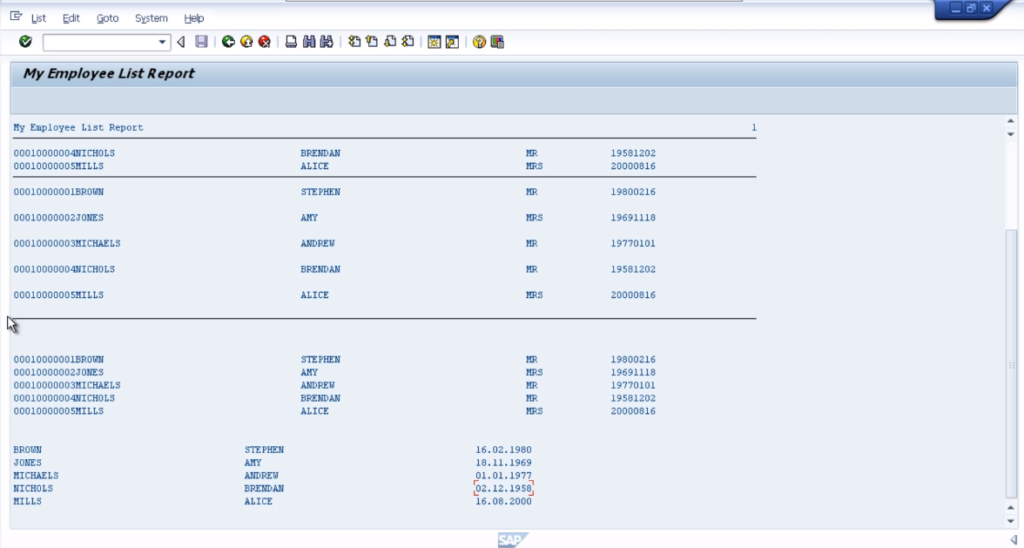
Cut this out. There we go. Just the three fields we want, all on their own individual line. One last thing is to insert another underline just to keep it tidy and there we go!
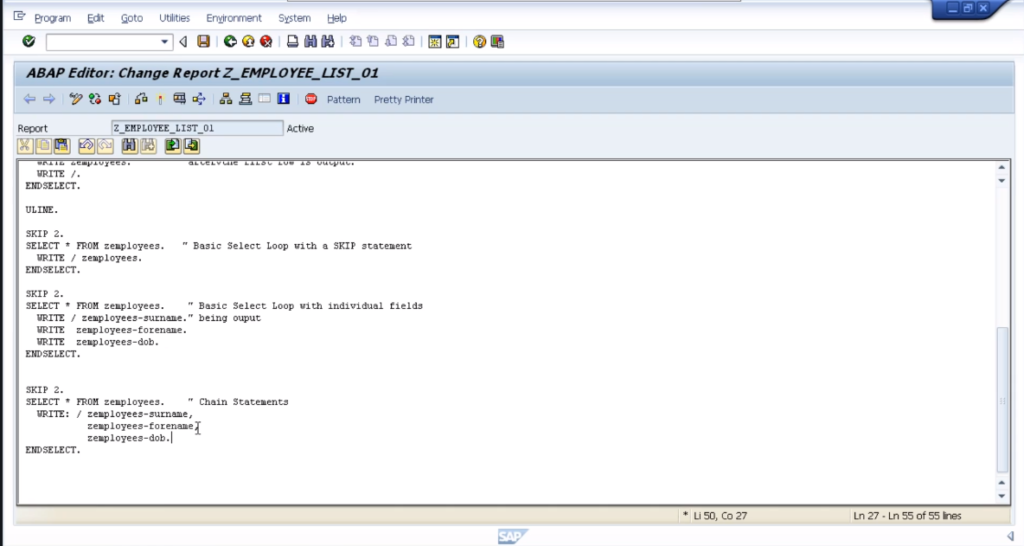
4. Chaining Statements Together
Introduction to Chaining Statements Together. In our program, we are using the right statement quite a lot. Now to save us time, we can chain our right statements together and this saves us from having to duplicate the right statement on every line that we write.
So to do this, copy a new section of code. Change some clients, and what we do with the WRITE statement is add a colon after it. This tells the SAP system that our WRITE statement is going to write out multiple fields or text literals as we define.
We can change the full stop to a comma. Get rid of the second WRITE statement. Do the same with the third. Edit the code and then when we have the last item we want to output with a WRITE statement, that’s where we put the period.
So the colon says to the system we’re going to output many items. We separate the items by a comma and we use the period to terminate the statement.
Quite simple and it can be used for many other statements such as the move statement. So we can execute the code and we should see we got exactly the same output as the one above.
The only difference is we’ve chained our write statements together, saving our precious fingers from too many key presses.
5. Declaring variables
In this lesson, we’re going to concentrate on creating fields in our program. There are two types of fields that we’re going to be looking at. The first type is variables, and the second one is constants.
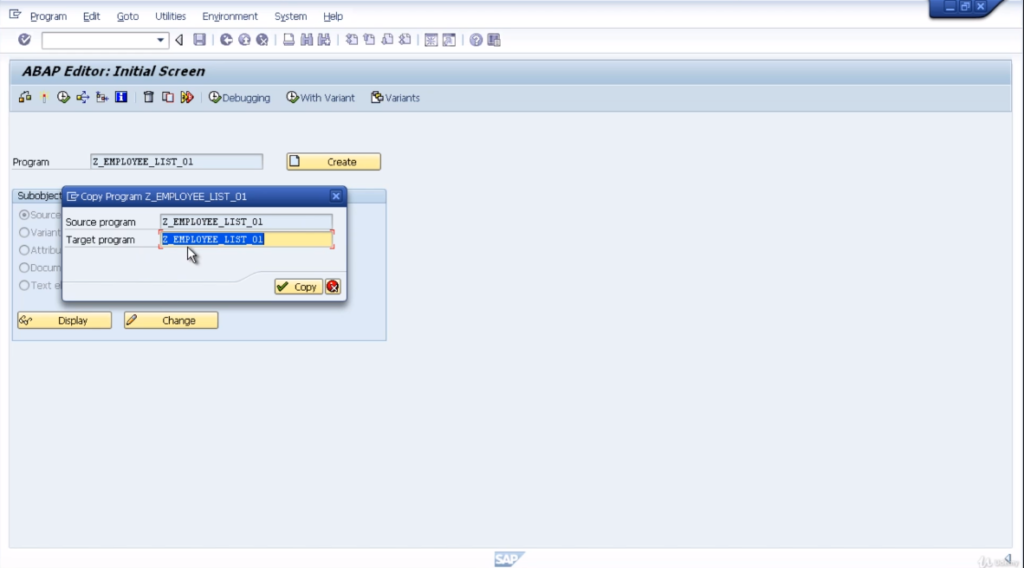
Before we get into the nitty-gritty, we first need to generate a brand new program. To do this, you can follow along with the steps that we outlined in previous modules or you can use the copy function in your ABAP Editor.
Personally, generate a new program, but if you want to reuse a lot of the existing code, choose the copy function and that’s what we will do right now, just to take you through it step by step.
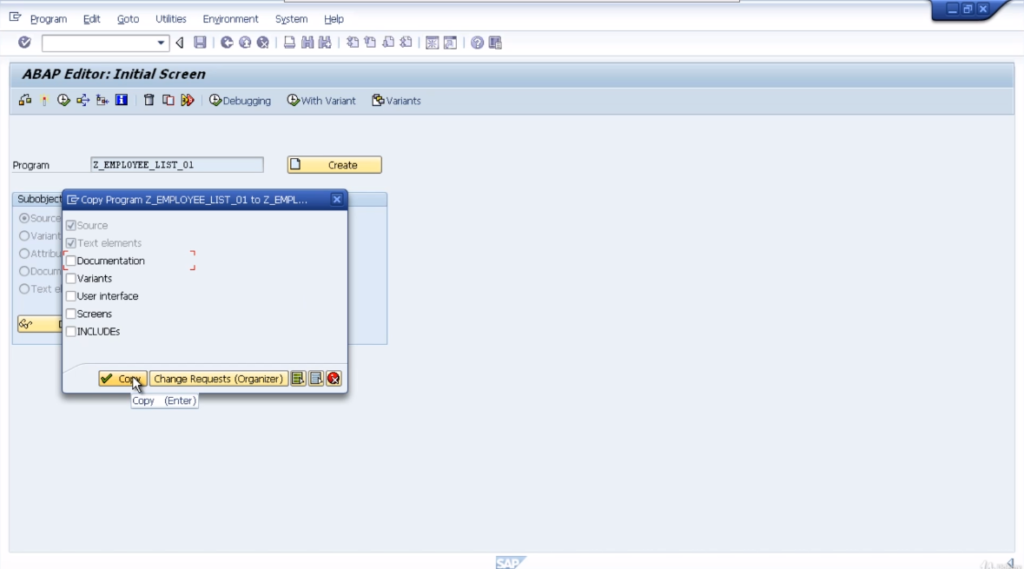
So first of all, enter your original program in the text box, and click Ctrl+F5 or press the copy button. For the window that’s asking us to enter a new name for our program and we’ll just put z_employee_list_02, then press the copy button.
Then we are given a screen that asks if we want to copy any additional objects and you can see we have documentation that in user interface screens and includes.
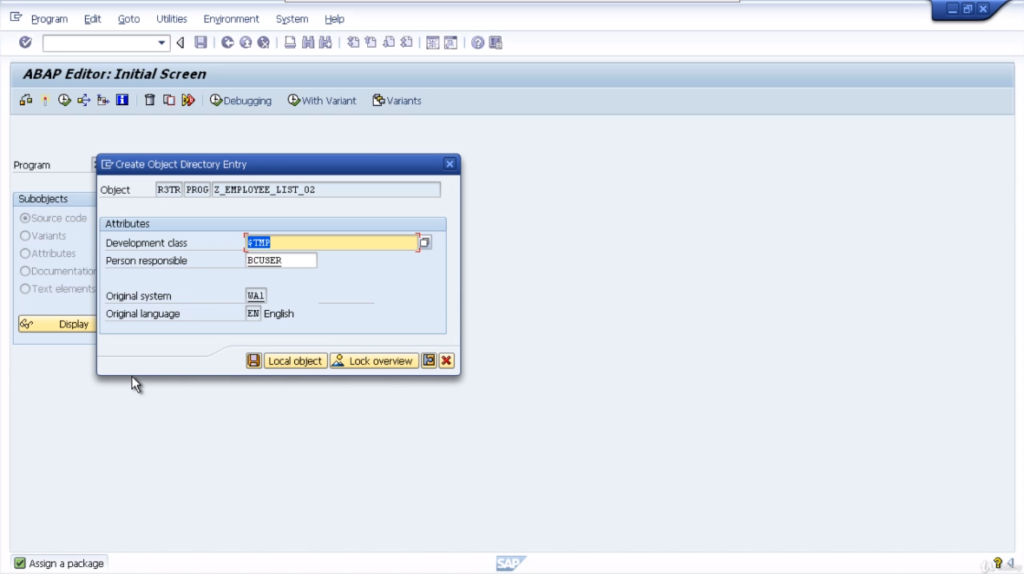
We haven’t created any of these objects in the previous program, so we just need to leave those blank and just click the copy button. Assign your new program to the local object development class and there you can see the status bar at the bottom tells you the copy has been successful.
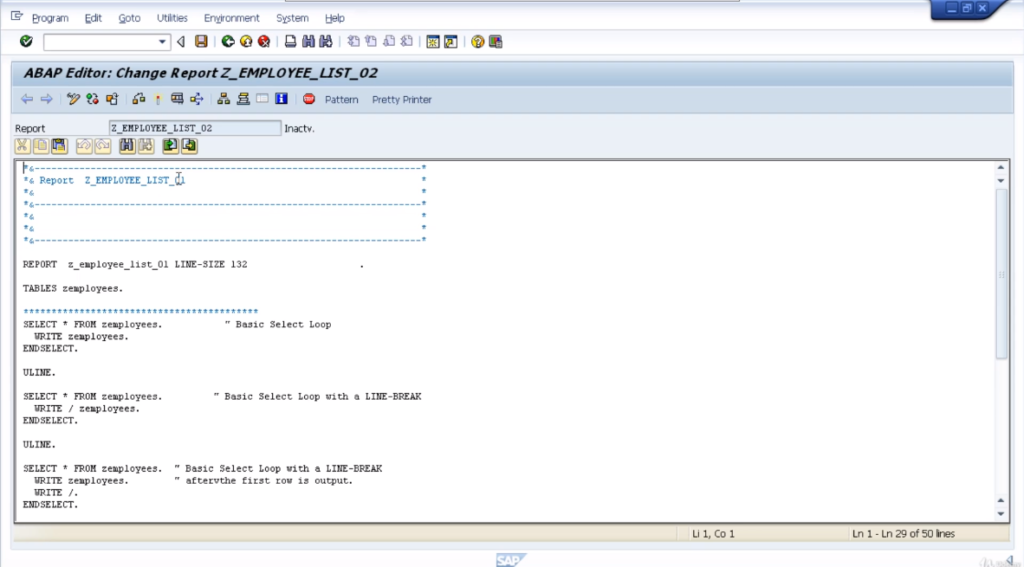
So now it automatically puts the new program name in the program text box. So, just click the change button. One thing that you must know is that the copy function works successfully but you’ll notice, it copied across references to our old report name.
So here we have a comment, so if you do use the copy function, just remember to update your comment and your actual report name itself. Now for this example, take away this line size statement just so we don’t come across any line restrictions while we’re testing our program.
Now also, because we have many select statements and write statements in this program let’s go through how we can just use the fast comment facility.
So most of the time we will actually delete a lot of code out of the program. But just for demonstration purposes let’s see how to comment code out really fast.
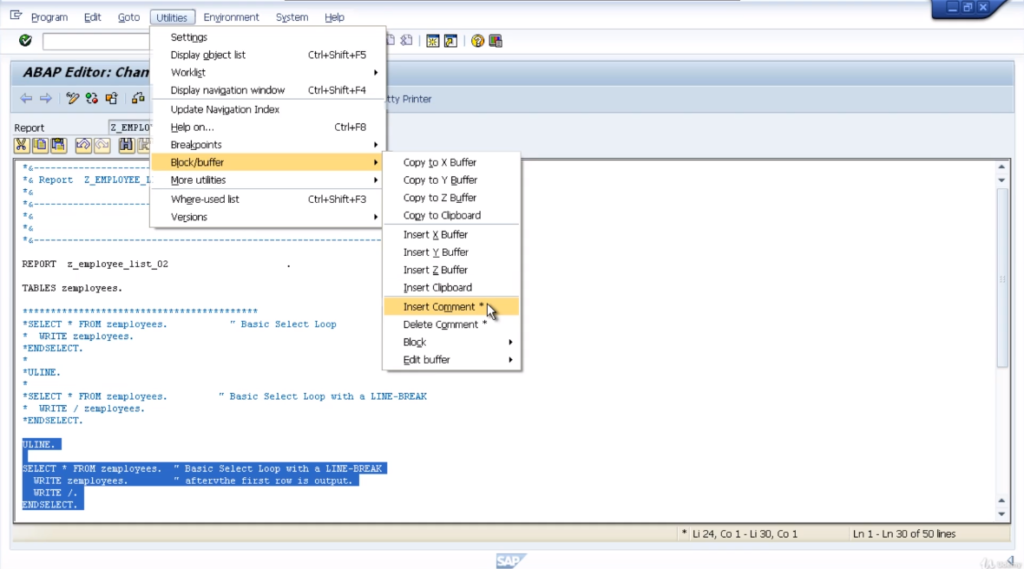
So normally you put an asterisk at the start of each line, there’s a quick way of doing this. If you highlight the lines of code that you want to comment, then you can hold down the control key and the less than sign, and it will automatically select the asterisk in the first column of the ABAP Editor.
Comment a line, if you can’t remember your key presses. Another way to do this is through the utility menu. Under the block/buffer, choose to insert a comment. That’s exactly the same thing.
Save the program and then we’ll get going with fields. You have an idea of what a field is, a temporary area of memory that we can assign a name to, and reference within our programs.
We use fields within our program to hold calculation results. They’re used by the program to help control the logic flow. Since they are temporary areas of storage normally held in RAM, they can be accessed superfast which helps speed up our program execution.
There are many other uses for fields within the program whilst creating your own programs and reading other programs created by other people. So let’s have a look at variables and how we declare variables in our program.
Now variable is a field whose values change during the program execution. Hence the term itself is a variable. There are a few rules for variables that you must follow.
They must start with a letter, they can have a maximum size of thirty characters. You cannot include the plus, comma, colon, and parentheses in the name.
You cannot use a reserved word. Now when you are creating variables try and keep the name of the variable meaningful. There’s nothing worse than working with a program where your variables are named a1, a2, a3, and so on. Try and give them good names, such as our employee table.
It’s got surname, forename, and date of birth. You know exactly what these fields are for. Now we declare variables by using the data statements. So let’s go ahead and use the data statements within our program.
We’ll go below the comments section. In the first type of field, we’ll declare an integer field. So we’ll type in DATA and space, and then we’ll give our field a name, let’s call this integer01, and we specify a data type by using the TYPE word.
Integers are declared by using the TYPE i. and we terminate our statement with a full stop. Let’s declare it another one and this time we’ll use the packed decimal so let’s call the field packed_decimal01, TYPE p, for packed decimal.
Then you end the statement with a full stop again. Now, packed_decimal01 is there to help store numbers with decimal places, and so on. So, what we can do is, actually, define how many decimal places we want our variable to hold.
So, when we’ve got TYPE p, we can then put space. Putting the word decimals and then a number of decimal places we want to store, put 2. Use a pretty printer and it covers everything and we’ll save the program.
Now we have used what are called elementary data types to define these two variables, and these types of variables have a fixed length in ABAP, so we actually don’t need to declare how long the variables need to be.
Now a little later on we’ll have a look at all the elementary data types and the space that they take up in memory. One piece of information to know about the packed_decimal is that it can store up to fourteen decimal places.
So in business-related scenarios that are more than ample. We have another option of declaring variables too using what we call the like added to the data statements.

So we can declare a brand new variable, we’ll call it packed_decimal_02, and instead of using the word TYPE this time we’re going to use the word LIKE and we’re going to say like the packed_decimal_01 field that we have already defined.
Now what this effectively does is makes sure that the new variable called packed decimal02 takes on exactly the same properties that we defined for packed decimal 01.
Now, you may think, well, you know? What’s, what’s so good about this? In the program, let’s say you have a need to create a whole number of variables. All of the same data type.
Here we are practice three and practice four. By making them like, packed decimal 01, we could potentially save ourselves a whole bunch of time later on.
Because let’s say our pack decimal 01 field instead of saying decimal places needs to be two, let’s say we need to increase it to three.
Just by updating that one variable that automatically updates all the other variables that have been defined using the like statement referring to our original variable.
Another good thing about the statement is we don’t have to just refer to variables in our program. We can refer to variables or fields in this case that exist in tables within the sub-system.
So, if you remember back when we defined the employees’ table, we had a field of the surname. We can declare a new variable within our program. Let’s call it, new_surname.
We can say, it’s going to be like table name Z employees,-surname, (the actual field name). This saves a whole bunch of time. Because quite often, you have to include numerous tables within your ABAP programs and you can never remember what the actual dates or times are of every field.
So just by using the like statement, referring to the actual field within the table, you can declare your brand new variables in your program without having to use your brain or go searching throughout the SAP system to find what the exact data type is.
So, just to make sure everything’s okay we’ll just do a check. Everything’s good. Line up data type declarations so, it’s a little easier to read.
Another addition that we can add to our data’s name and that is how we declare initial values for the variables that we define in our program. It is really easy.
So in this example, we have the integer 01. All we need to do is add the word value. Because it’s an integer it’s just going to accept numeric values so we can say 22.
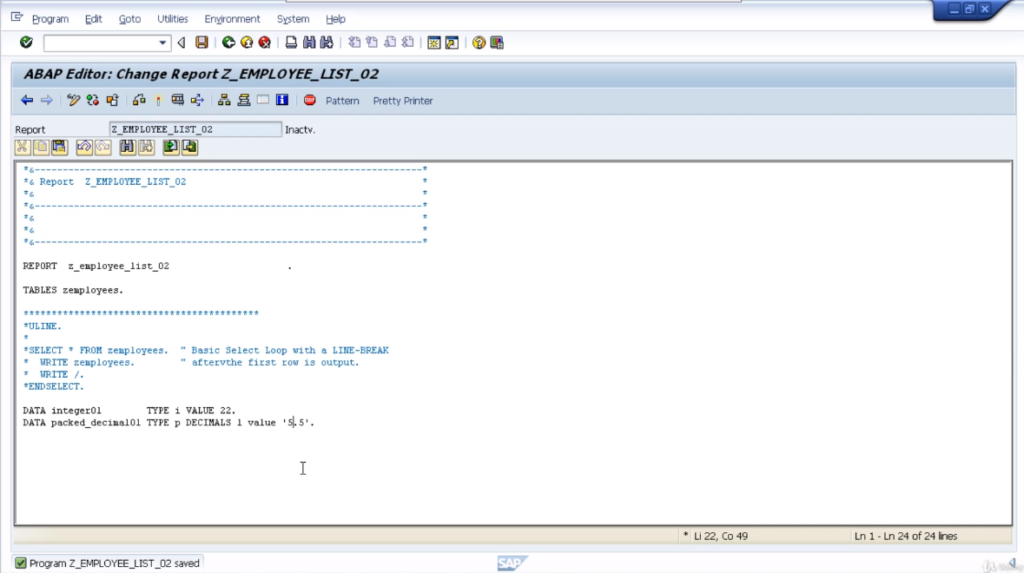
It automatically assigns a value of 22 to interger01 when the program starts. Now for packed decimal fields, there’s one slight difference which is to pin the value and then we have to put the actual value within single quotes, and this is because an ABAP statement is terminated at the use of a period.
For a packed decimal field that has decimal numbers, we used a period to define the decimal place within the number. Usually, this would terminate our statement but by putting a number within quotes, it’s telling ABAP and the SAP system, you know?
We’re not terminating the statements. We’re just declaring a decimal number. One more addition just for completeness is you’re not just restricted to positive numbers, if you want to declare a negative number, just put the appropriate sign for the value of the field.
6. Constants
Let’s now take a look at declaring the other type of variable, called constants. So a constant is a field within our program whose value stays the same during the complete execution of the program.
We never want it to change. Hence the term, constant. We can declare constants by using the constants statement instead of the data statement.
When we declare a constant, we must also assign a value to that field. When we are writing code, we can then only ever reference the constant variable, but never change its value of it.
If you do try and change the value of a constant within your program, you’ll usually get a runtime error, so don’t try it. So let’s have a look at the syntax for declaring a constant variable.
The syntax is very similar to the data statement, but with a few minor differences. First of all, you have to use the word constants. Give it a name say MYCONSTANT1.
Give it a type p decimals value ‘6.6’. We want to do another one say MYCONSTANT2 type I value 6. This time we’ll make it a normal integer.
Just one thing to note, you cannot define constants for data types, X strings, references, internal tables, and structures containing internal tables. So just remember, we will come on to those data types at a later stage of this training program.
That’s all in this module. Let’s hop to a new lesson.